4 Benefits Of Using Gradle Multi-Project Builds

If your Gradle build has only a single project then you could be missing out on important benefits of multi-project builds. Splitting Gradle projects into multiple subprojects is almost always a good idea, so in this article you'll discover the 4 benefits of using Gradle multi-projects builds to setup your project for success.
Single vs. multi-project builds
Before we get into the 1st benefit, let's define what a multi-project build is and how it differs from a single-project build.
Single-project build
A single-project Gradle build consists of:
-
settings.gradle(.kts) file representing your Gradle build (.kts extension for the Kotlin vs. Groovy flavour of Gradle)
-
build.gradle(.kts) file representing your Gradle project
-
source code representing the application to be built by Gradle
When you run a Gradle task against such a setup, for example./gradlew build, 3 distinct phases occur:
-
initialization: Gradle initializes the project by executing settings.gradle(.kts). For a single-project build this file tells Gradle that no other projects are taking part in the build.
-
configuration: Gradle executes build.gradle.kts to configure the project.
-
execution: Gradle executes the task(s) passed on the command line, in this case build.
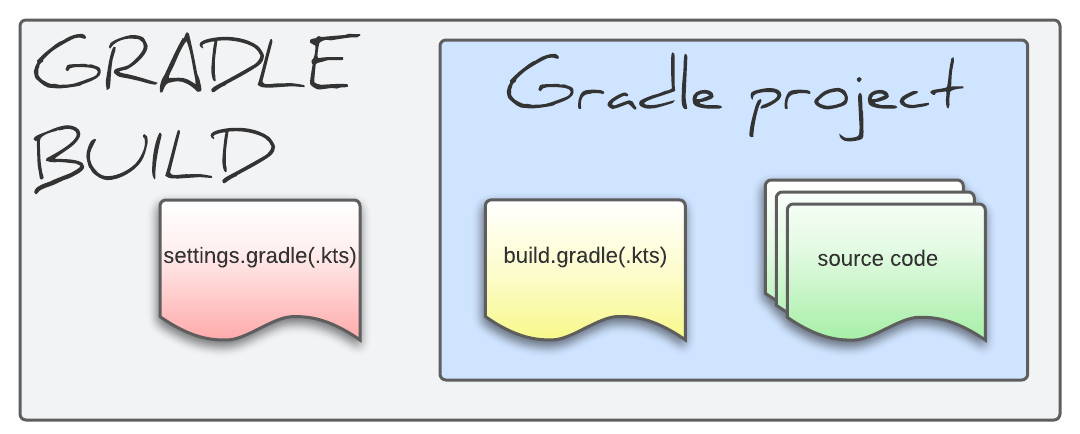
Gradle single-project build setup
Multi-project build
A multi-project build consists of:
-
settings.gradle(.kts) file representing your Gradle build. This contains a special entry to include required subprojects e.g.
include("app", "model", "service"). -
build.gradle(.kts) and source code representing the root project, which is equivalent to the project contained in a single-project build
-
repeated build.gradle(.kts) and source code pairs in subdirectories, representing any number of subprojects
This forms a hierarchical tree structure where each node is either the root project or a subproject.

Gradle multi-project build setup
Each subproject is its own unique project configurable with its own build.gradle(.kts) build script. That means it can have its own unique tasks and configuration depending on what the subproject needs to achieve.
So why go to all this effort of creating this hierarchical project structure which on the surface looks like it increases rather than reduces complexity?
Benefit 1: building multiple artifacts
In the single-project build above we have a single set of source code that by default resides in src/main/java.
Let's assume the build.gradle(.kts) file has been configured to set this project up as a Java project.
That means when we run ./gradlew build a single jar file is generated. It contains all the compiled Java .class files and any resources, if present.
But what if we want to generate another jar file?
Reasons to do this might include generating:
-
a different flavour of a jar file
-
a client library to offer an API to consumers
-
a non-Java based artifact
In a single-project build creating a different jar file is difficult because the project is setup for a single purpose only.
With multi-project builds this becomes possible because each subproject contains its own source code and configuration. Not only can you create a different jar file based on different source code, but you could just as easily setup a subproject to compile Kotlin, Scala, Groovy, or even C++.
In fact, anything you can configure within build.gradle(.kts) you can configure for a Gradle subproject. So if you need to build and publish multiple artifacts, then consider doing so from a separate subproject.
Benefit 2: sharing & reusing code
To illustrate the next benefit, imagine you're working on an application which exposes an API.
It comprises 4 distinct layers:
-
app is the entry point to the application and contains code to handle API requests
-
service has business logic classes which call the repository layer and manipulate returned entities
-
repository interacts directly with the database and hides complexity from other layers
-
model contains a data model representation of the entities handled by this application
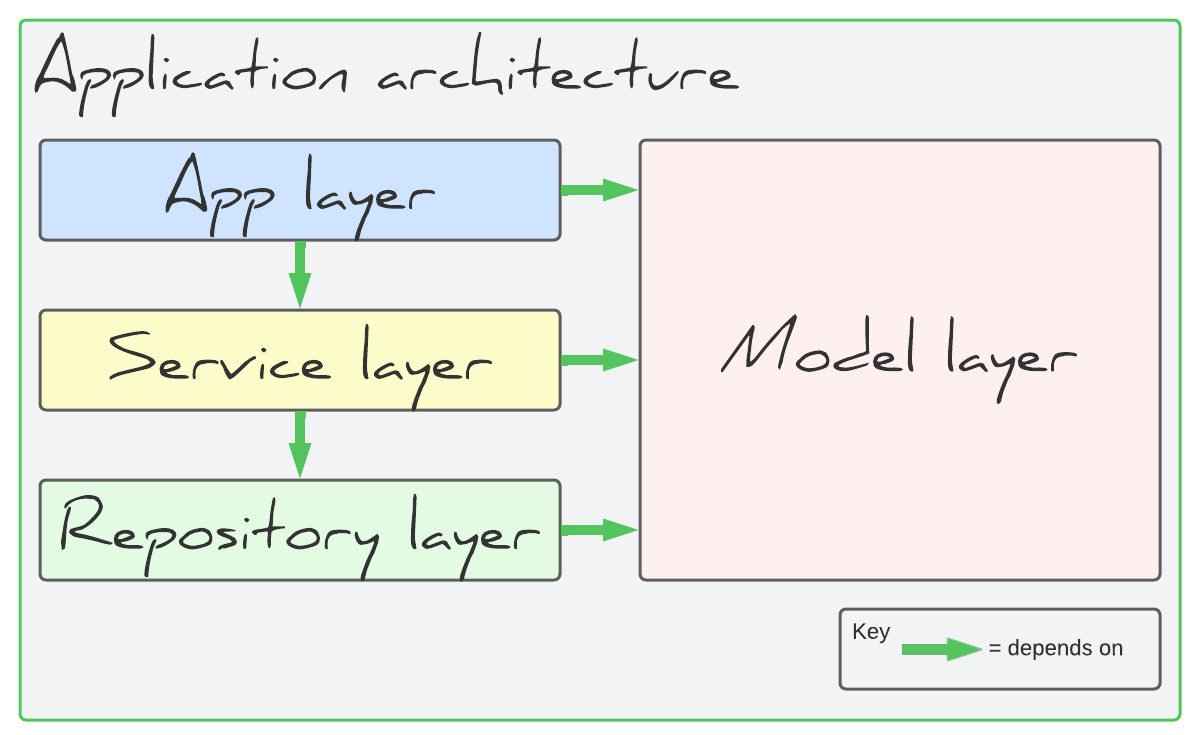
If this application were modelled with a single-project build, all code would be contained within src/main/java.
A new requirement
Consider what happens when a new requirement comes in to publish a new API client library (for clients to easily interact with the API exposed by this application).
A good solution is to turn this project into a multi-project build and create a new subproject for this client, taking advantage of benefit 1.
But what if we wanted to use code from the model layer in the new API client library?
Well, each layer of the main application can be extracted into its own subproject.

Dependencies between projects can be setup in the build script. Here's how that looks for the client subproject, which depends on model:
Just like with a dependency on an external artifact (e.g. commons-lang3), a project dependency means that the jar file produced by the other project will be added to this project's classpath.
Or in other words, you can use the code from the other subproject in this subproject.
Splitting your application's layers into different subprojects as shown above not only promotes code reuse, but has other potential benefits as you'll see next.
Benefit 3: enforce architectural principles
When an application has several layers as shown above, it's almost always a good idea for dependencies between layers to go in one direction only.
For example, the service layer needs to access the repository layer to read/write/update entities in the database.
But a dependency from the repository layer to the service layer would introduce a cyclic dependency. Cyclic dependencies create unnecessary coupling, which prohibits understanding, reuse, and maintainability.
Yes, in other words they're a bad idea.
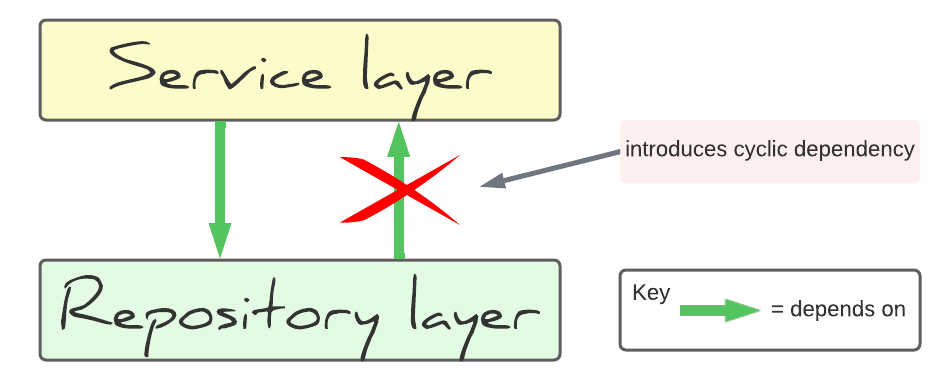
In a single-project build it's easy to create cyclic dependencies like this because all code is contained within a single src/main/java directory. Unless you're using the Java Platform Module System introduced in Java 9, then there's nothing preventing developers from unintentionally creating unwanted coupling between layers.
Once your project moves to a multi-project build with separate subprojects for each layer, it's much easier to enforce layer dependencies.
For example, we can add the following project dependency to the build script of the service subproject.
This means 2 things:
-
the service subproject has access to the code from the repository layer
-
the repository layer still doesn't have access to the service layer
So architectural principles like preventing cyclic layer dependencies can be enforced i.e. developers will be prevented from using service classes in repository classes.
Of course anything's possible! Developers could reconfigure the Gradle build to break these principles, but training and code reviews can help ensure standards are followed.
Benefit 4: better build performance
One pain point that frequently features on a development team's retrospective board is build performance.
An important aspect of this is incremental build performance, which is the time it takes to rebuild code and run tests after making a small code change. Yes, the way developers work day-to-day. 👨💻
Gradle offers several features to make incremental builds as fast as possible, like a feature actually called incremental build, the Gradle daemon, and incremental compilation (learn more in this Maven vs. Gradle comparison).
But splitting projects into a multi-project build can offer even better performance.
Build & test performance
Consider what happens when a small code change is made to a project and we need to rebuild and test it using ./gradle build.
In a single-project build running the build task involves recompiling all the code and rerunning all the tests.
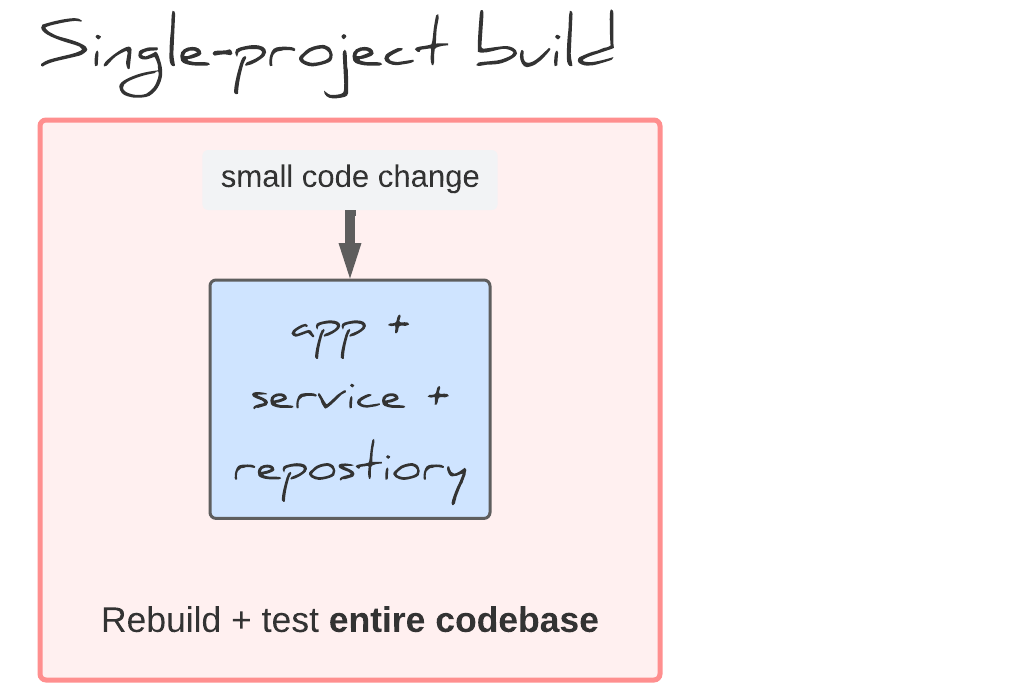
In a multi-project build a small code change only requires building the changed subproject and any dependent projects. For example, changing service requires rebuilding app and service, but not repository.
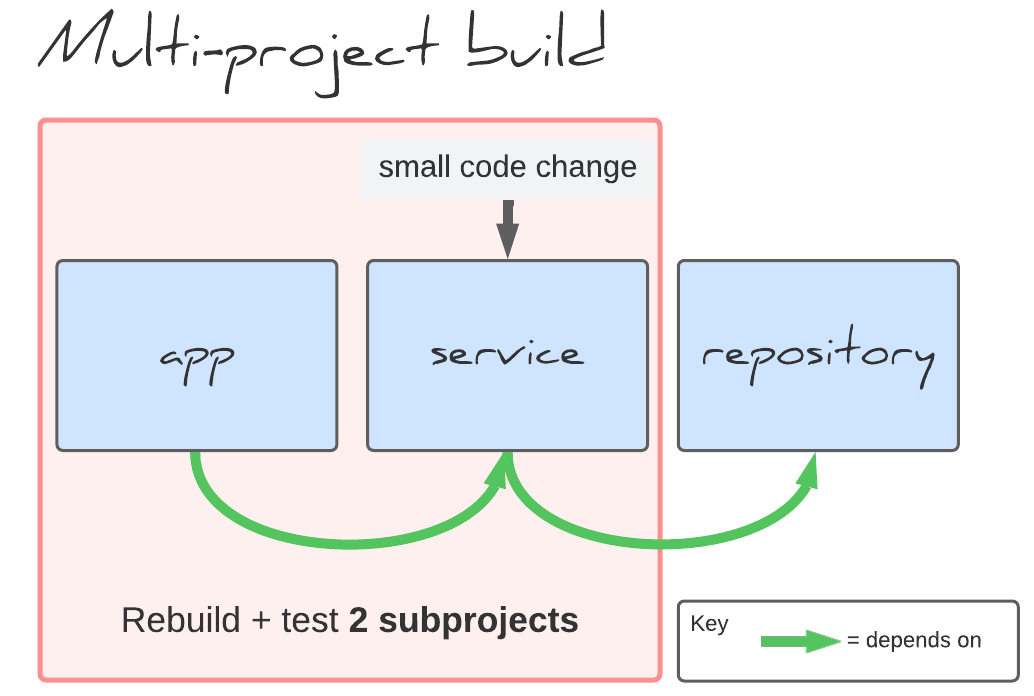
How beneficial this is will depend on your project setup, including:
-
number of subprojects
-
spread of code and tests between subprojects
Parallel build
With a multi-project build in place, you can use Gradle's parallel build features for even better performance. This allows tasks from multiple subprojects to run in separate threads at the same time.
To enable this feature pass --parallel on the command line or add this property to gradle.properties.
org.gradle.parallel=trueDuring parallel execution Gradle uses the number of available CPU cores to calculate the optimal number of threads to use.

Gradle's parallel build across 3 threads
To learn how to setup your project in a decoupled way to make the most of parallel build, check out this Gradle documentation.
Final thoughts
If you've been wondering whether to move to a multi-project build setup, you now understand 4 compelling benefits that definitely make it worth considering.
To learn how to properly implement multi-project builds grab a copy of Gradle Build Bible today. You'll discover how to configure multi-project builds, execute tasks against them, troubleshoot them, and much more.
Lack of Gradle knowledge slowing you down?
A broken build is easy enough to fix. But a misconfigured build is the silent time killer that costs hours every week.
Slow builds. Slow tests. Slow development.
But the official Gradle docs are confusing. Most developers never properly configure their projects—and as codebases grow, builds become bottlenecks.

This guide fixes that. It's a step-by-step walkthrough for Java developers who want to master Gradle fast.
- Unlock the mysteries of the build script.
- Speed up your workflow.
- Make development fun again.
If this is a problem you're dealing with in your own team, you can see how I approach software delivery in practice.