Running Java in AWS Lambda

For the longest time backend Java developers only ran code on web servers.
Web servers are the glue between the outside world and your application. They pass incoming network requests to your code to do some work and return a response — like handling REST API calls made by most modern web apps.
Web servers are predictable, reliable, but deeply flawed.
- As traffic increases, you need to manually scale up the number of web servers.
- As traffic drops, you must scale down not to waste money on unnecessary resources.
- You'll need a team of DevOps engineers to create a system to automate the process.
That's a lot of work, but after decades running software like this Java teams don't know any other way.
So here's a question:
If nobody uses your Java application at night, does it make sense to spend money to continuously run web servers 24/7?
In the future, all Java code will run in production on a pay-per-use basis.
Your code will run only when needed, with every request costing a fraction of a penny. With no web servers to manage, the time and money savings will be huge.
Ready for the good news?
Running backend code without a web server is already available today with serverless technology. Amazon Web Services (AWS) offer my favourite serverless tool called AWS Lambda, used by 1,000,000+ customers every month.
AWS Lambda runs Node.js, Python, and Java too.
In this article, you'll learn the easiest way to run Java in AWS Lambda. You'll see how quick it is to write, build, and deploy a serverless application with tools you already know like Spring Boot.
Then you can decide for yourself if the web server's days are numbered.
1. Writing a serverless application in Java
Writing code to run serverless is no more complicated than creating a Spring Boot REST API to run on a web server. You write something called a serverless function, which takes an input and returns an output.
So let's create a function to return the number of book sales on my website, to use on this webpage instead of a hard-coded value.
Everything you need to write serverless functions in Java is in two Spring libraries:
spring-cloud-starter-function-webspring-cloud-function-adapter-aws
Add them to your Gradle build script (build.gradle.kts or build.gradle) like this:
dependencies {
    implementation("org.springframework.cloud:spring-cloud-starter-function-web:4.1.1")
    implementation("org.springframework.cloud:spring-cloud-function-adapter-aws:4.1.1")
    // other dependencies
}With these libraries available in your project, create and annotate a Java @SpringBootApplication class.
package com.tomgregory.serverless;

import org.springframework.boot.SpringApplication;
import org.springframework.boot.autoconfigure.SpringBootApplication;

@SpringBootApplication
public class ServerlessApplication {
    public static void main(String[] args) {
        SpringApplication.run(ServerlessApplication.class);
    }
}
Create a separate package (e.g. com.tomgregory.serverless.functions) and a class for the actual serverless function.
Here's mine, which for now returns a hard-coded value.
package com.tomgregory.serverless.functions;

import java.util.function.Function;

public class Product implements Function<String, String> {
    @Override
    public String apply(String s) {
        return "238";
    }
}
Note how it implements Java's Function interface, which takes a String input and returns a String.
Finally, in application.properties configure spring.cloud.function.scan.packages to help Spring locate your serverless functions.
spring.cloud.function.scan.packages=com.tomgregory.serverless.functionsThat's it!
Testing locally
To try out the function locally, Spring supports running in web server mode. It helps us validate everything's setup right before deploying to AWS where the function runs in serverless mode
First, apply the Gradle Spring Boot plugin.
plugins {
  id("org.springframework.boot") version "3.2.4"
  // other plugins
}
Then run the bootRun Gradle task to start the web server.
$ ./gradlew bootRun
Starting a Gradle Daemon, 1 incompatible Daemon could not be reused, use --status for details

> Task :bootRun

  .   ____          _            __ _ _
 /\\ / ___'_ __ _ _(_)_ __  __ _ \ \ \ \
( ( )\___ | '_ | '_| | '_ \/ _` | \ \ \ \
 \\/  ___)| |_)| | | | | || (_| |  ) ) ) )
  '  |____| .__|_| |_|_| |_\__, | / / / /
 =========|_|==============|___/=/_/_/_/
 :: Spring Boot ::                (v3.2.4)
Call the function at http://localhost:8080/<your-function-name> and check you get the expected response.
$ curl localhost:8080/product
238
Before we move onto packaging this into a jar file ready for AWS, note these other Spring Cloud Function features.
- Change your function input type to access the full AWS request
APIGatewayV2HTTPEvent. This means you can use properties like path parameters. - Change your function response type to
Messageto use your own response class which Spring automatically serialises to JSON. - Use standard Spring features like dependency injection.
To showcase these, here's a full Java Lambda function that returns a value from a database.
package com.tomgregory.serverless.functions;

import com.amazonaws.services.lambda.runtime.events.APIGatewayV2HTTPEvent;
import com.tomgregory.serverless.ProductResponse;
import org.apache.commons.text.WordUtils;
import org.springframework.http.HttpHeaders;
import org.springframework.http.HttpStatus;
import org.springframework.messaging.Message;
import org.springframework.web.server.ResponseStatusException;
import software.amazon.awssdk.services.dynamodb.DynamoDbClient;
import software.amazon.awssdk.services.dynamodb.model.AttributeValue;
import software.amazon.awssdk.services.dynamodb.model.GetItemRequest;

import java.util.HashMap;
import java.util.Map;
import java.util.function.Function;

import static java.lang.Integer.parseInt;

public class Product implements Function<APIGatewayV2HTTPEvent, Message<ProductResponse>> {

    private final DynamoDbClient dynamoDbClient;

    public Product(DynamoDbClient dynamoDbClient) {
        this.dynamoDbClient = dynamoDbClient;
    }

    @Override
    public Message<ProductResponse> apply(APIGatewayV2HTTPEvent event) {
        String productName = extractProductName(event);

        GetItemRequest request = GetItemRequest.builder()
                .key(generateKey(productName))
                .tableName("dev-products")
                .build();

        Map<String, AttributeValue> returnedItem = dynamoDbClient.getItem(request).item();
        if (returnedItem == null) {
            throw new RuntimeException("Could not find database entry for " + productName);
        }
        AttributeValue salesCountAttribute = returnedItem.get("salesCount");
        if (salesCountAttribute == null) {
            throw new ResponseStatusException(HttpStatus.NOT_FOUND);
        }

        return org.springframework.messaging.support.MessageBuilder
                .withPayload(new ProductResponse(productName, parseInt(salesCountAttribute.n())))
                .setHeader(HttpHeaders.CONTENT_TYPE, "application/json")
                .build();
    }

    private static String extractProductName(APIGatewayV2HTTPEvent event) {
        String productNamePathParameter = event.getPathParameters().get("productName");
        return WordUtils.capitalize(productNamePathParameter.replaceAll("-", " "));
    }

    private static HashMap<String, AttributeValue> generateKey(String productName) {
        HashMap<String, AttributeValue> keyToGet = new HashMap<>();
        keyToGet.put("id", AttributeValue.builder()
                .s(productName).build());
        return keyToGet;
    }
}To avoid running the function locally in web server mode, why not create an automated test?
Apply the @FunctionalSpringBootTest annotation to a test class to spin up your entire function and automatically validate the response.
For example, this test checks the response contains the expected numeric value.
package com.tomgregory.api;

import org.junit.jupiter.api.Test;
import org.springframework.beans.factory.annotation.Autowired;
import org.springframework.boot.test.context.SpringBootTest;
import org.springframework.boot.test.web.client.TestRestTemplate;
import org.springframework.cloud.function.context.test.FunctionalSpringBootTest;
import org.springframework.http.HttpHeaders;
import org.springframework.http.ResponseEntity;

import java.net.URI;

import static net.javacrumbs.jsonunit.assertj.JsonAssertions.assertThatJson;
import static org.springframework.http.RequestEntity.post;

@FunctionalSpringBootTest(webEnvironment = SpringBootTest.WebEnvironment.RANDOM_PORT)
public class WebFunctionTests {

    @Autowired
    private TestRestTemplate rest;

    private String body = """
            {
                "pathParameters": {
                    "productName": "gradle-build-bible"
                }
            }
            """;

    @Test
    public void returnsValidJSON() throws Exception {
        ResponseEntity<String> result = rest.exchange(
                post(new URI("/products/gradle-build-bible"))
                        .header(HttpHeaders.CONTENT_TYPE, "application/json")
                        .body(body), String.class);
        assertThatJson(result.getBody()).node("productName").isEqualTo("Gradle Build Bible");
        assertThatJson(result.getBody()).node("salesCount").isNumber();
    }
}With this function working locally, we now need to package it in a way AWS Lambda will understand so it can run it any time of day or night.
2. Building a Lambda-compatible jar file
To run Java in AWS Lambda, we need to upload a jar file in a format AWS understands.
Most importantly, the jar file must be in exploded format.
In the Gradle build script, apply the shadow plugin which can create an exploded jar.
plugins {
    id("com.github.johnrengelman.shadow") version "8.1.1"
    // other plugins
}
Configure it as suggested by the Spring Cloud Function docs.
val shadowTasks = tasks.withType<ShadowJar> {
    archiveClassifier = "aws"
    dependencies {
        exclude(
            dependency("org.springframework.cloud:spring-cloud-function-web:4.1.1")
        )
    }
    mergeServiceFiles()
    append("META-INF/spring.handlers")
    append("META-INF/spring.schemas")
    append("META-INF/spring.tooling")
    append("META-INF/spring/org.springframework.boot.autoconfigure.AutoConfiguration.imports")
    append("META-INF/spring/org.springframework.boot.actuate.autoconfigure.web.ManagementContextConfiguration.imports")
    transform(PropertiesFileTransformer::class.java) {
        paths = listOf("META-INF/spring.factories")
        mergeStrategy = "append"
    }
    manifest {
        attributes["Main-Class"] = "com.tomgregory.serverless.ServerlessApplication"
    }
}

tasks.named("assemble") {
    dependsOn(shadowTasks)
}
In summary, the above build script code:
- Configures the shadow plugin to generate an additional jar file ending in
-aws.jar. - Removes the spring-cloud-function-web library since we don't need web server mode on AWS.
- Sets up a task dependency to generate the jar file whenever you run the assemble task.
Run the assemble task and see the generated -aws.jar file.
$ ./gradlew assemble
Starting a Gradle Daemon, 1 busy and 1 incompatible Daemons could not be reused, use --status for details

BUILD SUCCESSFUL in 26s
6 actionable tasks: 5 executed, 1 up-to-date

$ ls build/libs/
serverless-java-aws.jar  serverless-java-plain.jar  serverless-java.jar
You can peak inside the jar file with jar tf build/libs/<project-name>-aws.jar to see the exploded .class files mentioned earlier.
3. Deploying Java to AWS Lambda
Now we need to bridge the gap between the jar file just created and a running serverless application in the cloud by creating an Lambda resource in AWS.
You could use the AWS Console, but to preserve your sanity I recommend a simple tool called Serverless Framework.
With Serverless Framework, you define Lambda functions in a simple YAML template and it deploys to AWS automatically.
Check out this video to learn more, but you should be able to follow this simple function definition.
functions:
  getProduct:
    handler: org.springframework.cloud.function.adapter.aws.FunctionInvoker::handleRequest
    runtime: java21
    events:
      - httpApi:
          path: /products/{productName}
          method: get
    environment:
      SPRING_CLOUD_FUNCTION_DEFINITION: product
    iamRoleStatements:
      - Effect: Allow
        Action:
          - dynamodb:GetItem
        Resource: !GetAtt ProductsTable.Arn
    package:
artifact: build/libs/serverless-java-aws.jar- Give the Lambda function a name (getProduct).
- Set it's handler to a Spring class which passes the event to your function code.
- Choose the latest Java 21 runtime (also supports 17, 11, & 8).
- Add an event so this function can be called from an HTTP REST API.
- Set the
SPRING_CLOUD_FUNCTION_DEFINITIONenvironment variable to tell Spring which function to use. - Setup permissions to allow your function code to access any required AWS services.
- Tell Serverless Framework where to find the jar file.
Now run serverless deploy and Serverless Framework uploads the jar file and creates the AWS Lambda function.
$ serverless deploy
Running "serverless" from node_modules

Warning: Invalid configuration encountered
  at 'functions.getProduct.runtime': must be equal to one of the allowed values [dotnet6, go1.x, java17, java11, java8, java8.al2, nodejs14.x, nodejs16.x, nodejs18.x, provided, provided.al2, python3.7, python3.8, python3.9, python3.10, python3.11, ruby2.7, ruby3.2]

Learn more about configuration validation here: http://slss.io/configuration-validation

Deploying tomgregory-site to stage dev (eu-west-1)
Package lock found - Using locked versions
Packing external modules: aws-jwt-verify@^4.0.0, stripe@^12.1.1
Serverless Certificate Creator Summary
Certificate
  arn:aws:acm:us-east-1:299404798587:certificate/cc0c4e53-459d-4f7c-965c-becc593fb696 => dev.tomgregory.com

✔ Service deployed to stack tomgregory-site-dev (97s)
So all that's left to do is try this bad boy out.
4. Running the AWS Lambda function
Calling a serverless function is the same as any REST API.
You can hit the API directly:
$ curl https://<some-api-domain>/products/gradle-build-bible
{"productName":"Gradle Build Bible","salesCount":238}
Or hook it up to a webpage, in this case to dynamically populate the number of books.
To monitor your function in production, AWS gives you a dashboard to track things like request duration and error rate.
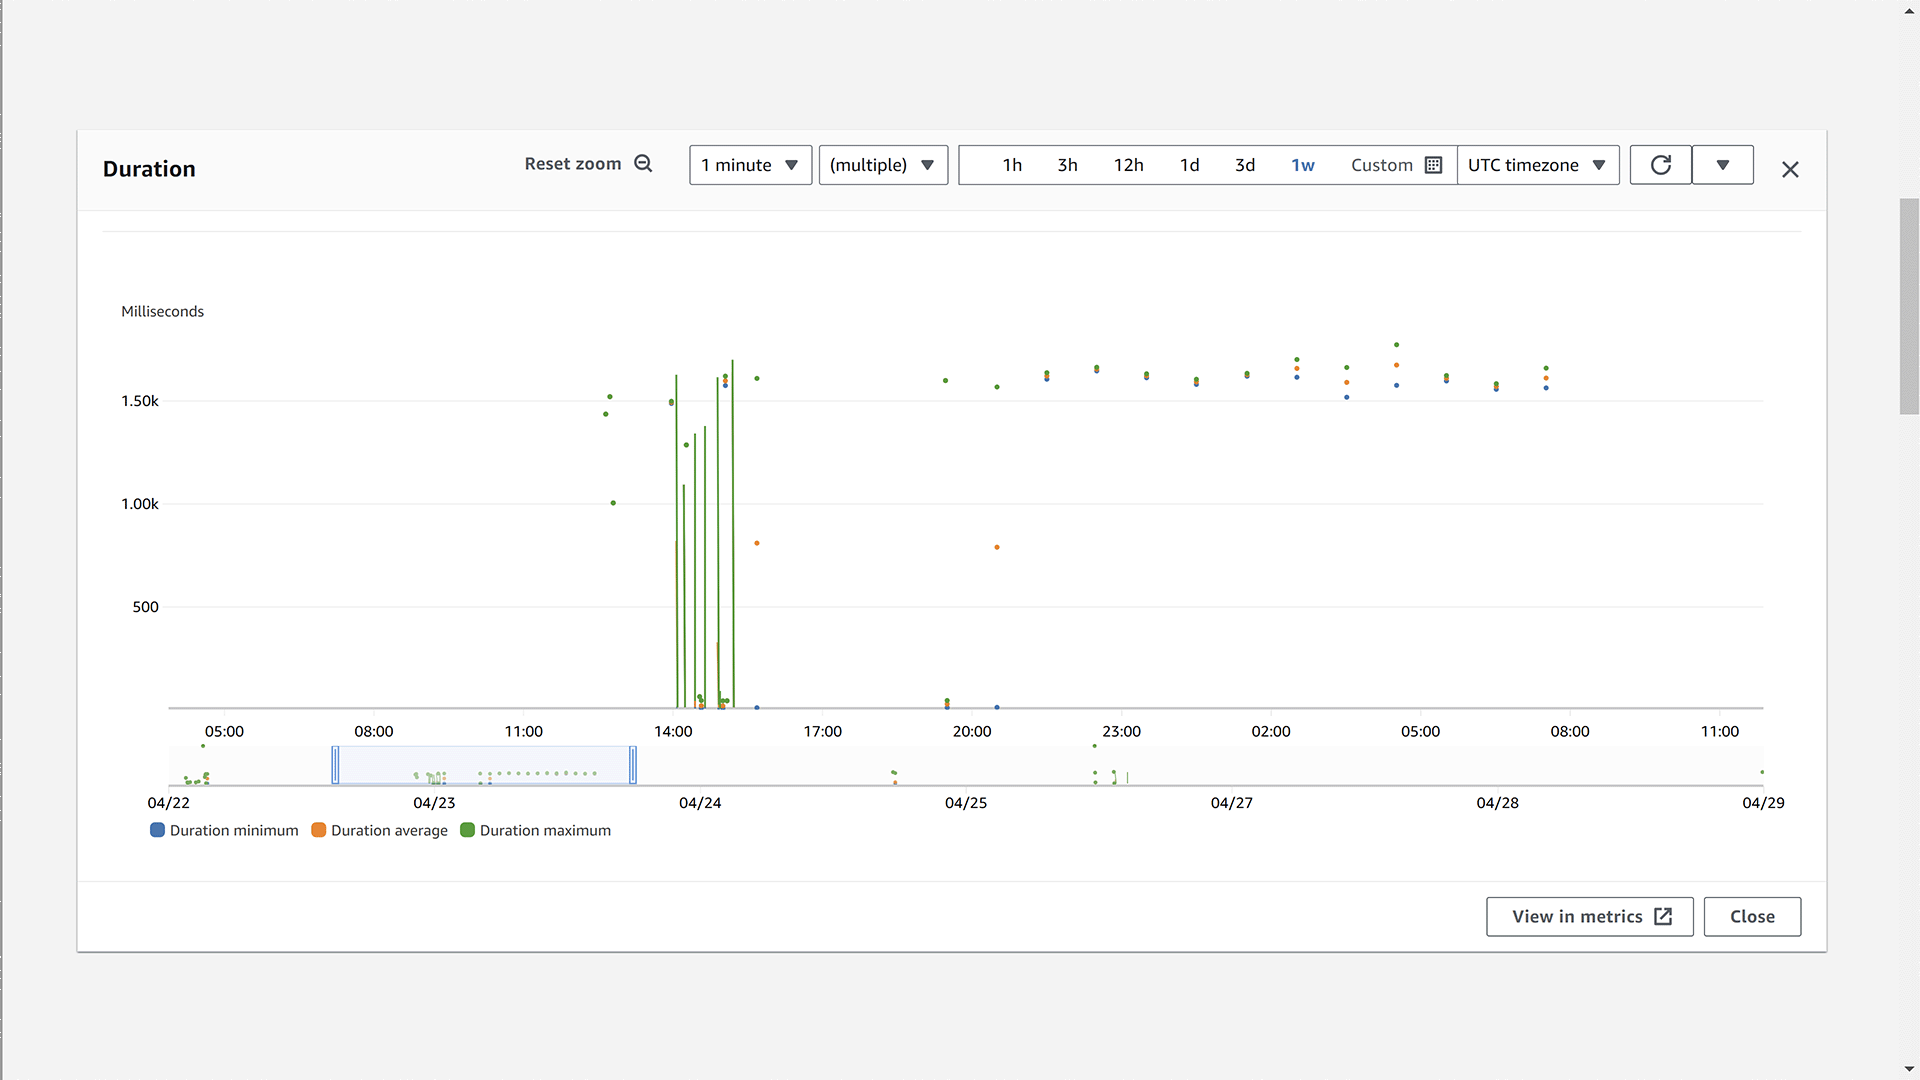
Java performance in AWS Lambda
You may have heard Java developers complain about slow Lambda startup times.
The so-called cold start is when AWS initialises a Lambda function for the first time after a period of no use. In the logs for your Lambda function you see Init Duration, which is slower for Java because of the JVM startup time.
REPORT RequestId: b78f80e0-33bf-4e3a-89b5-6f6632bcacb5 Duration: 1834.44 ms Billed Duration: 1835 ms Memory Size: 1024 MB Max Memory Used: 244 MB Init Duration: 5180.44 ms
But once your function is out of this idle state, responses are fast.
If you think cold start times are an issue, consider other use cases for Java serverless functions:
- Background processing
- Workflow tasks
Cost of using AWS Lambda
You can review costs in the AWS billing dashboard.
Lambda is free for low-traffic sites like mine within the 1,000,000 monthly request free tier.
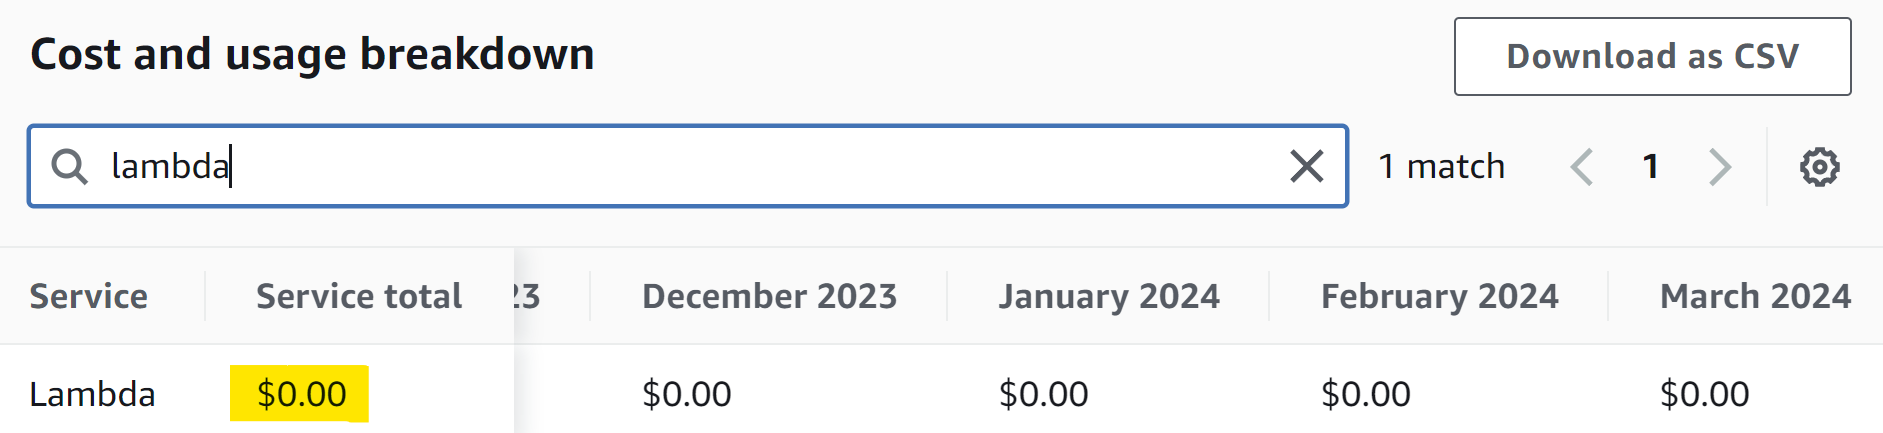
After that, an extra million requests costs a staggering $0.20 (plus duration costs).
5. Final thoughts
For me, the simplicity of not running a web server and paying per use makes serverless totally worth it. It also feels like a step in the right direction with more AWS customers using Lambda every year.
What do you think? Are you ready to embrace serverless technology or will web servers still be part of the future for Java developers?
If this is a problem you're dealing with in your own team, you can see how I approach software delivery in practice.