How To Secure Your Gradle Credentials In Jenkins

Credentials will be required in this scenario, and a common mistake is to insecurely store these credentials in version control. In this article you'll learn how to securely setup credentials for your private repository using Jenkins credentials, and inject them into your Gradle builds.
Overview
Before we get into a working example of exactly how all this fits together, it's worth asking a question as to why we want to do this in the first place.
Why store credentials in Jenkins?
When we use Jenkins as a build tool, normally it needs to perform various tasks that might require credentials, such as:
- pulling an artifact from a private repository
- publishing an artifact to a private repository
- publishing a Docker image to a private Docker repository
- deploying a service to a cloud provider, such as AWS
The credentials required for these tasks need to be stored somewhere, and more often than not the default place developers think to put them is in the same place as the code that executes the task. A common location for this might be a Gradle build.gradle file that then gets committed into version control.
Storing credentials in version control is almost always a bad idea. Anyone who gets access to your code in version control then has access to all the locations which the credentials provide access to.
What do we mean by Gradle credentials?
Thinking specifically about Gradle, when we talk about credentials we're normally talking about credentials that provide access to a specific repository. In Gradle's build.gradle file, we can define such a repository like this:
repositories {
    maven {
        url "http://repo.mycompany.com/maven2"
        credentials {
            username "user"
            password "password"
        }
    }
}
Using this technique we can then depend on Maven artifacts that have been deployed to a password protected repository, typically a private repository that we own.
We can make an improvement here by pulling out the username and password to a gradle.properties file which normally lives in your user home directory:
mavenUsername=admin
mavenPassword=admin123
The build.gradle would then be updated like this:
repositories
    maven {
        url "http://repo.mycompany.com/maven2"
        credentials {
            username mavenUsername
            password mavenPassword
        }
    }
}
This is definitely an improvement, as the gradle.properties file isn't typically something you commit to version control. We can go one step further by not relying on the credentials being stored in a file at all. Instead, we'll have Jenkins inject them directly into the build as environment variables, providing a much more secure solution.
Working example
The following diagrams summarises what we're trying to do here:

We want to achieve the following:
- publish or pull an artifact from a private Maven repository that has authentication enabled
- store the Maven repository credentials in Jenkins credentials
- inject the Maven repository credentials into our Gradle build at build time, allowing access to the repository
2.1. Initial setup
To show how this works we'll need the following services running:
- A Jenkins server
- A Maven repository
- A Git repository
Easy startup with Docker Compose
The easiest way to get the first 2 up and running is to use Docker. You can follow along with this example by checking out this GitHub repository:
git clone https://github.com/jenkins-hero/gradle-credentials-jenkins.gitAnd then running:
cd gradle-credentials-jenkins
./gradlew docker dockerComposeUp
Run docker ps to see what containers are now running:

We've got an instance of Jenkins running on http://localhost:8080 and an Archiva Maven repository running on http://localhost:8081.
Archiva setup
By default Archiva allows access as it's guest user. Since we want to demonstrate gaining access to a private repository using credentials provided by Jenkins, we'll have to disable this user.
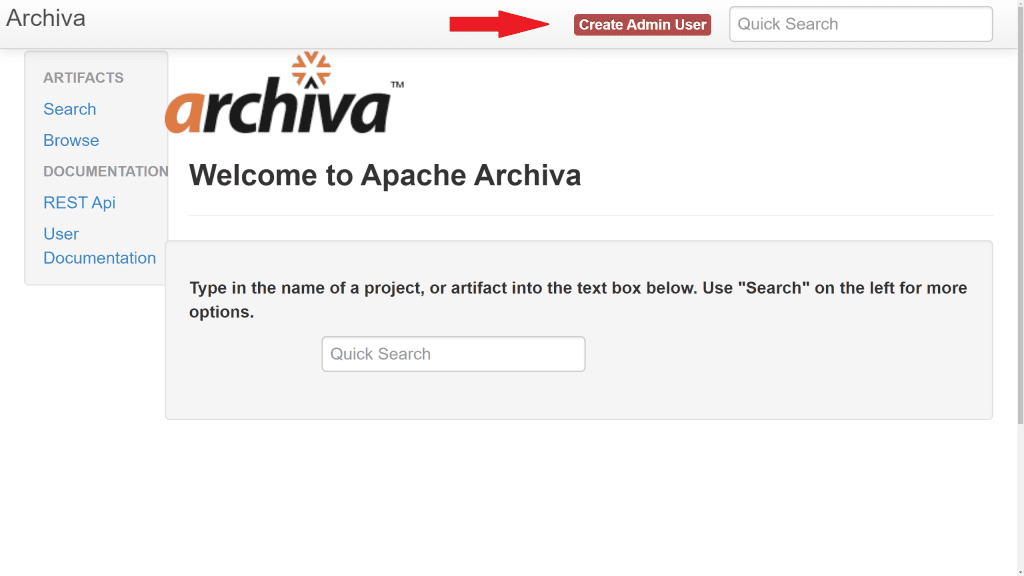
- Navigate to Archiva at http://localhost:8081
- First off we need to create an admin user account to get access to all the settings. Click on the Create Admin User red button on the top right.
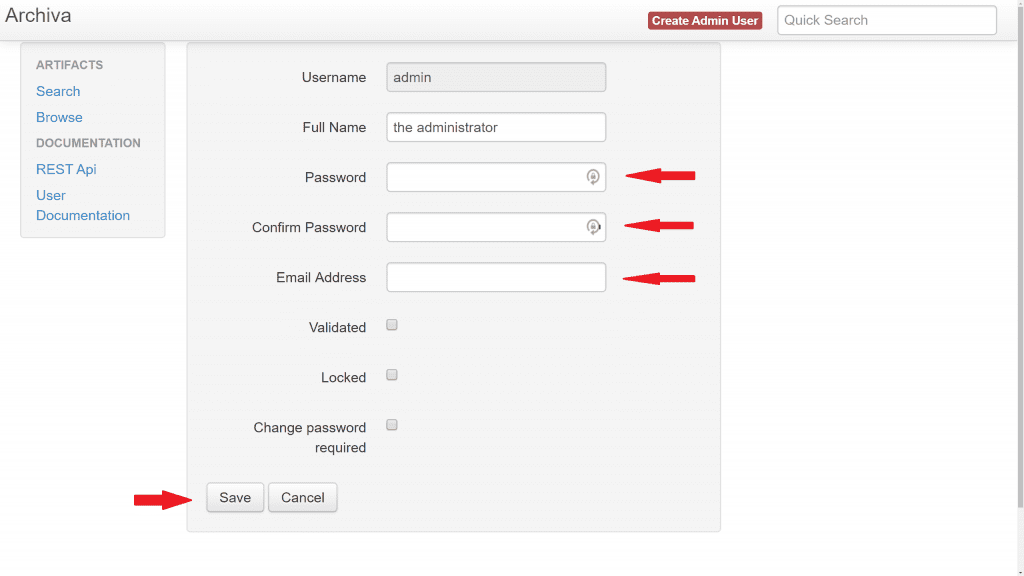
3. Enter a password, password confirmation, email address, and click save
4. Some new options now appear on the left hand side. Select Manage under Users, then select the Edit button for the Guest user.
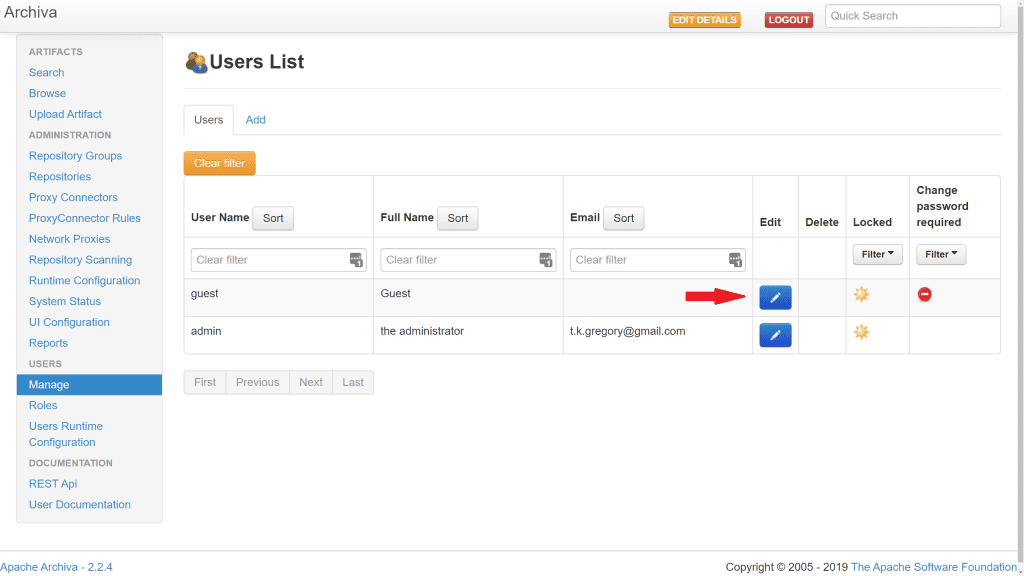
5. Click on the Edit Roles button
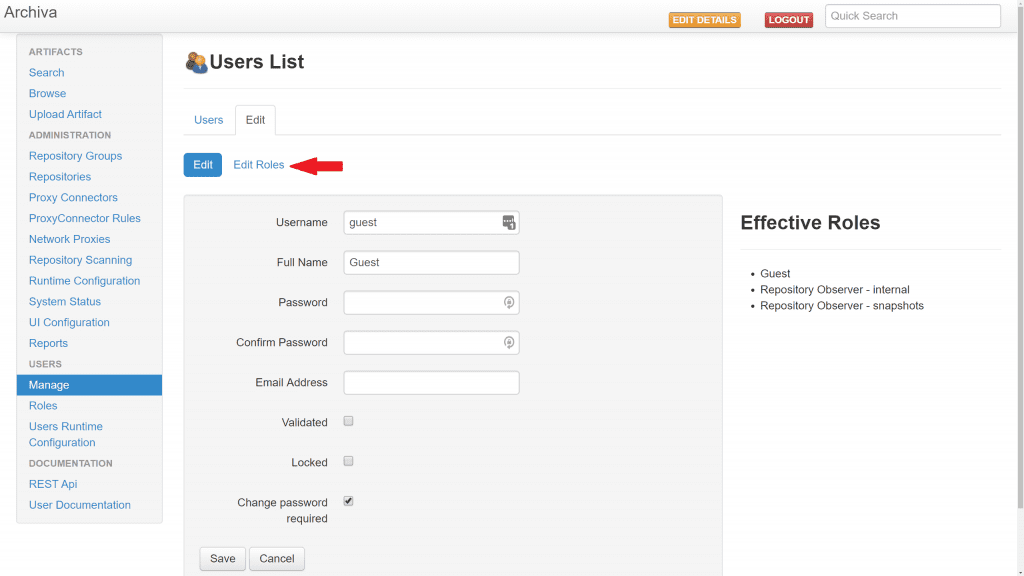
6. Uncheck the Repository Observer permissions for the snapshots and internal repositories. Click the Update button.
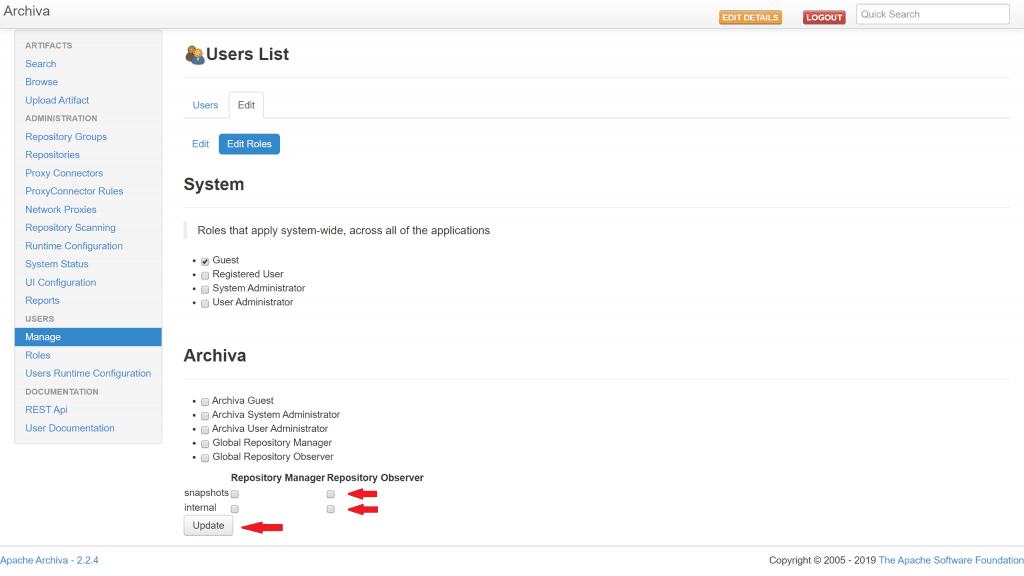
You now have a Maven repository setup that requires credentials to be able to push to it and pull from it. For simplicity, we'll use the admin credentials in Gradle, but in a real life scenario you'll want to setup a separate user.
2.2. Configuring credentials within Jenkins
Moving over to Jenkins, let's get the Maven repository credentials setup.
Get the right plugins
There are 2 plugins that we need:
- Credentials plugin (docs) - provides a way to store credentials in Jenkins via the user interface
- Credentials Binding plugin (docs) - allows credentials to be injected into a pipeline build step as an environment variable
These plugins can be installed by going to Manage Jenkins > Manage Plugins. If you're following along with the example GitHub repository, the plugins are provisioned automatically in the Docker image.
You can see if the correct plugins are installed on the Manage Plugins screen and clicking on the Installed tab:
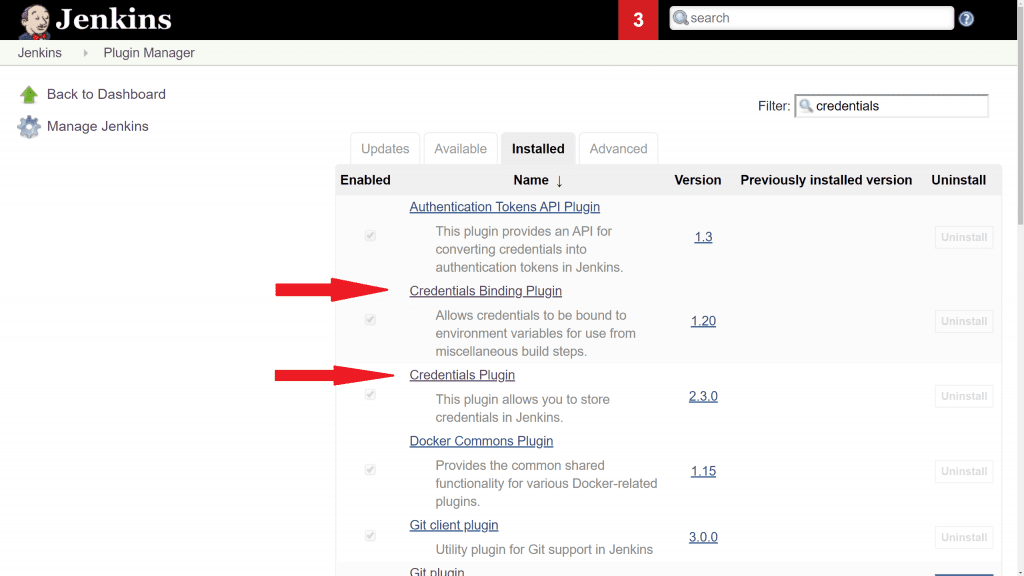
Info: the username & password authentication for the Jenkins instance in the working example has been turned off for demonstration purposes. A real Jenkins instance should always have authentication enabled.
Add the credentials
- Now that we have the right plugins, a new Credentials option should appear on the left hand side of the Jenkins home page. Click on it.
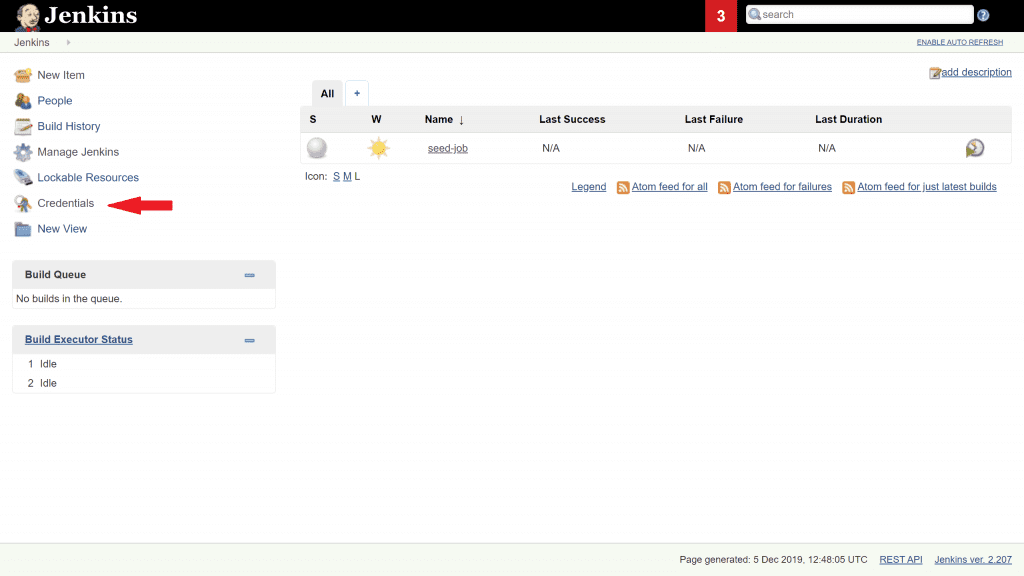
2. Click System 3. Click Global Credentials 4. Click Add Credentials on the left hand side.
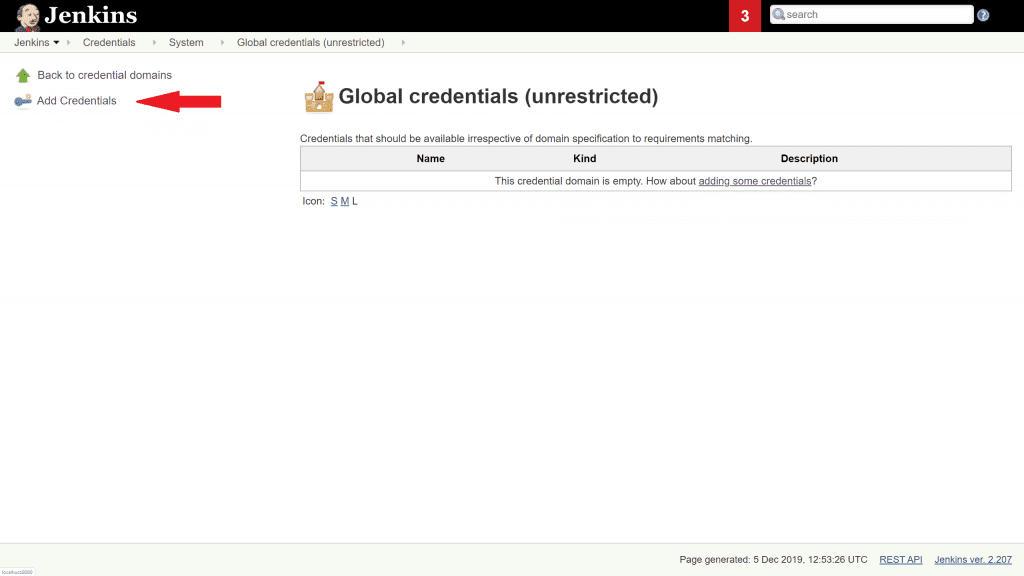
5. Finally! Now it's time to add the credentials! We need to enter three pieces of information:
- the username, which in our case is admin
- the password, which is whatever you entered when you setup the admin user in Archiva
- an id for this credential. This is how it's referenced from the Jenkins pipeline we'll look at in a later section. We'll use archiva.
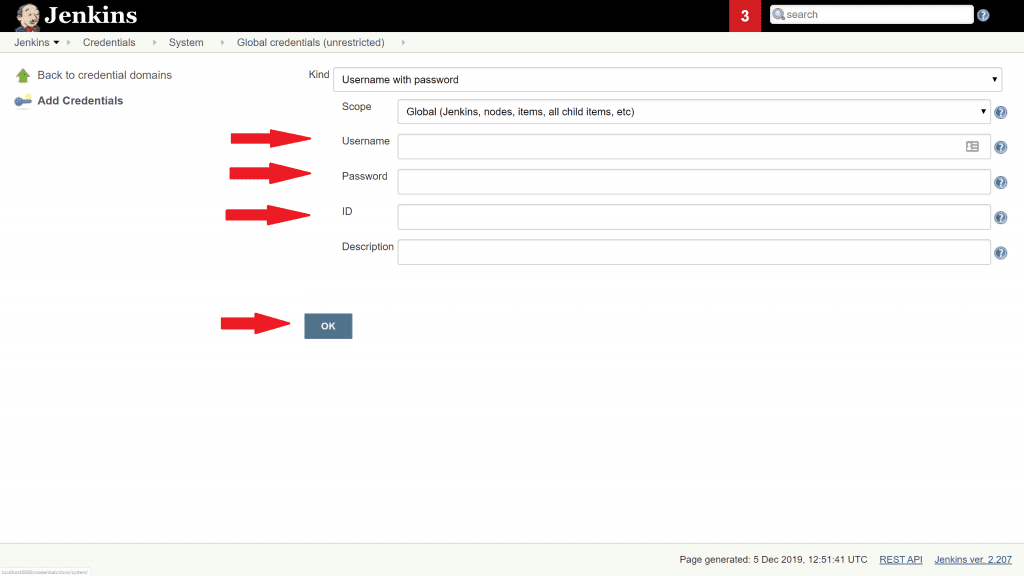
6. Click the OK button, and you'll see this confirmation screen.
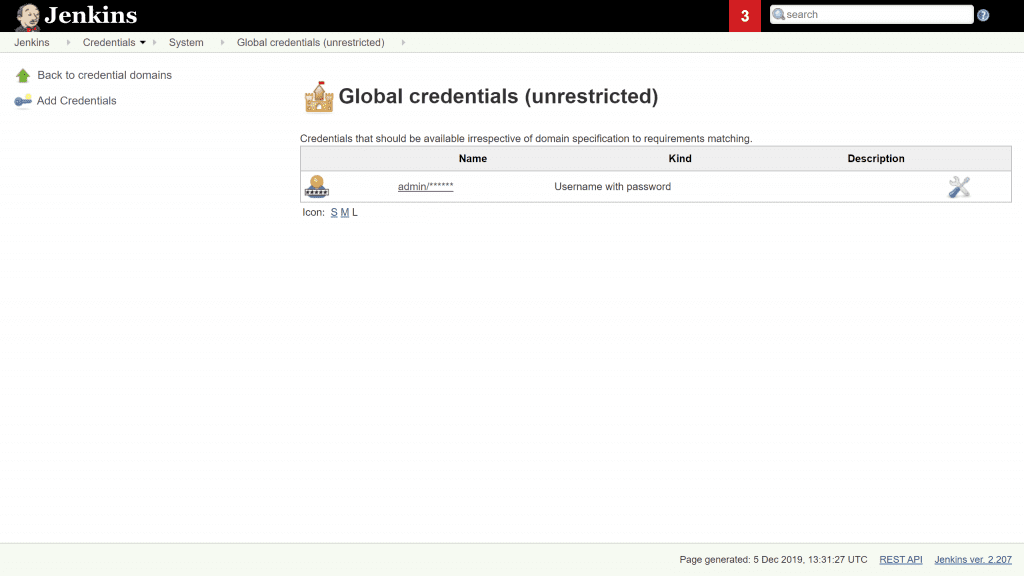
2.3. Using Jenkins credentials to publish an artifact with Gradle
Let's jump into Gradle and have a think about how we'll be able to use an environment variable passed in from Jenkins to connect to the Maven repository.
Additional plugin
Imagine you have an artifact that is built by your Gradle project, say a jar file. In order to publish that to a Maven repository we'll need to add the Maven Publish Plugin to our build:
plugins {
    id 'maven-publish'
    ... // any other plugins you require
}
With this plugin added, we get an additional gradle task available to us, publish. Before we execute this task though, we need to add some additional configuration.
Maven Publish Plugin configuration
publishing {
    publications {
        maven(MavenPublication) {
            groupId = project.group
            artifactId = project.name
            version = project.version

            from components.java
        }
    }
}
Here we're defining what the Maven artifact's group id, artifact id, and version will be.
The from components.java tells the plugin that it should publish the output from the Java plugin, i.e. the jar file.
We also need to tell the Maven Publish Plugin what repository to push to, by adding this additional configuration block inside publishing:
publishing {
    publications {
        ... //as above
    }
    repositories {
        maven {
            url = "http://archiva:8080/repository/snapshots"
            credentials {
                username System.getenv('ARCHIVA_USR')
                password System.getenv('ARCHIVA_PSW')
            }
        }
    }
}
There are 3 parts to this:
- The URL of the Maven repository. In the case of this example, we'll publish to an Archiva snapshots repository. We can reference the host as archiva:8080 since Docker automatically allows communication between containers via the container name.
- The username, which we pull from an environment variable ARCHIVA_USR
- The password, which we pull from an environment variable ARCHIVA_PSW
Assuming we have the specified environment variables in place, it's just a case of running the following command to publish the artifact to the Maven repository:
./gradlew publish2.4. Using Jenkins credentials to pull an artifact with Gradle
Now that we can publish to a Maven repository, it's time to pull from it.
To show how this works, imagine you have a very simple project that has a dependency on a Java class within a jar file deployed to your private Maven repository. This is a very common scenario, and normally the dependency is expressed in a build.gradle like this:
dependencies {
    implementation group: 'com.tom', name: 'artifact-to-publish', version: '1.0-SNAPSHOT'
}
To pull a publicly accessible 3rd party library from somewhere like the Maven Central repository, we would ordinarily add mavenCentral() to the repositories configuration. But, since we're using our private repository we'll need this configuration:
repositories {
    maven {
        url 'http://archiva:8080/repository/snapshots'
        credentials {
            username System.getenv('ARCHIVA_USR')
            password System.getenv('ARCHIVA_PSW')
        }
    }
}
This is very similar to the configuration we had above for the Maven Publish plugin, and consists of:
- The URL of the Maven repository
- The username, which we pull from an environment variable ARCHIVA_USR
- The password, which we pull from an environment variable ARCHIVA_PSW
Assuming we have the specified environment variables in place, it's just a case of running the following command to build the Gradle project, which will automatically pull the required dependency from our private Maven repository:
./gradlew build2.5. Injecting credentials into a Jenkins build pipeline step as environment variables
Now that we've got the Maven repository credentials configured in Jenkins, and our Gradle build is expecting the credentials to be passed in as environment variables, we just need to glue the two together.
That's why we added the Credentials Binding Plugin mentioned earlier, so that we can bind the credentials to environment variables for use in a pipeline build step. Normally the pipeline is defined inside a file called Jenkinsfile:
pipeline {
    agent any

    environment {
        ARCHIVA = credentials('archiva')
    }
    stages {
        stage('Publish') {
            steps {
                git 'https://github.com/jenkins-hero/gradle-credentials-jenkins.git'

                sh './gradlew publish --info --stacktrace'
            }
        }
    }
}
The call to credentials in the snippet above is referencing the id of the credential we added earlier in Jenkins. We're assigning it to an environment variable called ARCHIVA, but because this is a username & password pair a bit of Jenkins magic happens. We actually get both ARCHIVA_USR and ARCHIVA_PSW environment variables.
Since we've defined the credential in the environment section of the plugin, the environment variables will be available in any build steps we later call. Therefore, any Gradle build we call can assume these variables will be made available. That's exactly what we've done in the previous section about Gradle.
2.6. Bringing it all together
If you're following along with the accompanying GitHub repository, it's finally time to see this all working. Just to double check, now you should have:
- an instance of Archiva running with a configured admin user
- the Archiva guest user should be disabled, so that calls to the Archiva snapshots repository require authentication
- an instance of Jenkins running with the Archiva admin user credentials configured in a credential with id archiva
Execute the seed job
If you go to the Jenkins home page you'll see we have a predefined job setup here, called seed-job:
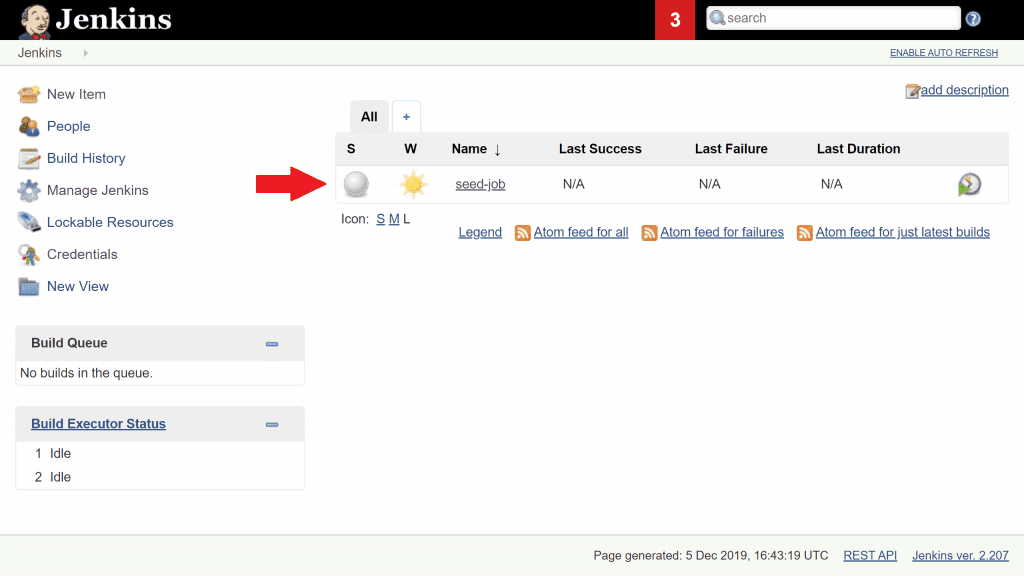
This job is going to create 2 additional jobs for us, to demonstrate the publishing to our private Maven repository, and the pulling from it. Click on seed-job and click Build Now to execute it. Go back to the Jenkins home page and you should now have 2 additional jobs available.
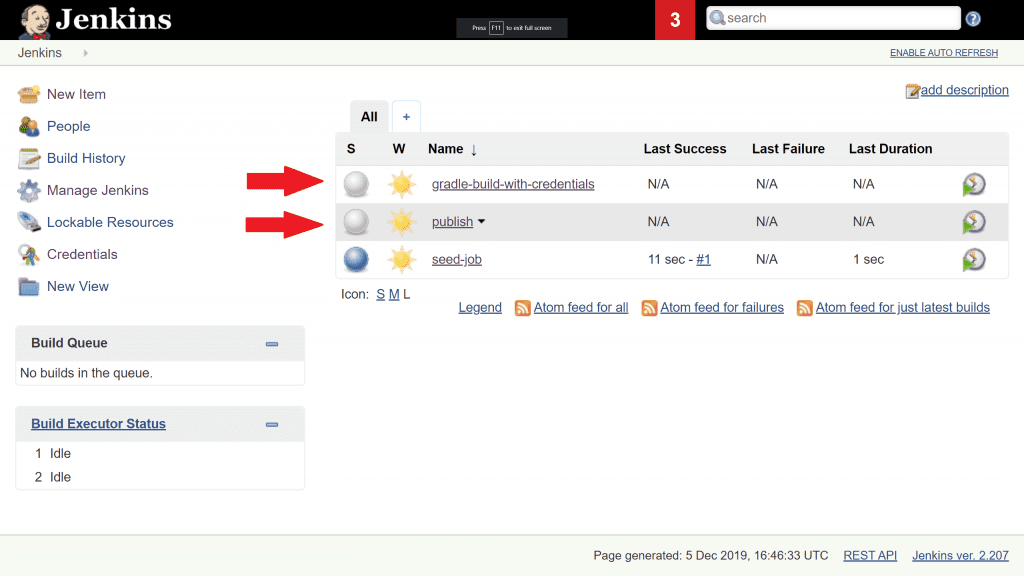
Execute the publish Jenkins job
The publish job will run a Jenkins pipeline which runs ./gradlew publish. The credentials are injected as environment variables as described in the previous section of this article (here's the pipeline definition).
Click on the job and execute it by clicking Build Now. This may take a while as it downloads the relevant Gradle libraries from gradle.org.
Go to the build that just executed and check the console output.
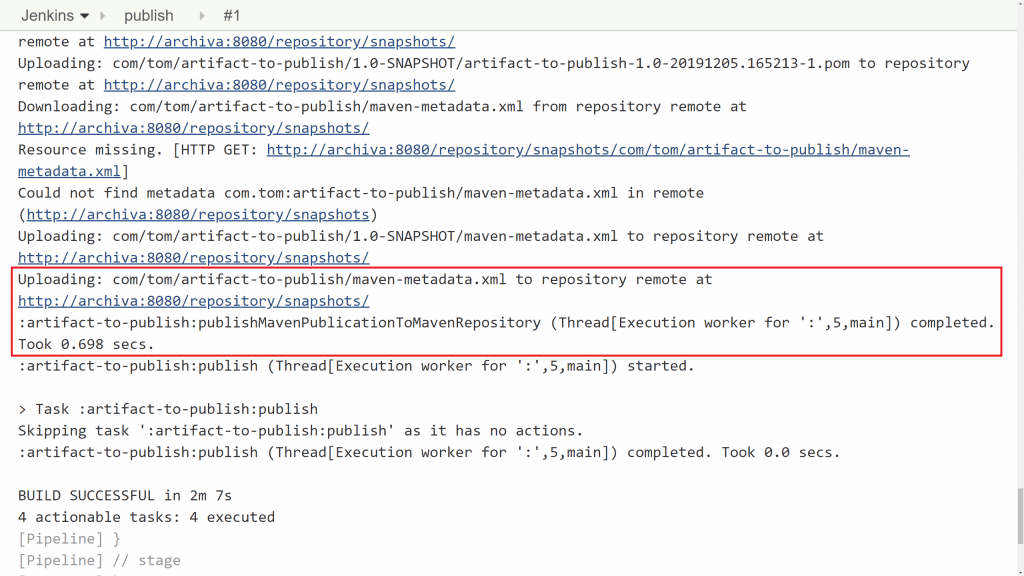
Importantly you'll see that it published the artifact to http://archiva:8080/repository/snapshots.
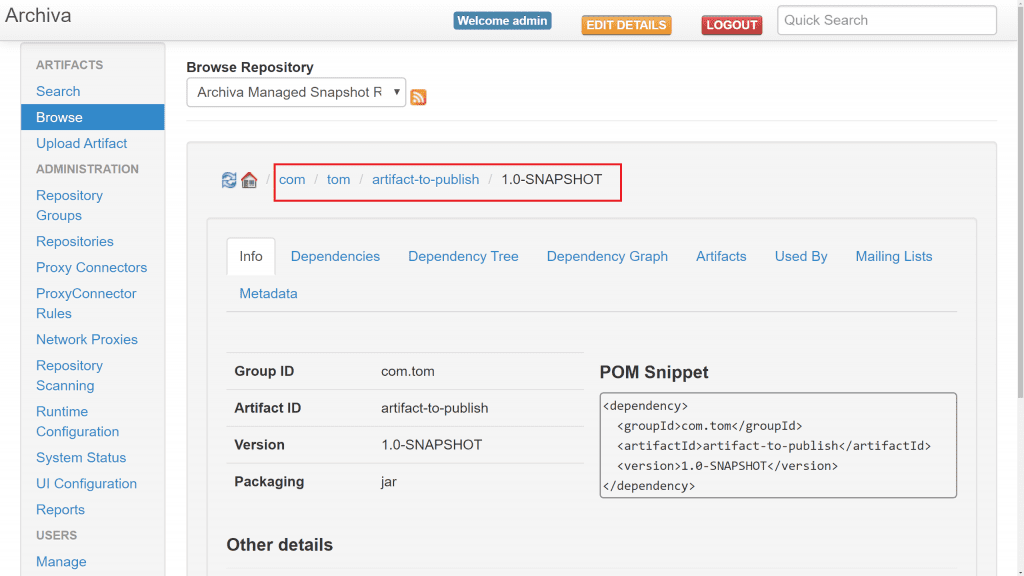
We can also validate this by logging into Archiva at http://localhost:8081 as admin, then browsing the snapshot repository.
Execute the build Jenkins job
Now we've successfully published an artifact using Jenkins credentials, let's run a Gradle build which has a dependency on that artifact.
The gradle-build-with-credentials job similarly injects the credentials as environment variables for the Gradle build to access (see the pipeline definition).
This particular job builds a Java project which depends on a class that lives in the artifact we just published in the previous section (specifically, this class depends on SpecialService).
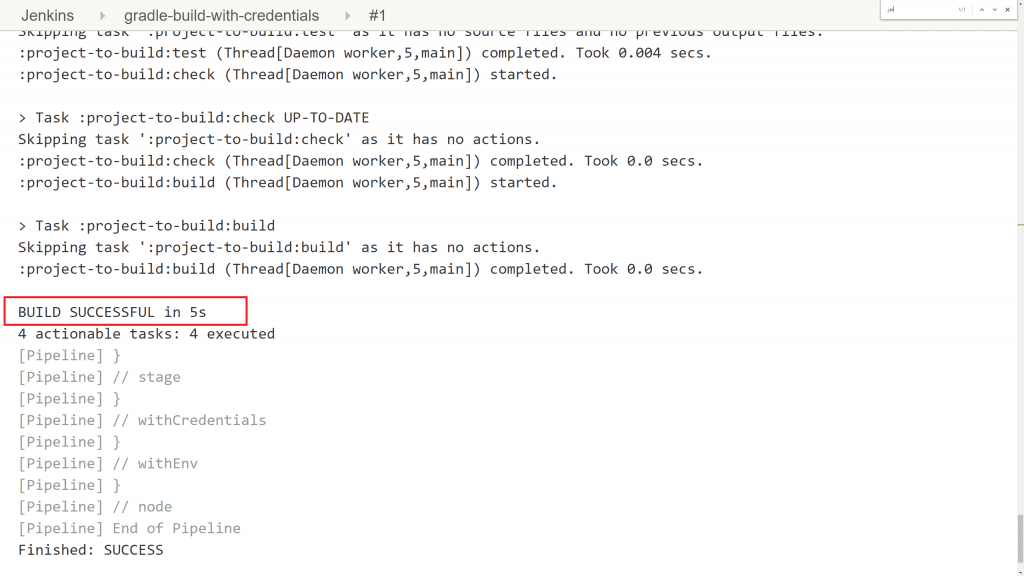
From the Jenkins home page click on the gradle-build-with-credentials job. Hit Build Now to execute it. The build should finish successfully. Since this build has a dependency on the artifact , this proves that the artifact has been pulled correctly from Archiva with the correct credentials.
Conclusion
You've now seen how to store credentials in Jenkins using the credentials plugins, how to inject credentials into your Jenkins pipeline steps as environment variables, and then how to use those environment variables to publish artifacts to and pull artifacts from an authenticated Maven repository.
Now you can easily avoid committing credentials into your version control, making your software projects and infrastructure much more secure.
If you have any questions about the working example, or any problems getting it up and running, please let me know in the comments below.
Resources
GITHUB REPOSITORY Follow along with this article by checking out the accompanying GitHub repository.
GRADLE PLUGINS Maven Publish Plugin docs
JENKINS PLUGINS Jenkins Credentials Plugin docs Jenkins Credentials Binding Plugin docs
JENKINS PIPELINES Declarative pipeline environment credentials configuration docs
Lack of Gradle knowledge slowing you down?
A broken build is easy enough to fix. But a misconfigured build is the silent time killer that costs hours every week.
Slow builds. Slow tests. Slow development.
But the official Gradle docs are confusing. Most developers never properly configure their projects—and as codebases grow, builds become bottlenecks.

This guide fixes that. It's a step-by-step walkthrough for Java developers who want to master Gradle fast.
- Unlock the mysteries of the build script.
- Speed up your workflow.
- Make development fun again.
If this is a problem you're dealing with in your own team, you can see how I approach software delivery in practice.