VPCs, subnets, and gateways - fundamentals for working with containers in AWS

Let's be honest, for most developers getting their software written and working on their own machine and maybe a test environment is the main priority.
Deploying to production? Ah, that's another team.
All the AWS network 'stuff' - VPCs, subnets, gateways? Someone else's business, right? Secondary to the contents of the holy Docker image and the beautiful code within.
This couldn't be further from the truth. The current trend is to developers owning their work all the way through from concept to production. That includes development, testing, continuous integration, deployment, monitoring, security, and support. Development is only one step of the workflow, but having knowledge of the other steps helps developers deliver business value faster.
Oh, and it's more fun too. 👍
If you're writing software to run in containers on AWS, then knowledge of the fundamentals will help you to better deploy, secure, and support your code. This article covers the AWS networking basics than underpin any software container workload that you run in AWS, whether that be in ECS or Kubernetes. Most developers don't know this stuff, so this knowledge is going to be your secret weapon for your journey into containers on AWS.
What is a VPC anyway? Your own piece of the cloud
An AWS Virtual Private Cloud (VPC) is your own private network within Amazon's cloud infrastructure. Much like if you were running your own datacentre, you can configure your VPC as you like and deploy whatever resources you want to in there.
The benefit, of course, is that:
-
you don't have to provision any hardware yourself as your VPC is created within AWS's own datacentres
-
you benefit from the scalable nature of AWS by being able to provision whatever AWS resources you need, whenever you need them. All at the click of a button. 🐭
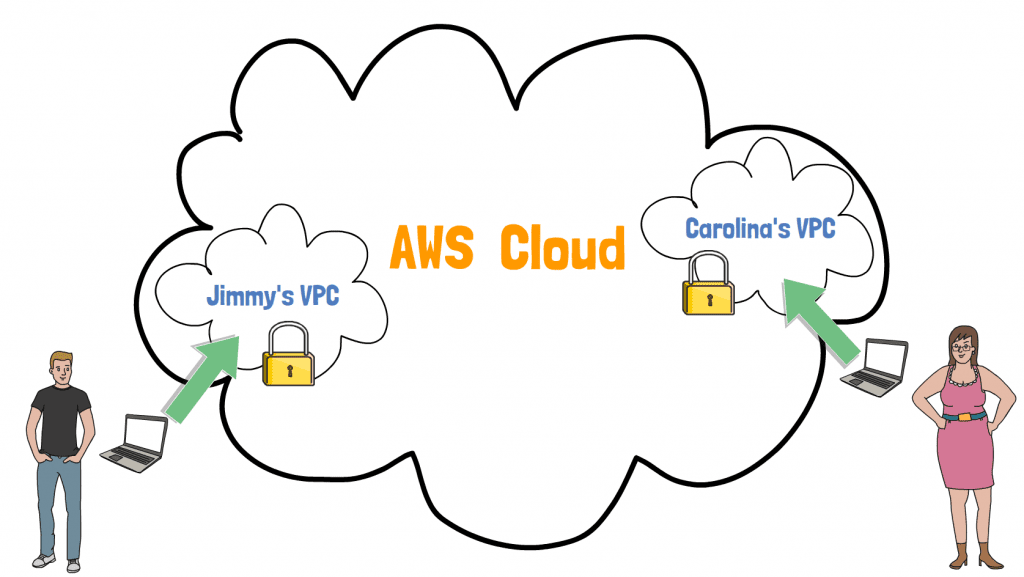
As you might know, you're not the only one using the AWS Cloud. Your VPC is one of many within AWS. Fortunately security is at the core of AWS, and there's no way anyone else can access your VPC, unless you specifically allow them to.
By sharing datacentres within many other AWS customers, you benefit from economies of scale. AWS pricing is often cheaper than what you might pay to manage your own datacentre.
VPC technical properties
When you create a VPC in AWS, it has these configurable properties:
-
Name - you can name your VPC by providing a
Nametag -
IP address range - the range of private IP addresses that can be used within your VPC. The technical name for this is a CIDR block, which is special notation for easily specifying IP address ranges e.g.
172.31.0.0/16means any of the 65,536 IPs between172.31.0.0and172.31.255.255(see this article for a full explanation of CIDR blocks).
VPCs and containers
Whenever you deploy a container into AWS, whether that be through Elastic Container Service (ECS) or Elastic Kubernetes Service (EKS), you deploy the container into a specific VPC. This means that it's part of your private network, and is addressable with its own unique private IP address. That's good, because now other services can call your container, or you can even attach it to a load balancer to be available to the internet.
Subnets: where the magic happens
Subnets are a way to slice up your VPC pie. Where a VPC specifies an IP address range, a subnet allows you to group those IPs into smaller sub-networks, or subnets. This is great, because you can then assign different behaviours to each of those subnets.
Let's zoom in on one of the VPCs from the diagram above:
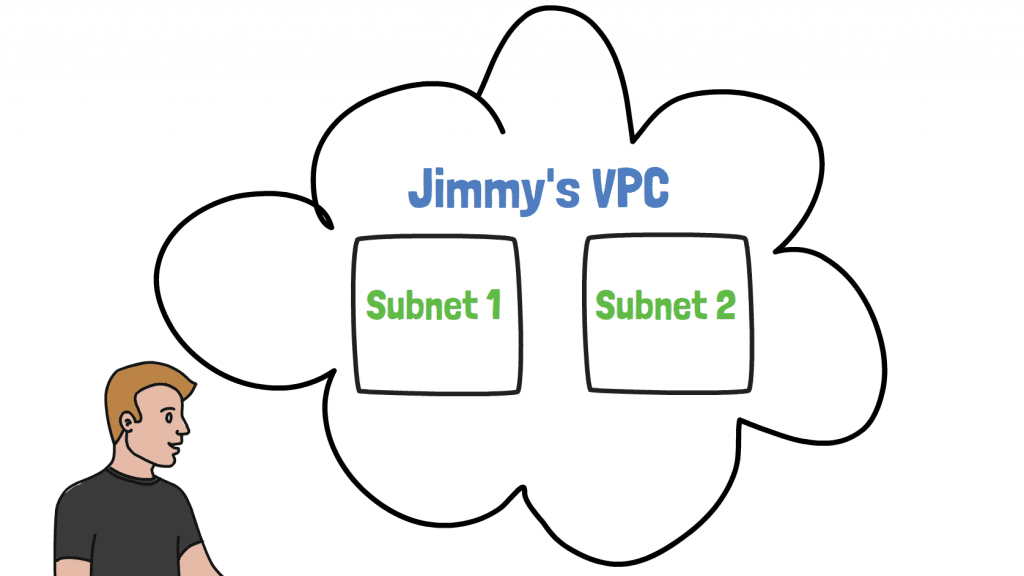
Our friend Jimmy has split his VPC into two subnets, subnet 1 and subnet 2. So what reasons might he have to do such a thing?
-
He might want to deploy services into different AWS availability zones, which are different physical datacentres. Doing this enables you to create highly available fault tolerant services. Since a subnet can only exist in a single availability zone, to deploy across multiple availability zones you need multiple subnets.
-
He might want to improve the security of one of the subnets by hiding it from the internet. This is achieved by creating a private subnet - a subnet which can't be directly accessed from the internet and which doesn't have direct access to the internet. This is perfect for deploying databases or other back-end services, as they are normally only accessed by your own internal services.
Subnets and containers
When you deploy containers into a VPC, you also need to specify the subnets they should deploy into.
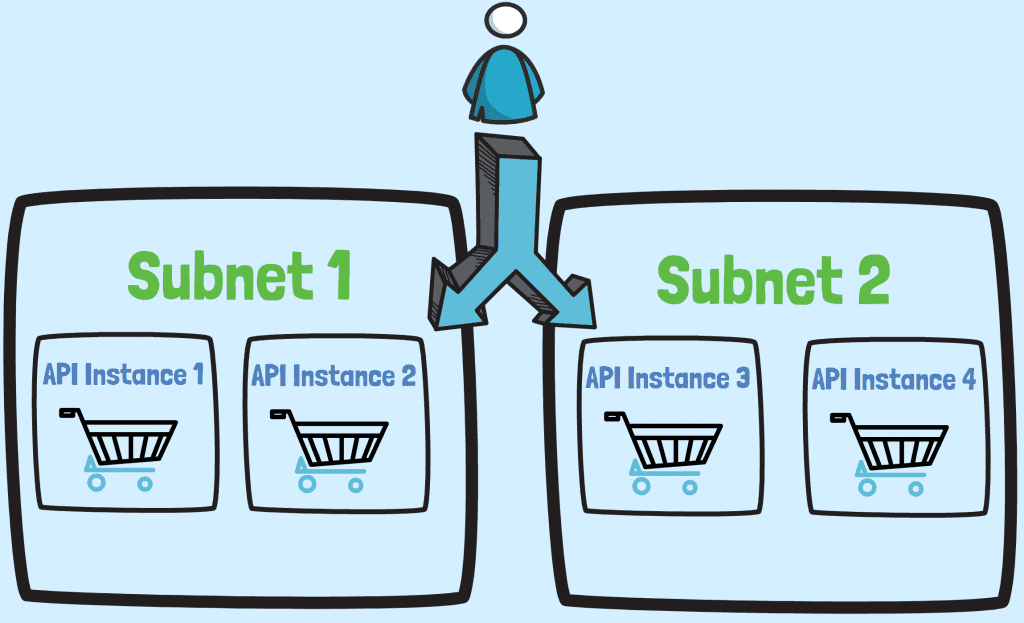
For example, imagine you're deploying an API service for an e-commerce site. 🛒 In this case you could deploy multiple instances of the service across multiple subnets in different availability zones. This gives you high availability and scalability at the same time, meaning your users always have access to the API.
Internet gateways and NAT gateways? A link to the outside world
So now you've got a VPC and subnets setup, you're in a position to deploy something, right? Almost. We could deploy a container into one of our subnets at this point, but without a few more missing pieces of the jigsaw it won't have internet access.
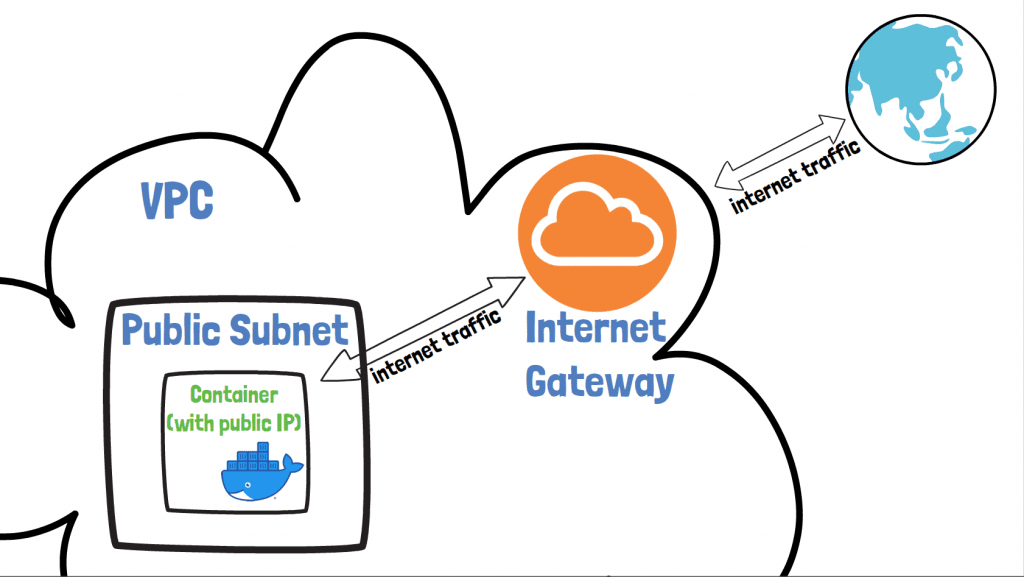
Introducing the AWS Internet Gateway. This provides access from a container to the internet, as long as the container meets two criteria:
-
it's deployed into a subnet that routes external traffic through the internet gateway (also known as a public subnet)
-
it has a public IP
With an internet gateway attached to your subnet, your containers can make requests to the internet, but also importantly be reached from the internet too.
Sometimes though, you don't want your container to be reachable from the internet. Imagine you have some service that only ever needs to be accessed internally.
Following the e-commerce example this might be an analytics service for analysing customer behaviour:
-
it still needs to make requests to the internet itself to gather market data for analytics purposes
-
you shouldn't be able to make requests to it from outside the VPC
A private subnet would be a ideal setup for this scenario, as we can make sure the service doesn't have a public IP and can't be accessed from the internet
How though, can we still provide this service with internet access?
NAT Gateways
The AWS NAT Gateway is AWS's answer to giving a container internet access without having to assign it a public IP. It's like the internet gateway for private subnets.
-
a NAT gateway is assigned a fixed public IP address
-
all traffic destined for the internet from your container passes through it
-
it translates the private IP of your container to a public IP required for internet access, hence its name of Network Address Translator (NAT) Gateway
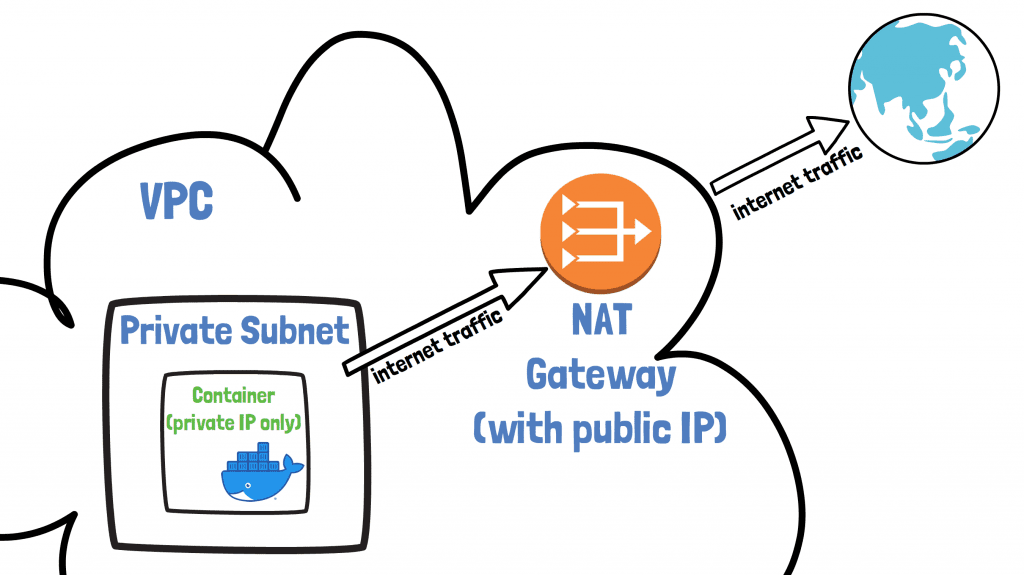
It's important to understand that the Internet Gateway and NAT Gateway are horizontally scaled and highly available AWS resources. This means you can always rely on them being there.
They're also super-easy to create too, with a few clicks in the UI or through templating (which'll we'll do later in this article).
Route tables? Rules for your network traffic
So we figured out when to use an internet gateway and when to use a NAT gateway. How though, do we actually tell our subnets to use these resources when trying to make requests out to the internet.
This is where AWS Route Tables come in. They allow you to define rules to say where network traffic from a subnet is directed. Let's talk about two types of route table rules you need to know about.
Imagine you have a container, container A, deployed into a subnet in your VPC. Let's think about two scenarios for where it needs to make requests:
-
Local traffic - if container A needs to access another container, container B, in the same VPC the target for this traffic is local to keep the traffic internal
-
External traffic - if the container needs to access an IP external to the VPC, then we can decide where this traffic should go. This could be an internet gateway or NAT gateway
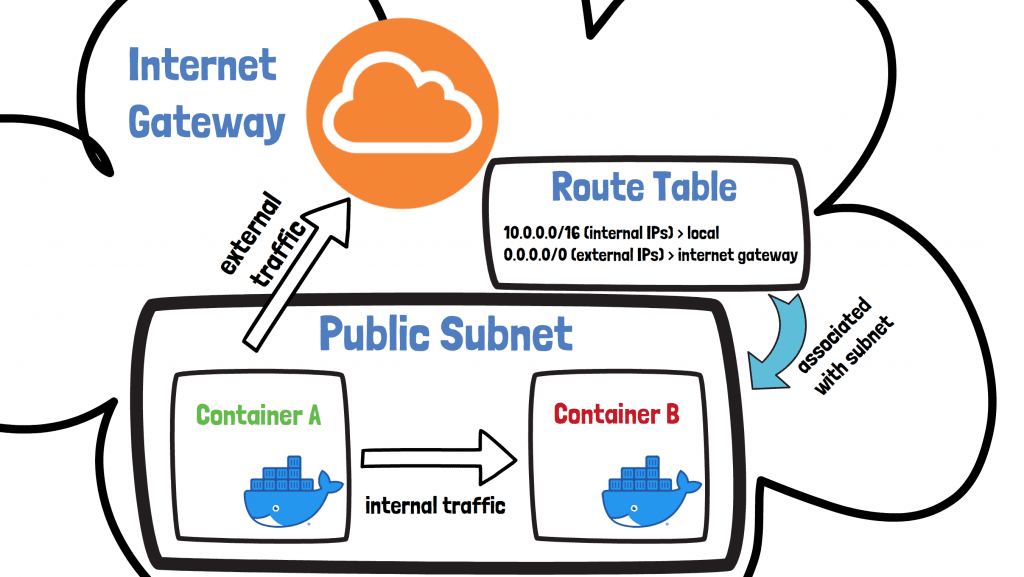
A route table is attached to a subnet, and based on its rules then traffic is able to flow in the right direction depending on its destination. In the example above we have a route table attached to a public subnet with two rules:
-
the first rule means traffic with an internal IP address destination stays within the local network
-
the second rules means traffic with an external IP address destination goes via the internet gateway
Public vs. private subnets
The topic of public and private subnets can be a source of confusion, so let's summarise.
A public subnet has a route to the internet via an internet gateway. This means that containers deployed into this subnet have internet access and can be accessed directly from the internet, as long as they're assigned a public IP address.
On the other hand, a private subnet doesn't have a route to the internet via an internet gateway. Since it's not attached to an internet gateway, containers deployed there cannot be accessed directly from the internet. Containers can be provided with internet access though by attaching a NAT Gateway to the private subnet.
Your account's default VPC
To make life easier, the nice guys over at Amazon HQ provide you with a default VPC when you open your AWS account. You get one VPC for each AWS region, as well as:
-
a public subnet in each availability zone in the region
-
an internet gateway
-
a route table with rules to send external traffic via the internet gateway
AWS regions and availability zones
In AWS a region is a separate geographical area where you might want to deploy your service. A region is split up into separate isolated physical datacentres called availability zones. Each region has at least two availability zones.
Default VPC
To see your default VPC, sign into the AWS Console and go to Services > VPC > Your VPCs. Look for the VPC with the Default VPC column set to Yes.

Importantly we can see the VPC ID and the IPv4 CIDR i.e. the IP range that it supports. In this case 172.31.0.0/16, which means any of the 65,536 IPs between 172.31.0.0 and 172.31.255.255.
Default route table
On the VPC page we can also see the ID of the VPC's Main Route table. This is the default route table that applies to any subnets that don't have any other route table specifically assigned to them. Click on the route table's ID then go to the Routes tab.

Here we can see that any traffic destined for inside the VPC has a target of local. Any external traffic has a target of our default internet gateway, allowing traffic out to the internet.
Default subnets
Finally, clicking on the Subnet Associations tab of the route table will tell us which subnets it's applied to. There are three subnets listed, which correspond to the three default subnets created by AWS. You might see more or fewer subnets depending on which region you're in.

If you wanted to, you could click through on each Subnet ID to see more details. You would see that each subnet exists in a different availability zone.

A prod-ready VPC example in CloudFormation
The default VPC is fine for basic deployments, but when deploying multiple services you'll want to think about creating public and private subnets to improve security.
Since I'm such a nice guy I've provided you a template to create such a VPC right here. 😊 It uses AWS's templating engine called CloudFormation to create the following resources:
-
a VPC
-
2 public subnets
-
an internet gateway
-
a route table with a route from the public subnets to the internet gateway
-
2 private subnets
-
a NAT gateway
-
a route table with a route from the private subnets to the NAT gateway
Bear in mind that this template is just an example of a production ready setup. Click the button below to get going.
It will launch a web page in the CloudFormation area of your AWS account.
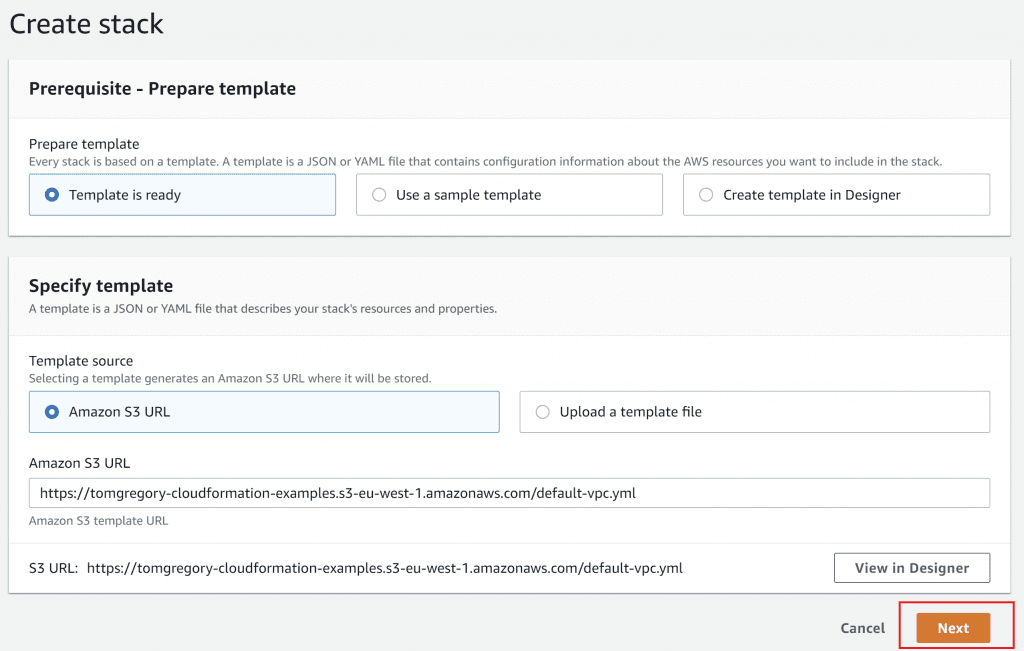
Click Next three times to accept all the default options, then on the final page click Create stack.
You'll now see a screen that shows you the progress of your VPC CloudFormation template creation. It will be in a CREATE_IN_PROGRESS state for a few minutes, then eventually will go to CREATE_COMPLETE. Awesomeness!
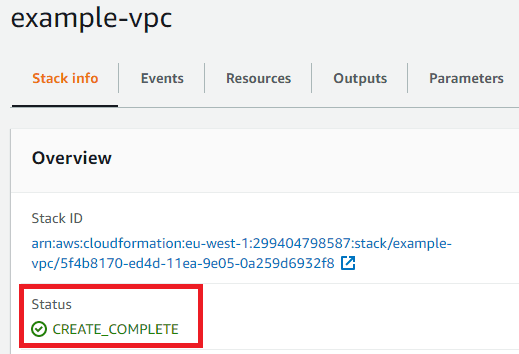
Checking out your new VPC
You can go view the VPC details in Services > VPC > Your VPCs. Look for a VPC called VPC - example-vpc and copy the VPC ID.

Then go to subnets and search for the VPC ID. You'll see the two public and two private subnets.

Click on one of the public subnets then click on the Route Table tab. You'll see a route to the internet gateway for traffic with an external destination, just like with the default subnet.
However, if you go to the details of one of the private subnets and click the Route Table tab, you'll see something different:
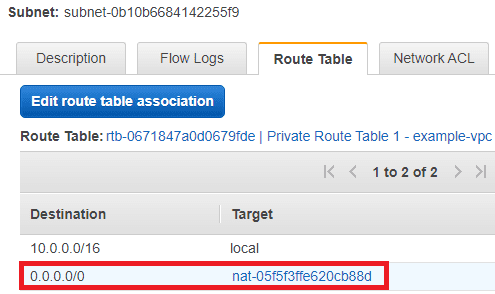
For traffic from the private subnets with an external destination, it gets routed via the NAT gateway created by this CloudFormation template. So services deployed in both the public and private subnets have access to the internet. ✅
Tear down
To delete the AWS resources created by this CloudFormation template, just go to Services > CloudFormation then select the stack named default-vpc and hit Delete. If you don't delete the stack you may incur unnecessary costs.
Final thoughts
The AWS networking basics described in this article should help you better understand how your deployed containers communicate over the network. With this knowledge you can better deploy, secure, and support your code. For a more detailed explanation of some of these topics check out the Amazon Virtual Private Cloud User Guide.
Whilst the default VPC you get when you open an AWS account is useful for getting up and running quickly, the VPC with public and private subnets we created in this article allows you to deploy services more securely. For this reason we'll be using it for several follow-up articles on other topics related to container technology in AWS.
Resources
Check out the accompanying video over on my YouTube channel.
