Gradle implementation vs. compile dependencies

Gradle version 6 supports both the implementation and compile dependency configurations. Why are they both there and which one should you use? Let's find out with the two simple rules described in this article.
Quick answer: use the implementation configuration and never compile, BUT read on for some important caveats
Ways to declare dependencies
When declaring Java dependencies in Gradle you provide a dependency configuration to which to assign your dependency. e.g.
dependencies {
    implementation 'org.springframework.boot:spring-boot-starter-web:2.2.5.RELEASE'
}
This uses the implementation dependency configuration. We can just as easily use the compile dependency configuration, at least in Gradle 6.
dependencies {
    compile 'org.springframework.boot:spring-boot-starter-web:2.2.5.RELEASE'
}
However, the docs for the Java plugin say:
compile(Deprecated) Compile time dependencies. Superseded byimplementation.
The compile dependency configuration has been removed in the recently released Gradle 7.0, and is deprecated in earlier versions. Fortunately, the implementation dependency configuration provides the same functionality as compile.
Rule One You should always use implementation rather than compile for dependencies, as compile is now deprecated or removed in the case of Gradle 7+.
Breaking the rules gives warnings
If you try to use compile in your Gradle 6 project you'll get a warning like this:
Deprecated Gradle features were used in this build, making it incompatible with Gradle 7.0. Use '--warning-mode all' to show the individual deprecation warnings.
If you run with --warning-mode all enabled you'll get a more detailed explanation:
The compile configuration has been deprecated for dependency declaration. This will fail with an error in Gradle 7.0. Please use the implementation configuration instead.
So if you want to continue using the latest version of Gradle, I suggest swapping out compile for implementation as soon as possible. 🏃
What is an implementation dependency?
Forget Gradle for a moment. When you're building and running a Java project there are two classpaths involved:
- Compile classpath - this is a list of dependencies that are required for the JDK to be able to compile Java code into .class files
- Runtime classpath - this list of dependencies is required to actually run the compiled Java code
When we're configuring Gradle dependencies all we're really doing is configuring which dependencies should appear on which classpath. Given there are only two classpaths, it makes sense that we have three options to declare our dependencies.
- compileOnly - put the dependency on the compile classpath only
- runtimeOnly - put the dependency on the runtime classpath only
- implementation - put the dependency on both classpaths

Rule Two Use the implementation dependency configuration if you need the dependency to be on both the compile and runtime classpaths. If not, consider compileOnly or runtimeOnly.
Why would you care so much about a dependency being only on a specific classpath? Well, a few benefits include:
- faster compilation if the compile classpath contains fewer dependencies
- when writing code you won't accidentally use a class that's from a dependency that should only appear on the runtime classpath
- cleaner classpaths reduce complexity
In Gradle you can inspect your classpaths using this task ./gradlew dependencies --configuration <compileClasspath | runtimeClasspath>, substituting in the configuration you want to see.
Dependency configurations for tests
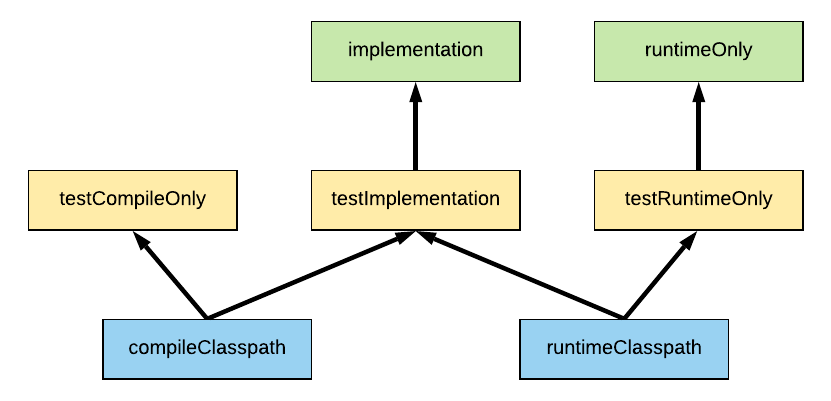
It's worth noting that it's a very similar story for test dependencies, with the Gradle Java plugin providing the testRuntimeOnly, testImplementation, and testCompileOnly dependency configurations. What dependencies you add to these configurations determines how your test compile and runtime classpaths will be created.
Of course, these test configurations also inherit from the non-test configurations, at least for implementation and runtime. After all, your test code does need to call your non-test code.

For a full understanding of dependency configurations I highly recommend Gradle Build Bible, which also explains how they relate to tasks in your project.
Writing Java libraries has an extra twist
If you're writing a library that another Gradle project is going to consume, then you'll probably want to use the Java Library Plugin. This plugin adds an additional api configuration, on top of the already mentioned implementation configuration.
For any Gradle projects consuming a project built using the Java Library Plugin, the following applies:
- any api dependencies declared in the consumed library will appear on the compile and runtime classpaths of the consumer library
- any implementation dependencies in the consumed library will appear on only the runtime classpath of the consumer library
If this sounds a bit cryptic, you can check out all the details in the article How to use Gradle api vs. implementation dependencies with the Java Library plugin.
Quick summary on implementation and compile dependencies
There's just one main point to remember when it comes to figuring out whether to use implementation vs. compile dependencies.
Rule 1: you should always use implementation rather than compile for dependencies, as compile is now deprecated or removed in Gradle 7+.
Also bear in mind:
Rule two: use the implementation dependency configuration if you need the dependency to be on both the compile and runtime classpaths. If not, consider compileOnly or runtimeOnly.
Hopefully this makes sense now. Be sure to check out the Gradle Java Plugin documentation on this subject.
Watch this video demonstrating the ideas from this article.
Lack of Gradle knowledge slowing you down?
A broken build is easy enough to fix. But a misconfigured build is the silent time killer that costs hours every week.
Slow builds. Slow tests. Slow development.
But the official Gradle docs are confusing. Most developers never properly configure their projects—and as codebases grow, builds become bottlenecks.

This guide fixes that. It's a step-by-step walkthrough for Java developers who want to master Gradle fast.
- Unlock the mysteries of the build script.
- Speed up your workflow.
- Make development fun again.
If this is a problem you're dealing with in your own team, you can see how I approach software delivery in practice.