Gradle Build Command

Running the Gradle build command builds your Gradle project, including assembling your application and running tests. Discover all the ways to run the Gradle build command, how it works, as well as why it might sometimes be best not to run it.
How to run the Gradle build command
Simply put, to build your application run the following command at your Windows command prompt.
gradlew buildOr if you're working in a Linux/Mac environment, it's this.
./gradlew buildWhat we're actually doing here is running the Gradle wrapper script and passing it a task name of build.
A Gradle task is an action that can be executed in your build to achieve some outcome. In the case of Java projects, applying the Java plugin automatically adds the build task which assembles and tests your application.
If your project doesn't have a wrapper script, I recommend adding one immediately by following this Gradle wrapper guide. Alternatively, you can run this command.
gradle buildThis relies on you having a Gradle distribution installed locally, and it being a version compatible with your Gradle project and build script.
Build command output
When you run the build command you'll see output like this.
$ ./gradlew build

BUILD SUCCESSFUL in 1s
4 actionable tasks: 4 up-to-date
This means that your application was assembled and any tests passed successfully.
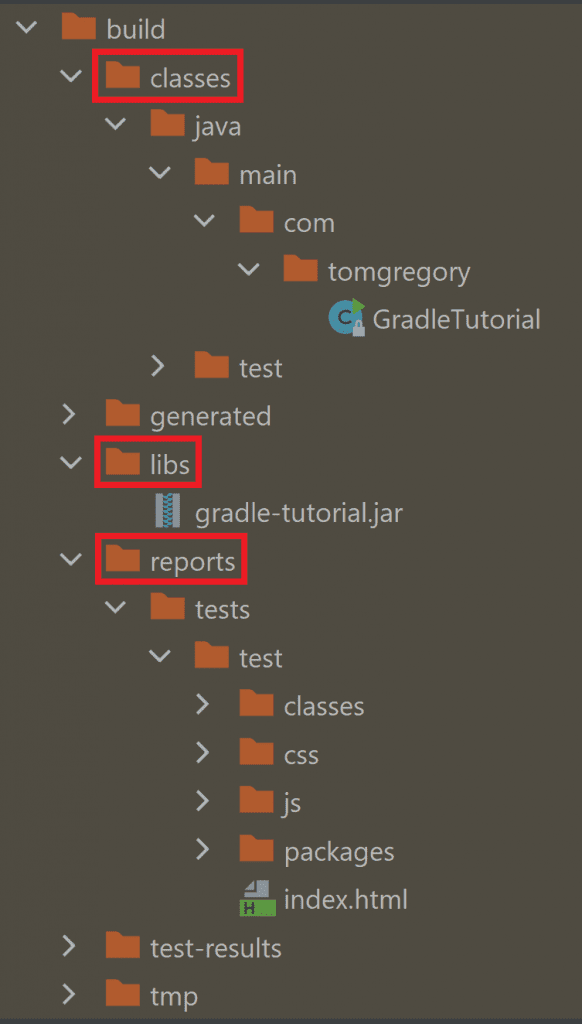
Gradle creates a build directory, in which it adds these useful outputs.
- classes directory: contains compiled .class files, as a result of running the Java compiler against your application Java source files.
- libs directory: contains a generated jar file, an archive with all your compiled classes inside ready to be executed or published.
- reports directory: contains an HTML report summarising your test results. If your build fails, then consult this report to see what went wrong.
Build command failure
If the build command fails, then the output looks like this.
$ ./gradlew build

> Task :test FAILED

com.tomgregory.GradleTutorialTest > verifyNoExceptionThrown FAILED
    java.lang.RuntimeException at GradleTutorialTest.java:9

1 test completed, 1 failed

FAILURE: Build failed with an exception.

* What went wrong:
Execution failed for task ':test'.
> There were failing tests. See the report at: file:///C:/workspace/gradle-tutorial/build/reports/tests/test/index.html

* Try:
Run with --stacktrace option to get the stack trace. Run with --info or --debug option to get more log output. Run with --scan to get full insights.

* Get more help at https://help.gradle.org

BUILD FAILED in 2s
4 actionable tasks: 1 executed, 3 up-to-date
Whatever caused the failure will be shown in the output. In this case it's a failing test case, so consulting the test report at build/reports/tests/test/index.html would be the next logical step.
How the Gradle build command works
As mentioned earlier, running the build command is more accurately described as running the Gradle wrapper with the build task. When you do this, Gradle reads your build configuration and creates an in memory model of all the tasks that make up your project.
If you've applied the Java plugin, Gradle sees that executing the build task actually consists of running several other dependent tasks. These dependent tasks may also depend on other tasks, creating the following task graph.
:build
+--- :assemble
|    `--- :jar
|         `--- :classes
|              +--- :compileJava
|              `--- :processResources
`--- :check
     `--- :test
          +--- :classes
          |    +--- :compileJava
          |    `--- :processResources
          `--- :testClasses
               +--- :compileTestJava
               |    `--- :classes
               |         +--- :compileJava
               |         `--- :processResources
               `--- :processTestResources
Remembering every detail of the task graph isn't important, but notice that running the build task also runs the assemble and check tasks, and so on. In fact, build is the top level task which runs all other Java-related tasks.
When not to use the Gradle build command
Given the above task tree, it may not always make sense to run the build task. Using the specific dependent task may provide faster results depending on your workflow.
- If you made a non-test code change and just need to recompile classes and build the jar file, then run the assemble task. This avoids running tests, potentially saving time.
- If you just need to compile without building the jar file, then run the classes task.
Of course, any savings made will depend on your specific project, but it's a good idea to be aware that these options exist.
You can see more details about these tasks, including their description, by running the tasks task (./gradlew tasks) and looking under Build tasks and Verification tasks.
Build tasks
-----------
assemble - Assembles the outputs of this project.
build - Assembles and tests this project.
buildDependents - Assembles and tests this project and all projects that depend on it.
buildNeeded - Assembles and tests this project and all projects it depends on.
classes - Assembles main classes.
clean - Deletes the build directory.
jar - Assembles a jar archive containing the main classes.
testClasses - Assembles test classes.
...
Verification tasks
------------------
check - Runs all checks.
test - Runs the unit tests.
Final thoughts
You now know that running the Gradle build command is equivalent to running the build task, which you do in Windows with gradlew build and on Linux/Mac with ./gradlew build. The build task depends on other tasks, and in some situations it may make sense to run a more specific task.
To learn more about these fundamental Gradle concepts, check out my free Gradle Quick-Start Guide: the fastest way to a working knowledge of Gradle
Lack of Gradle knowledge slowing you down?
A broken build is easy enough to fix. But a misconfigured build is the silent time killer that costs hours every week.
Slow builds. Slow tests. Slow development.
But the official Gradle docs are confusing. Most developers never properly configure their projects—and as codebases grow, builds become bottlenecks.

This guide fixes that. It's a step-by-step walkthrough for Java developers who want to master Gradle fast.
- Unlock the mysteries of the build script.
- Speed up your workflow.
- Make development fun again.