Integrating AWS CodeBuild into Jenkins pipelines

Whilst Jenkins is the feature rich old-timer of the CI world with over 1,500 plugins, some tasks are just better suited to other tools. In this article you'll discover why you'd want to integrate AWS CodeBuild with Jenkins, and how to do it with full working examples. Let's get right into it!
Why Jenkins with CodeBuild?
In case you didn't know already, CodeBuild is a serverless build tool from AWS. It's good for building, testing, and packing your application. With CodeBuild, you don't have to manage any servers, and the service automatically scales to handle whatever builds you throw at it. Even better, you only get charged during the times you actually run builds. The price depends on how beefy your build needs to be, but here are some examples.
| Memory (GB) | CPU (cores) | Price / minute |
|---|---|---|
| 3 | 2 | $0.005 |
| 7 | 4 | $0.01 |
| 16 | 8 | $0.015 |
From AWS CodeBuild Pricing.
Conversely, the Jenkins master runs all the time, whether you're using it or not. You can scale Jenkins builds by running them on short-lived so-called slave agents.
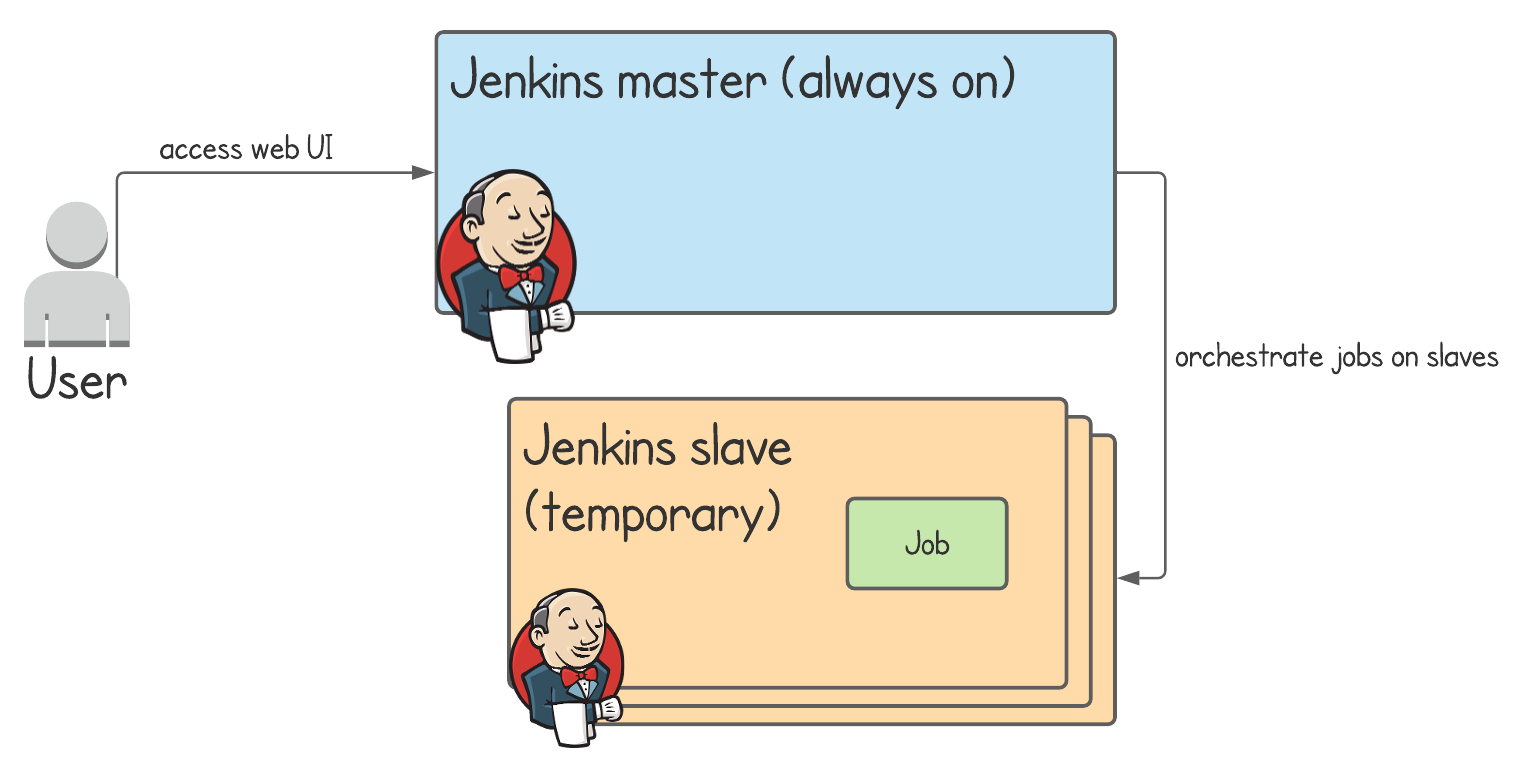
For the purposes of this article, let's assume you're deeply embedded with Jenkins. You have many projects being built with many Jenkins pipelines, and you have no desire to migrate them all to another CI service. What benefits could you get from a service like AWS CodeBuild?
1) Native Docker support
When you configure a project in AWS CodeBuild, giving it access to the Docker daemon to build Docker images is a simple configuration option.
"Privileged: (Optional) Select Privileged only if you plan to use this build project to build Docker images"
In Jenkins it's a bit more complicated.
If you're running slave agents, then you'll have to mount /var/run/docker.sock from the host to the container, in order for it to be able to interact with the Docker daemon.
That's not always easy.
In fact, sometimes it's impossible if you're using a managed container service where you don't have access to the host (such as with AWS Fargate).
2) Tighter AWS integration
Depending on whether you're all in or not with AWS, you might see this as a good or a bad thing. If you're already interacting with AWS though, it's likely you're jumping through a few hoops to get that working properly with Jenkins. CodeBuild can help you out here, with features like:
- injecting values from AWS Secrets Manager or Parameter Store directly into your build script
- building from source code stored in an S3 bucket or AWS CodeCommit
- deploying build artifacts to an S3 bucket
If you've already got everything setup in Jenkins but you like the sound of CodeBuild, then thankfully it's possible to run CodeBuild builds from a Jenkins pipeline. There are many inventive ways you could make use of this. Here's a basic example which would do some pre-processing in Jenkins, build the application and Docker image in CodeBuild, then do some post-processing again in Jenkins.

How can we run CodeBuild from Jenkins?
AWS CodeBuild has released an official Jenkins plugin to do most of the heavy lifting for us. It handles:
- configuration of a CodeBuild step in a Jenkins pipeline stage or freestyle job
- authentication with AWS
- starting a CodeBuild project in AWS
- outputting the CodeBuild project's build log onto the Jenkins console
- integrating the CodeBuild project's build details into a CodeBuild dashboard within Jenkins (see image below)

The Jenkins CodeBuild dashboard
Once you've installed the CodeBuild Jenkins plugin there are two places you can configure the CodeBuild integration.
Pipeline job
When you define your Jenkins pipeline, you've got a new step type to make use of.
awsCodeBuild projectName: 'project', credentialsType: 'keys', region: 'eu-west-1', sourceControlType: 'jenkins'There are quite a few different options here which we'll cover later. For full configuration details, on the configure pipeline page click Pipeline Syntax, select the AWS CodeBuild step, then you'll be able to generate a code snippet as well as see tooltips about each parameter.

Freestyle Job
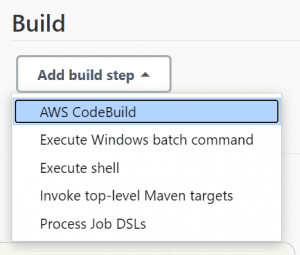
When you create a freestyle job, under Build > Add build step you've got a new option for AWS CodeBuild. We won't specifically be covering this option in this article, but the configuration of the freestyle job build step is exactly the same as the pipeline job step.
Full working example
Let's get into a step-by-step example to demonstrate all this working together. You'll be able to try this example yourself, and by the end use the techniques you've learnt in your own project.
So, what will we be doing?
- Setup 2 CodeBuild projects in AWS - one to demonstrate building code stored in GitHub, and the other for code stored in S3 (uploaded by Jenkins)
- Setup an IAM role for CodeBuild - CodeBuild will need to be able to write logs, read from S3, and get secrets from AWS Secrets Manager where we'll be storing DockerHub credentials
- Run Jenkins locally in Docker - we'll run Jenkins, configuring it automatically with
- AWS credentials for authenticated access to CodeBuild
- 2 pipeline jobs for the 2 CodeBuild projects
- Run the jobs - if all goes well the jobs will succeed and we'll be able to see the CodeBuild output directly in Jenkins
By the end, we'll have 2 Jenkins pipeline jobs which trigger 2 different CodeBuild projects.
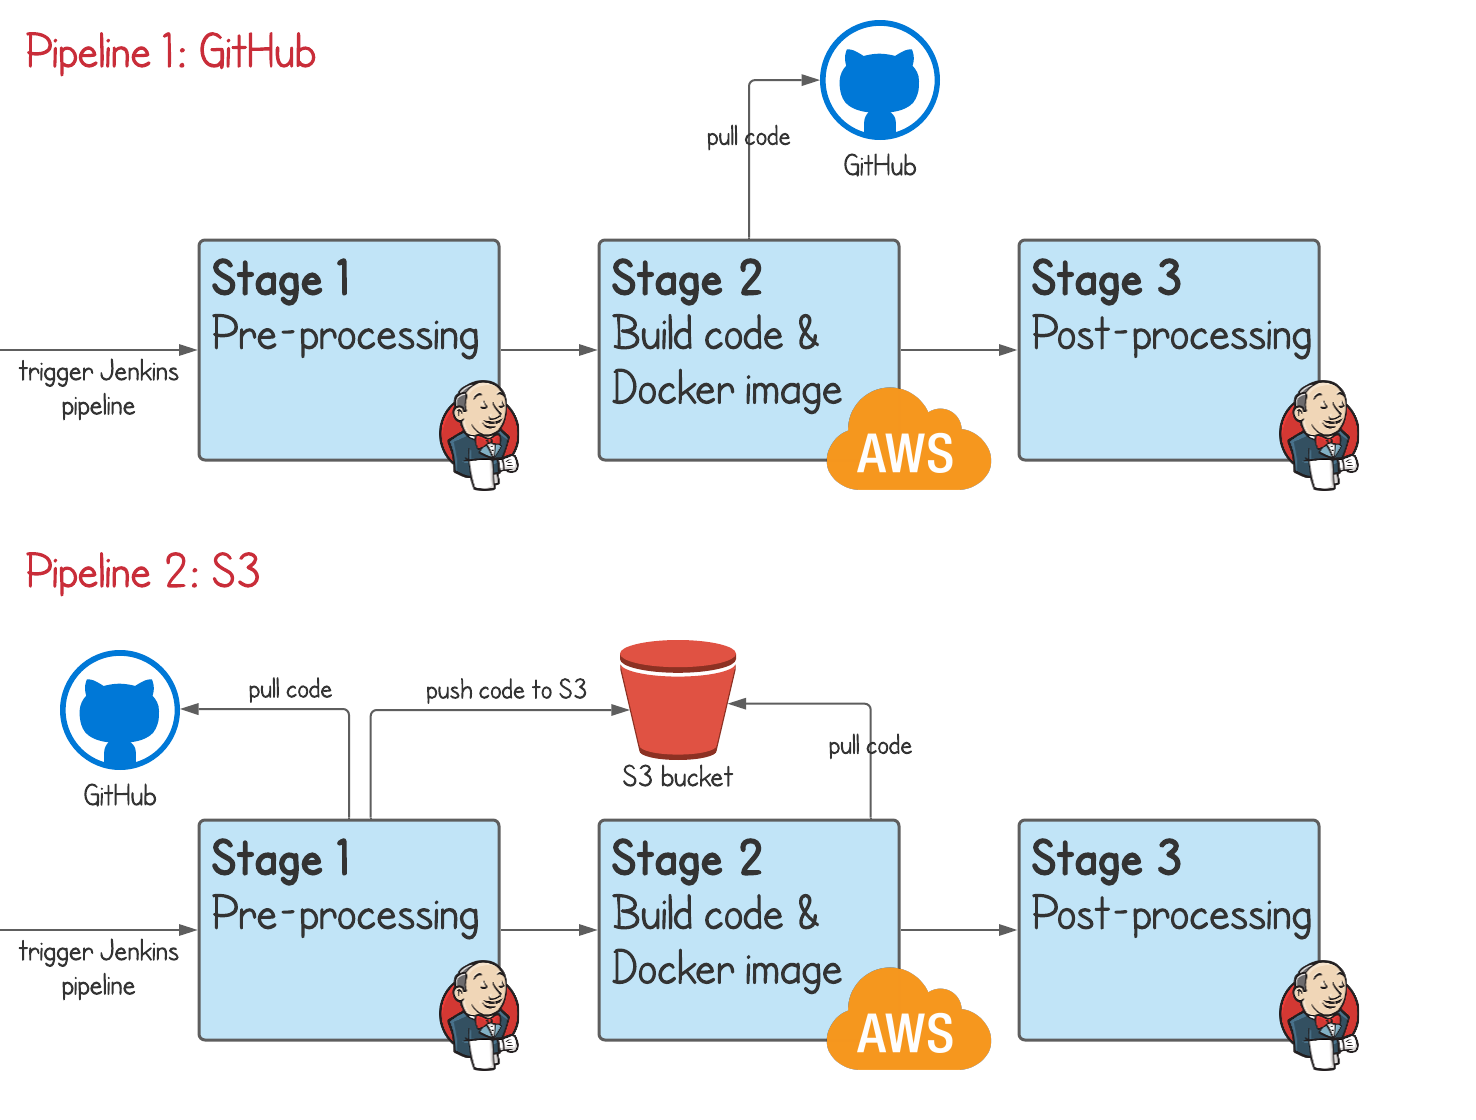
Pipeline 1 is a 3 stage pipeline, demonstrating a simple GitHub use case:
- the 1st stage is a dummy stage just to show that you can do some pre-processing
- the 2nd stage will run a CodeBuild project. CodeBuild will pull a simple Java application from GitHub, build it, test it, and create a Docker image.
- Jenkins will resume again at the 3rd stage, which is also a dummy stage just to show you can do some post-processing
Pipeline 2 is a 3 stage pipeline, demonstrating a slightly more complex S3 use case:
- again, the 1st stage is a dummy stage to show pre-processing
- the 2nd stage will run a CodeBuild project. This time, the Jenkins CodeBuild plugin will first upload all local source code to S3. The CodeBuild project will then pull it directly from S3 rather than GitHub, build it, test it, and create a Docker image.
- again, Jenkins will resume at the 3rd stage, a dummy stage to show post-processing
Creating the CodeBuild project
Log into the AWS Console, make sure you've selected the eu-west-1 (Ireland) region, then go to the CodeBuild dashboard.
Create the project
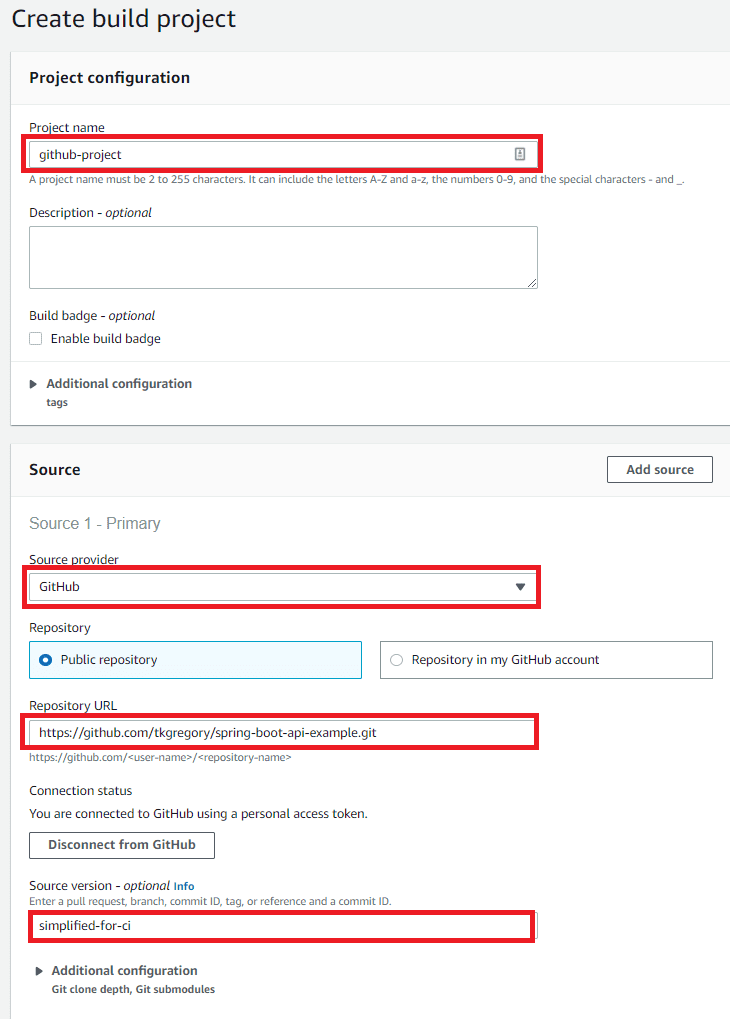
Let's create the first project, which will pull code from GitHub. Click Create build project which takes you to the Create build project page.
Under Project configuration, set a Project name of github-project.
Under Source, we'll setup this project to pull from a branch of a simple Java application I've made available specifically for this article. Choose a Source provider of GitHub, a Repository URL of https://gthub.com/jenkins-hero/spring-boot-api-example.git, and a Source version of simplified-for-ci.
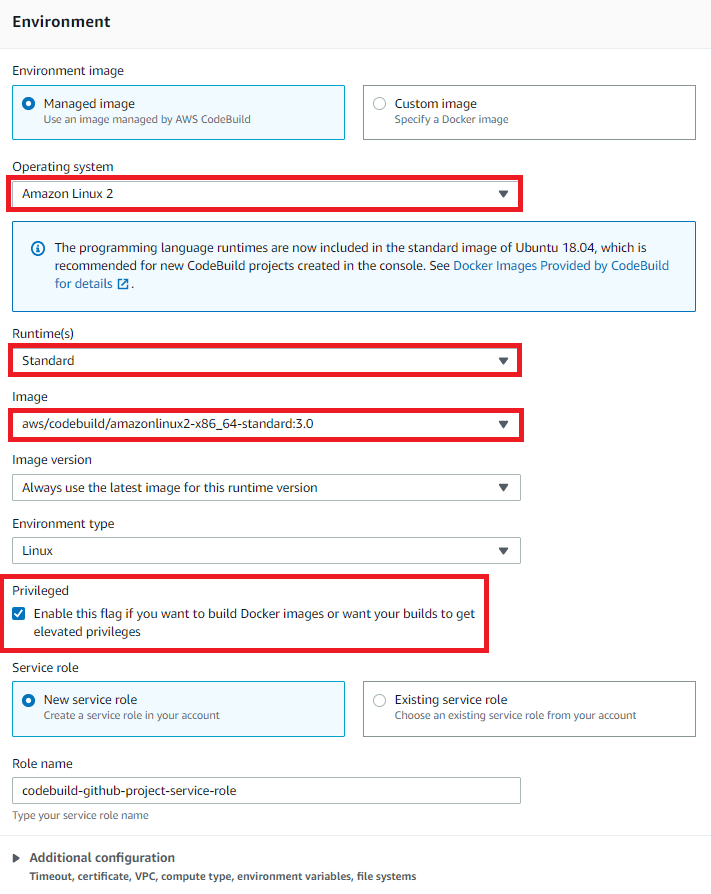
Environment is where we'll configure the environment in which the build runs. For Operating system, choose Amazon Linux 2 which comes with Java pre-installed. Under Runtime, choose Standard, then for Image choose aws/codebuild/amazonlinux2-x86_64-standard:3.0.
Importantly, we must tick the Privileged checkbox to allow building Docker images. Under Service role, leave the defaults which AWS will use to create an IAM role with the required permissions. Under Additional configuration you can set details like the memory & CPU to give to your build. We'll leave everything as default for now, which uses the smallest compute configuration of 3 GB & 2 CPUs.
The final thing we need to setup is the Buildspec, which is a bit like the Jenkins Jenkinsfile which tells your build what to actually do. Under Buildspec select Insert build commands then Switch to editor, which allows us to define a YAML buildspec inline.
Delete the default buildspec and paste in the following text:
version: 0.2
env:
  secrets-manager:
    dockerHubUsername: dockerhub-login:username
    dockerHubPassword: dockerhub-login:password
phases:
  build:
    commands:
      - 'docker login -u $dockerHubUsername -p $dockerHubPassword'
      - './gradlew build docker --info'
So what's going on here?
- under env we're creating 2 environment variables with values pulled from AWS Secrets Manager. This is for the DockerHub credentials we'll need to use to pull Docker images during the build. We'll create the actual secret shortly.
- under commands we're doing two things
- we log into DockerHub. This is required these days as they apply rate limiting on the number of Docker image pulls you can do. DockerHub credentials are taken from environment variables.
- we run a Gradle build, which builds the application, tests it, and creates a Docker image
Now, at the bottom of the page click Create build project.
Create a Docker Hub secret
We referenced a secret in the buildspec, so let's go create that. If you don't already have an account with DockerHub, head over to sign up. Make sure you've generated an access token from the DockerHub Account Settings > Security page.
Go to the Secrets Manager dashboard, and click Store a new secret.
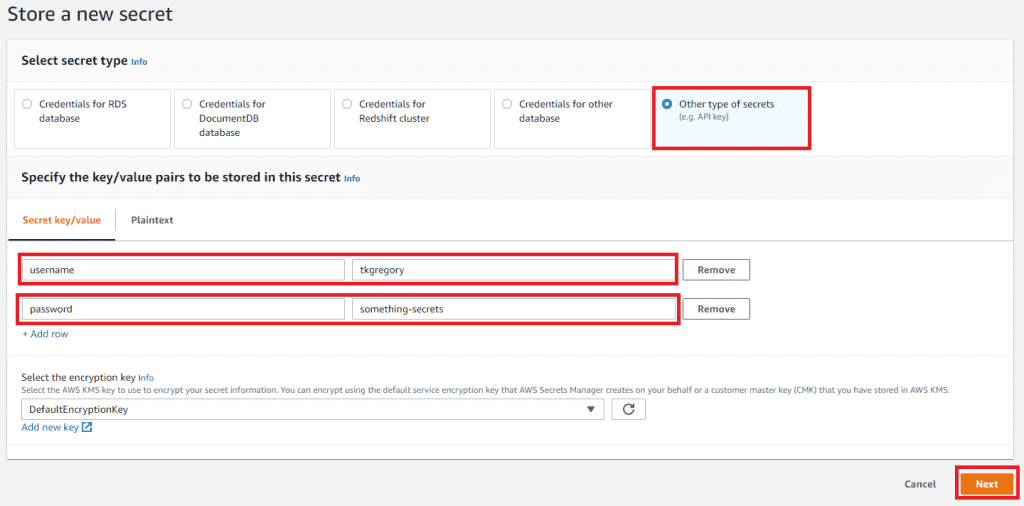
Select Other type of secrets. Under Secret key/value, we'll add the following entries.
- Key: username, Value: <insert your DockerHub username>
- Key: password, Value: <insert your DockerHub access token>
Click Next.
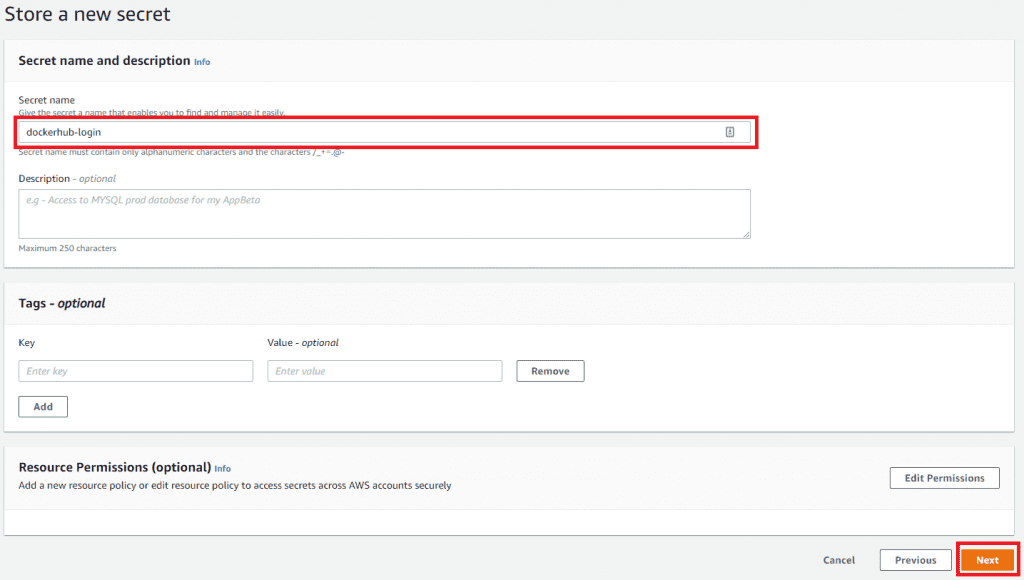
On the next page give a Secret name of dockerhub-login, and click Next.
Click Next twice more, accepting all the defaults, then click Store.
Update the CodeBuild IAM role
Finally, we need to quickly tweak the IAM role created by CodeBuild so it can pull the secret we just created.
Go to the IAM dashboard, click Roles on the left, and search for a role called codebuild-github-project-service-role. Click on the role name, then click Add inline policy on the right hand side.
Click on the JSON tab, then paste in this policy.
{
  "Version": "2012-10-17",
  "Statement": [
    {
      "Sid": "VisualEditor0",
      "Effect": "Allow",
      "Action": "secretsmanager:GetSecretValue",
      "Resource": "*"
    }
  ]
}
This provides read only access to all secrets. In a production setup, you should limit this to only the specific secrets required by CodeBuild.
Click Review policy, give it a name of SecretsManagerAccess, then click Create policy.
Test out the CodeBuild project (from AWS Console)
That's everything we need to do to setup the GitHub CodeBuild project, so let's give it a whirl. Back in the CodeBuild dashboard, select the github-project you just created, then click Start build.
It will take some time for AWS to provision resources for your build (~25 seconds), then you'll start to see some log output. The build takes roughly 2 minutes, and at the end you should see this success message.

Awesome! If you look through the rest of the log output you'll see code being built, tests running, and a Docker image being created. ✅
Now we just need to hook this up to Jenkins.
Getting up and running with Jenkins
The GitHub project jenkins-with-codebuild will build and run a pre-configured local Jenkins instance in Docker, with everything you need to get up and running, including:
- the AWS CodeBuild plugin
- 3 other plugins: Git, Job DSL, and Pipeline, which we'll use to setup and run the pipelines
- 2 auto-provisioned pipeline jobs (we'll step through these shortly)
- configuration to present your local AWS credentials to the Jenkins container via a Docker volume mount. You'll need to be an admin user or have permissions to start CodeBuild builds, as detailed in this documentation.
Clone the project, then run:
./gradlew docker dockerRunAnd you'll have a Jenkins instance running at http://localhost:8080.
On the Jenkins home page, run the job called seed-job, which will generate you another job called AWS CodeBuild example using GitHub.
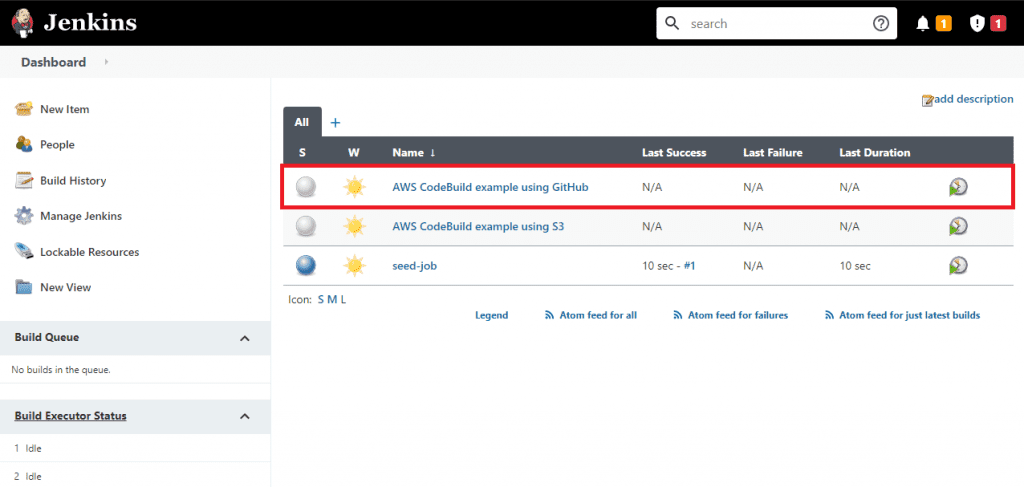
This is a pipeline job, whose pipeline is actually specified within this Jenkinsfile in the tkgregory/spring-boot-api-example repository we setup earlier in our CodeBuild build.
It looks like this:
pipeline {
    agent any
    stages {
        stage('Stage before') {
            steps {
                echo 'Do something before'
            }
        }
        stage('Build on AWS CodeBuild') {
            steps {
                awsCodeBuild credentialsType: 'keys', projectName: 'github-project', region: 'eu-west-1', sourceControlType: 'project'
            }
        }
        stage('Stage after') {
            steps {
                echo 'Do something after'
            }
        }
    }
}
This is a simple pipeline, which as mentioned earlier consists of 3 stages.
The first and third stage just print a message, but it's in the second stage where the CodeBuild project is triggered.
We use the awsCodeBuild step provided by the CodeBuild Jenkins plugin, and pass these configurations:
credentialsTypeof keys means that we're not using Jenkins credentials to authenticate with AWS, but will instead rely on the DefaultAWSCredentialsProviderChain. That's just a fancy way of saying that the plugin will look in several locations for AWS credentials, including the.awsdirectory we've mounted inside this container.projectNameof github-project references the name of the CodeBuild project we created earlierregionof eu-west-1 is the region in which the CodeBuid project was createdsourceControlTypeof project means that the source as defined by the CodeBuild project itself will be used. In our case, that will be the GitHub repository we configured earlier.
Jenkins & CodeBuild integration in action
Time for the fun part, Run the Jenkins job and let's see this CodeBuild integration in action!
Once the job starts, check the Console Output to see what's happening. Once the first stage completes (printing "Do something before"), the second stage will start, triggering your CodeBuild project. When this happens, you'll be given a link to the CodeBuild and CloudWatch dashboards.

You don't necessarily need to follow these links, since the CodeBuild build log will be output to the Jenkins console anyway. Eventually, the CodeBuild build should complete with a success message. Then the Jenkins pipeline will resume with the third stage, printing "Do something after", before finishing with a SUCCESS status
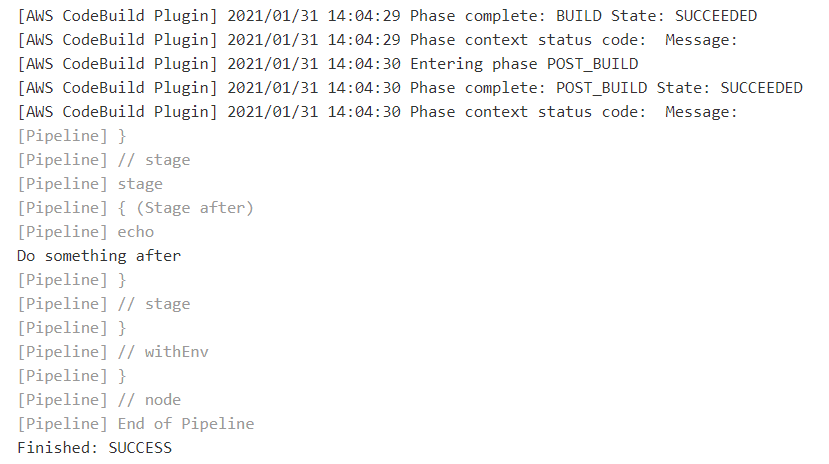
Great work! You've just integrated Jenkins with AWS CodeBuild. 👍
Extending with an S3 CodeBuild project
Let's try some more functionality of the Jenkins & CodeBuild integration and setup an S3 bucket to transfer sources from Jenkins to CodeBuild.
S3 bucket
In AWS, still within the eu-west-1 (Ireland) region, go to the S3 dashboard. Click Create bucket and provide a Bucket name of codebuild-code or similar. Scroll down, and under Bucket Versioning select Enable. This is required in order for the CodeBuild plugin to use this S3 bucket.
Leave all other settings as the defaults, then click Create bucket.
CodeBuild project
Now we'll create another CodeBuild project. Most of the steps remain the same as in the earlier section Creating the CodeBuild project, so follow those steps making these changes:
- name the project s3-project
- under Source
- choose the Source provider of Amazon S3
- for the Bucket use the name of the S3 bucket you just created
- for S3 object key or S3 folder enter sources.zip. This is the file CodeBuild expects to find the sources in.
- under Environment > Service role, pick Existing service role and choose the IAM role that was created when the previous CodeBuild project was setup (codebuild-github-project-service-role)
- for the buildspec enter the following, which is the same as the previous buildspec, but it includes a
chmodcommand. This is required as the gradlew file loses it's execute permission when uploaded to S3.
version: 0.2
env:
  secrets-manager:
    dockerHubUsername: dockerhub-login:username
    dockerHubPassword: dockerhub-login:password
phases:
  build:
    commands:
      - 'docker login -u $dockerHubUsername -p $dockerHubPassword'
      - 'chmod +x gradlew'
      - './gradlew build docker --info'
Click Create build project, but you won't be able to run it successfully until we've run the pipeline on the Jenkins side, which puts the code in S3.
Jenkins pipeline job
If you followed the earlier steps under Getting up and running with Jenkins you may have noticed another job that was created, called AWS CodeBuild example using S3. This pipeline project is setup with its own Jenkinsfile, which looks like this:
pipeline {
    agent any
    stages {
        stage('Stage before') {
            steps {
                echo 'Do something before'
            }
        }
        stage('Build on AWS CodeBuild') {
            steps {
                awsCodeBuild credentialsType: 'keys', projectName: 's3-project', region: 'eu-west-1', sourceControlType: 'jenkins'
            }
        }
        stage('Stage after') {
            steps {
                echo 'Do something after'
            }
        }
    }
}
The only difference here compared with the previous Jenkinsfile is in the awsCodeBuild step:
- the
projectNameis s3-project, to reflect the new CodeBuild project you just created. - the
sourceControlTypeis jenkins. This means Jenkins will upload the source code into the S3 bucket specified by the CodeBuild project. CodeBuild will then use this code to do its build.
There's nothing else to do here, so let's run this pipeline! Once again, you should get a successful build, with all the CodeBuild output shown in Jenkins Console Output.

Notice on the left-hand side there's a link to go the CodeBuild dashboard within Jenkins. Clicking this gives lots of information about your CodeBuild build, without going into the AWS Console itself.
For example, you can see the Source Location that your CodeBuild build used.
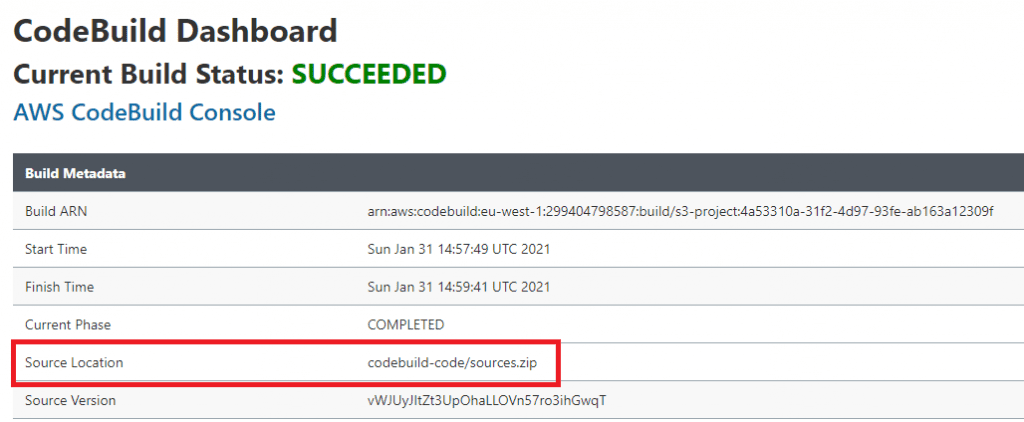
If you're interested, you can navigate to your S3 bucket and you'll see the sources.zip file there. Note that since the S3 bucket is versioned, if you run the Jenkins pipeline again, the zip file from the previous build will be retained.
You can see these versions if you click on the sources.zip S3 object and select Versions.

Given our setup, the CodeBuild project will always use the latest version of the S3 object.
Final thoughts
Before we finish off, please remember to delete the AWS resources and CloudFormation templates which were created during this example. You'll have to empty the S3 bucket before doing this.
Everything you've seen here you can translate to your own project, bearing in mind to:
- use the principle of least-privilege to provide Jenkins only those permissions required to run a CodeBuild build (see docs for what permissions are needed)
- be specific about what types of workloads you want to offload to AWS CodeBuild. If you've decided to stick with Jenkins as your main CI tool, choose some use cases which might benefit from running within CodeBuild and test them out.
If you want to see a side-by-side comparison of Jenkins and CodeBuild, including performance and pricing, check out the article Jenkins vs. AWS CodeBuild for building Docker applications.
Resources
AWS CloudFormation setup
You can follow the steps in this article to setup the CloudFormation resources using the AWS Console, or use the one-click CloudFormation stack deployment.
You can also just download the CloudFormation template itself, if you want to see exactly what it does.
GitHub projects
- the jenkins-with-codebuild project starts a Jenkins instance with everything you need for the examples, all auto-provisioned
- the spring-boot-api-example project (simplified-for-ci branch) is what is built in the examples. Note the Jenkinsfile-codebuild-github and Jenkinsfile-codebuild-s3 pipeline definitions for the 2 different examples.
Read the docs
- the Jenkins plugin site has some documentation on this feature
- perhaps more useful is the documentation within the Jenkins Snippet Generator.
On the configure pipeline page, click the Pipeline Syntax link.
Select the
awsCodeBuildstep, and you can see all the options, with tooltips provided.

If this is a problem you're dealing with in your own team, you can see how I approach software delivery in practice.
