Have you heard of Gradle, but you’re not really sure what it is, why you should use it, and how to get started? This tutorial answers all of these questions and helps you take your first steps with this powerful build tool.
In this Gradle tutorial you’ll learn:
-
why we need help from build tools to build Java applications
-
why Gradle is a great choice for building Java applications (better than Maven or custom scripts)
-
how to create your first Gradle Java project, understanding the fundamentals of projects, build scripts, tasks, and plugins
Gradle gets more usage year-by-year as developers realise the productivity benefits. Benefits that you too will be able to take advantage of in your own project. So let’s get right into it!
1. Who this tutorial is for?
If you’ve never used Gradle before you’re in the right place. This is a tutorial for complete beginners after all. If you have used Gradle, but are feeling confused and want to understand the basics, this is for you too.
Ideally, you should have some Java knowledge as this tutorial is focussed on building Java applications.
2. Why do we need build tools?
First up, lets get right back to basics to understand why we need build tools, also known as build automation tools, anyway.
Let’s consider a simple Java application and what needs to be done to transform it from just being some source code in a repository, to being an application ready to be executed.
Here’s the code for the application. Yes, it may well be the same as the first Java application you ever wrote, listed on a thousand tutorial websites.
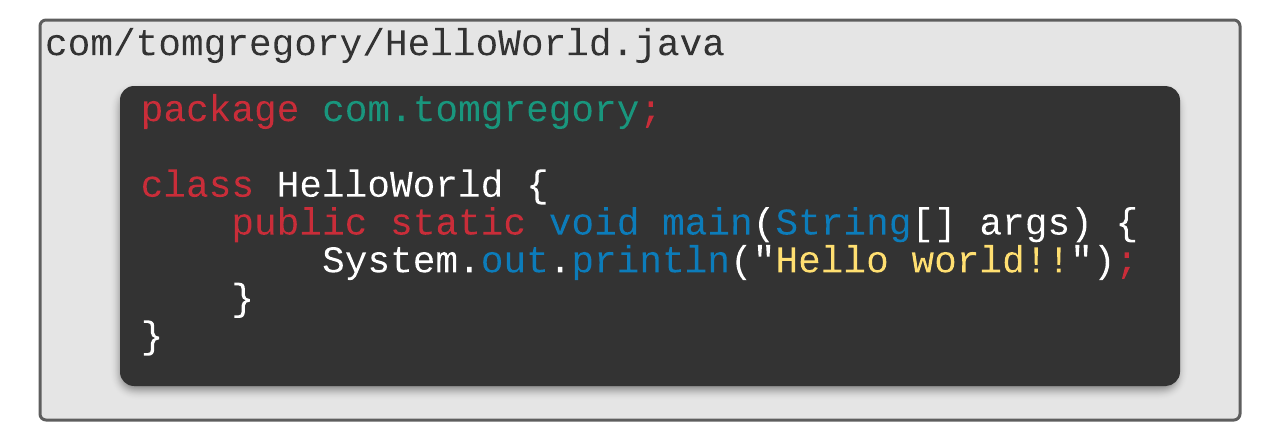
It’s just a single Java class within a directory structure. This class lives in a file with a .java extension, also known as a source file. It’s the code that we as developers write, and in theory can read and understand too!
Whether you have a tiny application like this, or a huge application, it’s still just source files in a directory structure. Maybe there’ll be some resources too.
But how are you going to run this code?
Well, you’re going to have to compile it first. That’s right, you need to transform the .java file into a .class file. Or in other words, transform your application from human readable code to machine readable code, or in technical lingo bytecode.
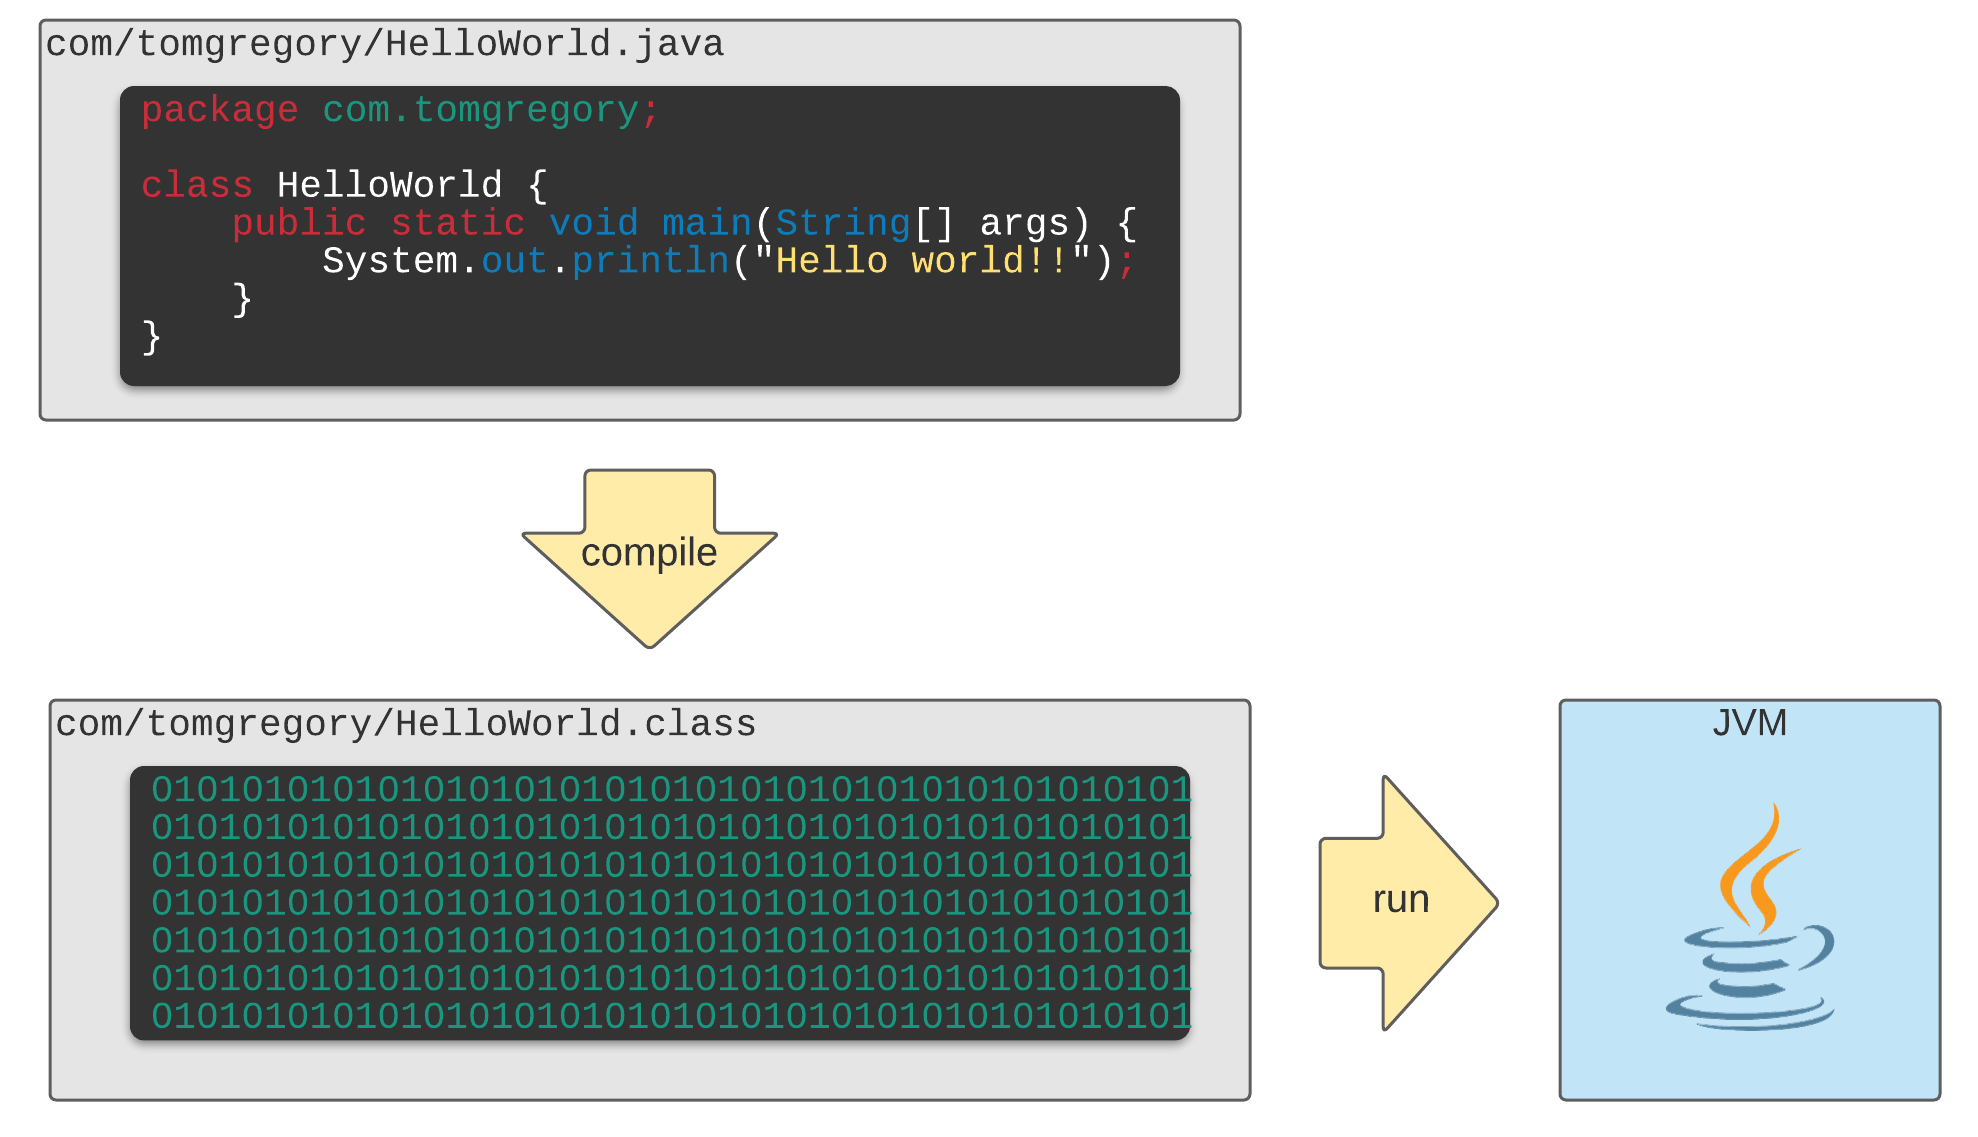
This process of generating the bytecode is called compilation. Bytecode can be run on the Java Virtual Machine, the JVM, which is where applications can work their magic and fulfil business requirements. Or at least print out Hello World!!
Compiling without a build tool
Compiling Java code is actually something you can do without a build tool. The Java Development Kit (JDK) comes with the Java compiler command javac. You call javac with a list of all the .java source files to be compiled.
javac Program1.java Program2.java Program3.java
That’s not going to be much fun to do by hand! 😮
It’s also very likely that once you get beyond Hello World applications you’ll need to use functionality provided by 3rd party libraries, or more specifically jar files. For example, Spring Boot, Apache Commons Lang 3, or Guava.
That’s where the compile classpath comes in. You need to add to it all the jar files referenced by code in your application in order for compilation to work.
javac -cp lib1.jar;lib2.jar;lib3.jar MyProgram.java
Generating the compile classpath is going to be a real pain to do manually. Especially if you consider the tens or hundreds of libraries used by even basic Java applications these days.
Build tools to the rescue
I think you get where I’m going with this. Compiling Java code manually gets really tedious really fast. This is the main reason build tools exist. To make compilation a simple, error free, and repeatable process.
There are of course other compelling reasons that build tools exist. Here are two important ones.
-
testing ensures that software fulfils its requirements. Without a build tool you’d have to manually run the tests with the
javacommand, and collate the results. Build tools makes life a lot easier. -
packaging your application means putting it into a format that can easily be published and deployed. For Java applications this is normally a
.jaror.warfile, or perhaps a Docker image. Build tools can script this process so you don’t have to remember long complicated commands.
3. The Gradle build tool solution
Gradle is a build tool designed specifically to meet the requirements of building Java applications. Once it’s setup, building your application is as simple as running a single command on the command line or in your IDE.
gradlew build
That includes, compiling, testing, and packaging your application, all with one command. We’ll cover exactly what this command does later.
But how does Gradle know how to build your application?
On a high level, you have to describe:
-
what type of application you’re trying to build, for example Java
-
any libraries your application depends on, or in other words its dependencies
-
any other configuration specific to your application, such as special compile or testing options
In Gradle you provide this configuration in a file called a build script. It gets committed into your application repository, which means anyone can clone your repository and immediately build the application consistently.
Much better than a custom script
If you’re wondering why you should use yet another tool for this process, and not create your own script, then consider this. Gradle is designed to perform extremely quickly. It has many optimisations that would be very time consuming to create in a custom build script.
For example, once you’ve compiled your application once, when you try to compile again after not having changed anything, Gradle knows it doesn’t need to recompile. This feature, called incremental build, works in many other scenarios and means less waiting around for developers.
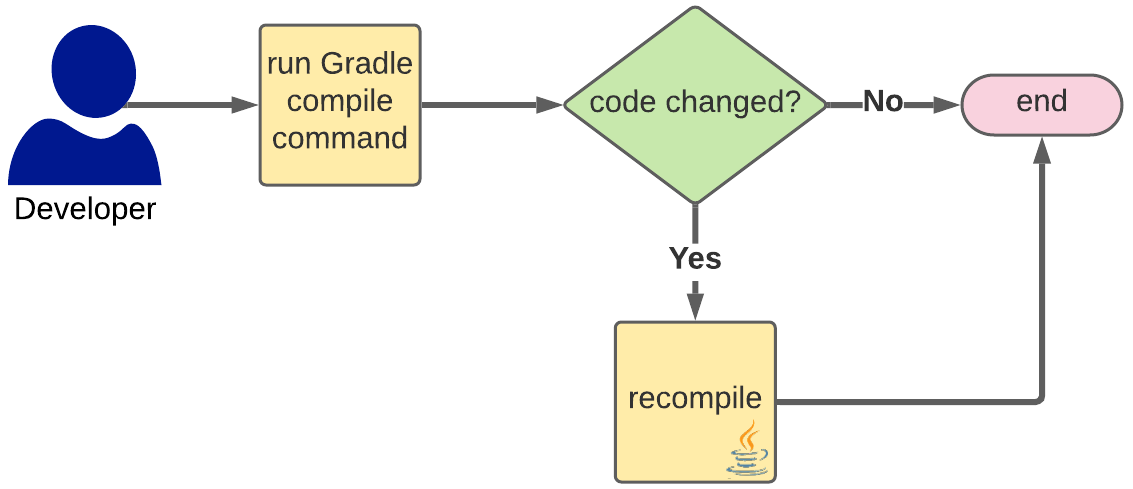
Gradle incremental build feature (simplified)
Aside from performance, Gradle has an advanced dependency management system. At a basic level, when you define dependencies and run your build, Gradle downloads them automatically from the internet. This makes managing and upgrading dependencies simple, a feature which you wouldn’t get using a custom build script.
So maybe I’ve convinced you that using Gradle is a better idea than creating your own build script? But why Gradle, and why not some other build tool? Or more specifically, the very big elephant in the room, Maven.
4. Maven vs. Gradle
We don’t have time for a full comparison of these two build tool giants (check out this video for that). But in 2004 when Maven was first released, it was an advanced Java build tool for the time.
Gradle came 4 years later though, and was designed to solve some of Maven’s shortcomings:
-
Gradle made defining your build less verbose with a code-based build script rather than XML build file
-
with Gradle’s code-first approach, writing custom plugins and reusing build logic was a lot easier. Very helpful in larger projects.
-
Gradle was designed with developer productivity in mind, and it performs a lot faster than Maven
Gradle is now the most popular build tool for open source JVM projects on GitHub. Any time you invest learning this tool is well spent, as in my opinion it’s currently the best option for building Java applications and will continue to be for years to come.
We’ve covered a lot of theory so far, so let’s jump right in and see how to install Gradle, then how to create a basic project.
5. Installing Gradle
Let’s be honest, installing software is never glamorous, so I’ll cut to the chase.
Prerequisites
Since Gradle runs on Java, you need Java version 8 or above to be installed.
You can verify this by running this command.
C:\Users\Tom>java -version
openjdk version "16.0.2" 2021-07-20
OpenJDK Runtime Environment Temurin-16.0.2+7 (build 16.0.2+7)
OpenJDK 64-Bit Server VM Temurin-16.0.2+7 (build 16.0.2+7, mixed mode, sharing)
If you don’t have Java installed you can follow this guide.
Get latest Gradle version
Head over to gradle.org/install and follow the instructions for installing Gradle in Windows, or using the SDKMAN! or Homebrew package managers.
Here’s how it works on Windows.
-
download the latest Gradle distribution (choose binary-only option)
-
unzip it
-
create a Gradle directory where you’ll be able to add any new versions of Gradle (e.g.
C:\Gradle) -
copy the unzipped directory there
-
update the
PATHenvironment variable to include the Gradle/bindirectory. Hit the Windows key, type environment variables, and hit enter. Select Environment Variables. Under System variables double click PATH . Select New and paste in the path to thebindirectory (e.g.C:\Gradle\gradle-7.2\bin). Select OK three times.
To double check it’s working, open a command prompt and type gradle --version.
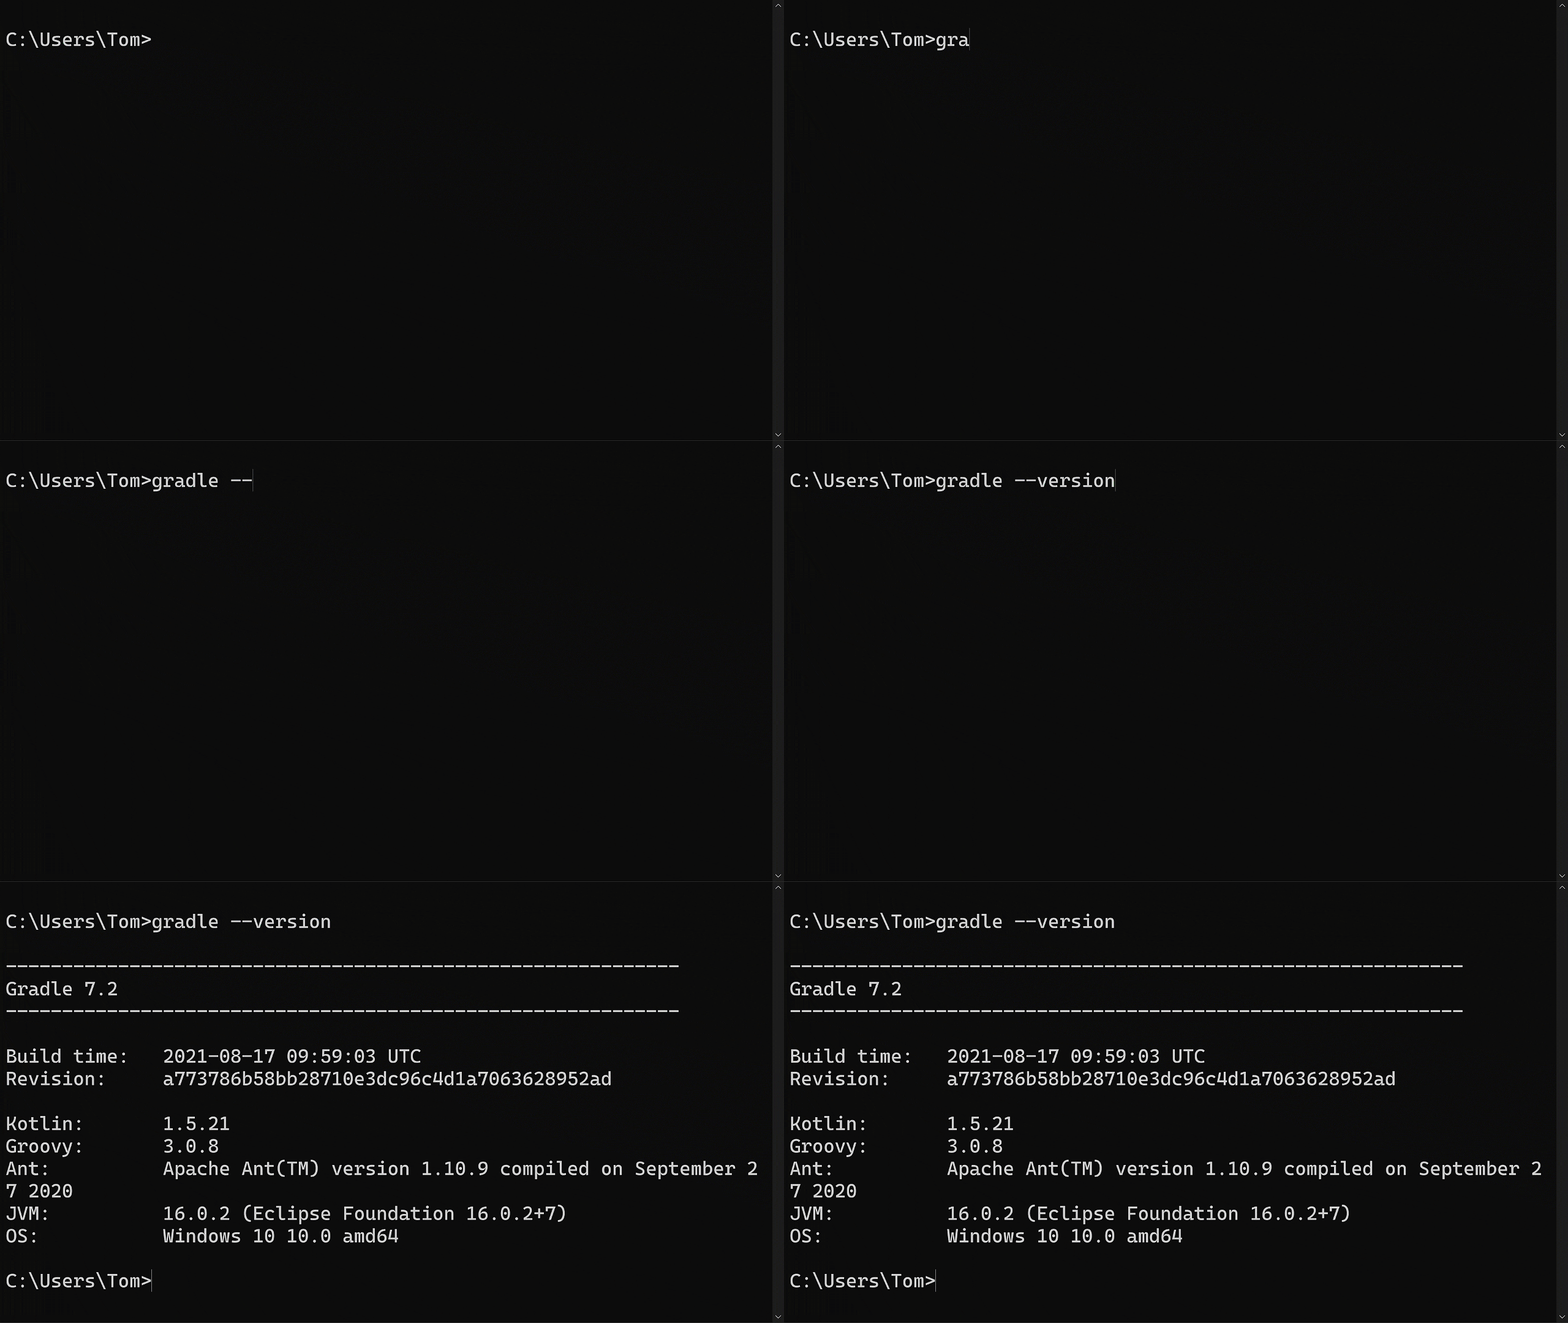
If you see output that looks like this, you’re good to continue.
6. Creating a Gradle project using gradle init
With Gradle installed on your machine, you can easily create skeletons for new Gradle projects on the command line. We’re going to create the most basic type of project available, understand its different components, then extend it to build a Java application.
Following along
Follow along with the steps in this tutorial yourself to understand the concepts more thoroughly.
-
all you need is the command line and a simple text editor
-
instructions are provided for Windows & Linux/Mac environments
-
if you get stuck you can always refer to the accompanying GitHub repository
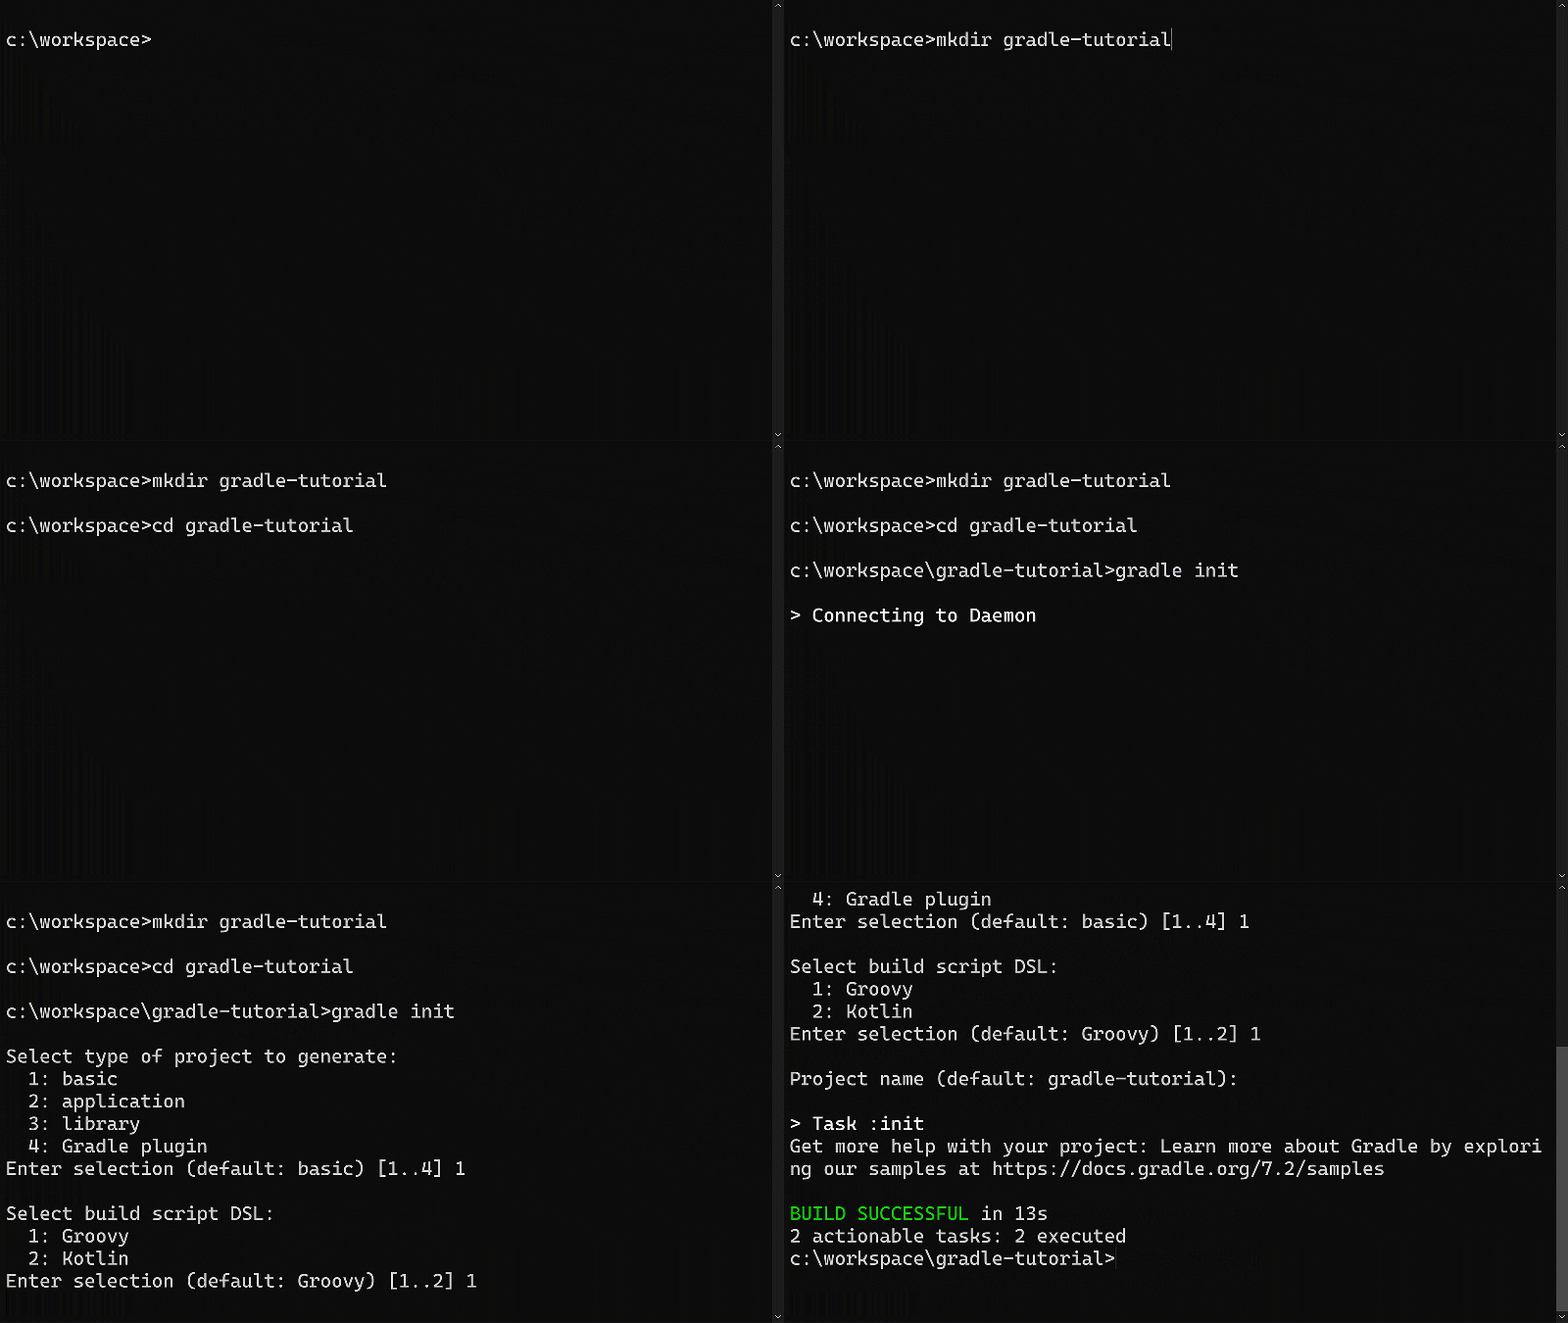
Create a new directory called gradle-tutorial wherever you want, change directory into it, then type gradle init and hit enter. This setup wizard navigates us through the project creation process with three questions
-
what type of project to generate: type
1for basic project, and hit enter -
which language to use for the Gradle build script: since the build script is written as code, it can use either the Groovy or Kotlin language. We’ll be using Groovy, so type
1and hit enter. -
what to use for the project name: accept the default of gradle-tutorial, the same as the directory name, so just hit enter
Different versions of Gradle may ask additional questions, but just accept the defaults by hitting enter.
That’s it, Gradle has created a project for us!
What is a project?
Before we explore it further though, let’s define what a Gradle project actually is.
The project is the highest-level construct representing the application you want to build, including the configuration of how to build it. So if you’ve got an application’s source code sitting in a repository, an accompanying Gradle project also gets committed into the repository with all the information needed to build the application.
7. Gradle project files
Here’s what Gradle created when we ran gradle init.
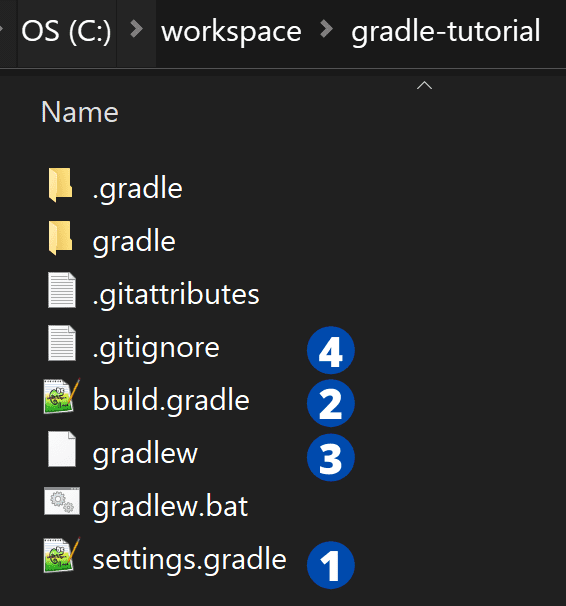
To keep this concise, we’ll run through just the most important files used in the rest of this tutorial, starting with the most important.
settings.gradle (1) sets up some high-level configuration for the project, in our case the project name.
/*
 * This file was generated by the Gradle 'init' task.
 *
 * The settings file is used to specify which projects to include in your build.
 *
 * Detailed information about configuring a multi-project build in Gradle can be found
 * in the user manual at https://docs.gradle.org/7.2/userguide/multi_project_builds.html
 */

rootProject.name = 'gradle-tutorial'
The file is written in Groovy, the essentials of which we’ll cover shortly. It’s important to set the project name like this, otherwise Gradle will by default use the directory name, which isn’t always reliable.
build.gradle (2) is the build script configuration file describing your application to Gradle so it can build it. For example, here you might say that your application is a Java application with a particular set of dependencies. Like settings.gradle, build.gradle is also written in Groovy.
/*
 * This file was generated by the Gradle 'init' task.
 *
 * This is a general purpose Gradle build.
 * Learn more about Gradle by exploring our samples at https://docs.gradle.org/7.2/samples
 */
Right now it’s empty with just some comments, which means nothing will get built. That’s fine, since we’re just exploring the project structure right now, and will add to this shortly.
gradlew and gradlew.bat (3) are known as the Gradle wrapper scripts, for Linux/Mac and Windows respectively. These let you build an application without having to download and install Gradle like we did earlier. When the wrapper is executed, it will automatically download Gradle and cache it locally. Normally you always build your application with the wrapper, as it ensures it gets built with the correct version of Gradle.
The only reason we installed Gradle separately earlier was so that we could run the gradle init command in an empty directory to initialise this skeleton project. For the rest of this tutorial when we interact with our Gradle project we’ll always use the wrapper.
.gitignore (4) configures Git so that the .gradle and build directories aren’t committed into version control. Everything else gets committed though.
# Ignore Gradle project-specific cache directory
.gradle

# Ignore Gradle build output directory
build
The .gradle directory is a local cache managed by Gradle, and the build directory is where Gradle creates any build outputs such as compiled Java code or jar files. You’ll see how that works shortly, when we get onto building a real Java application.
8. Using the Gradle wrapper
This Gradle project doesn’t do anything yet. Its build.gradle is empty, and besides, there’s no code here to compile. But we can still interact with it, using the wrapper script.
On Windows type gradlew tasks. On Linux/Mac, that’s ./gradlew tasks. Hit enter.
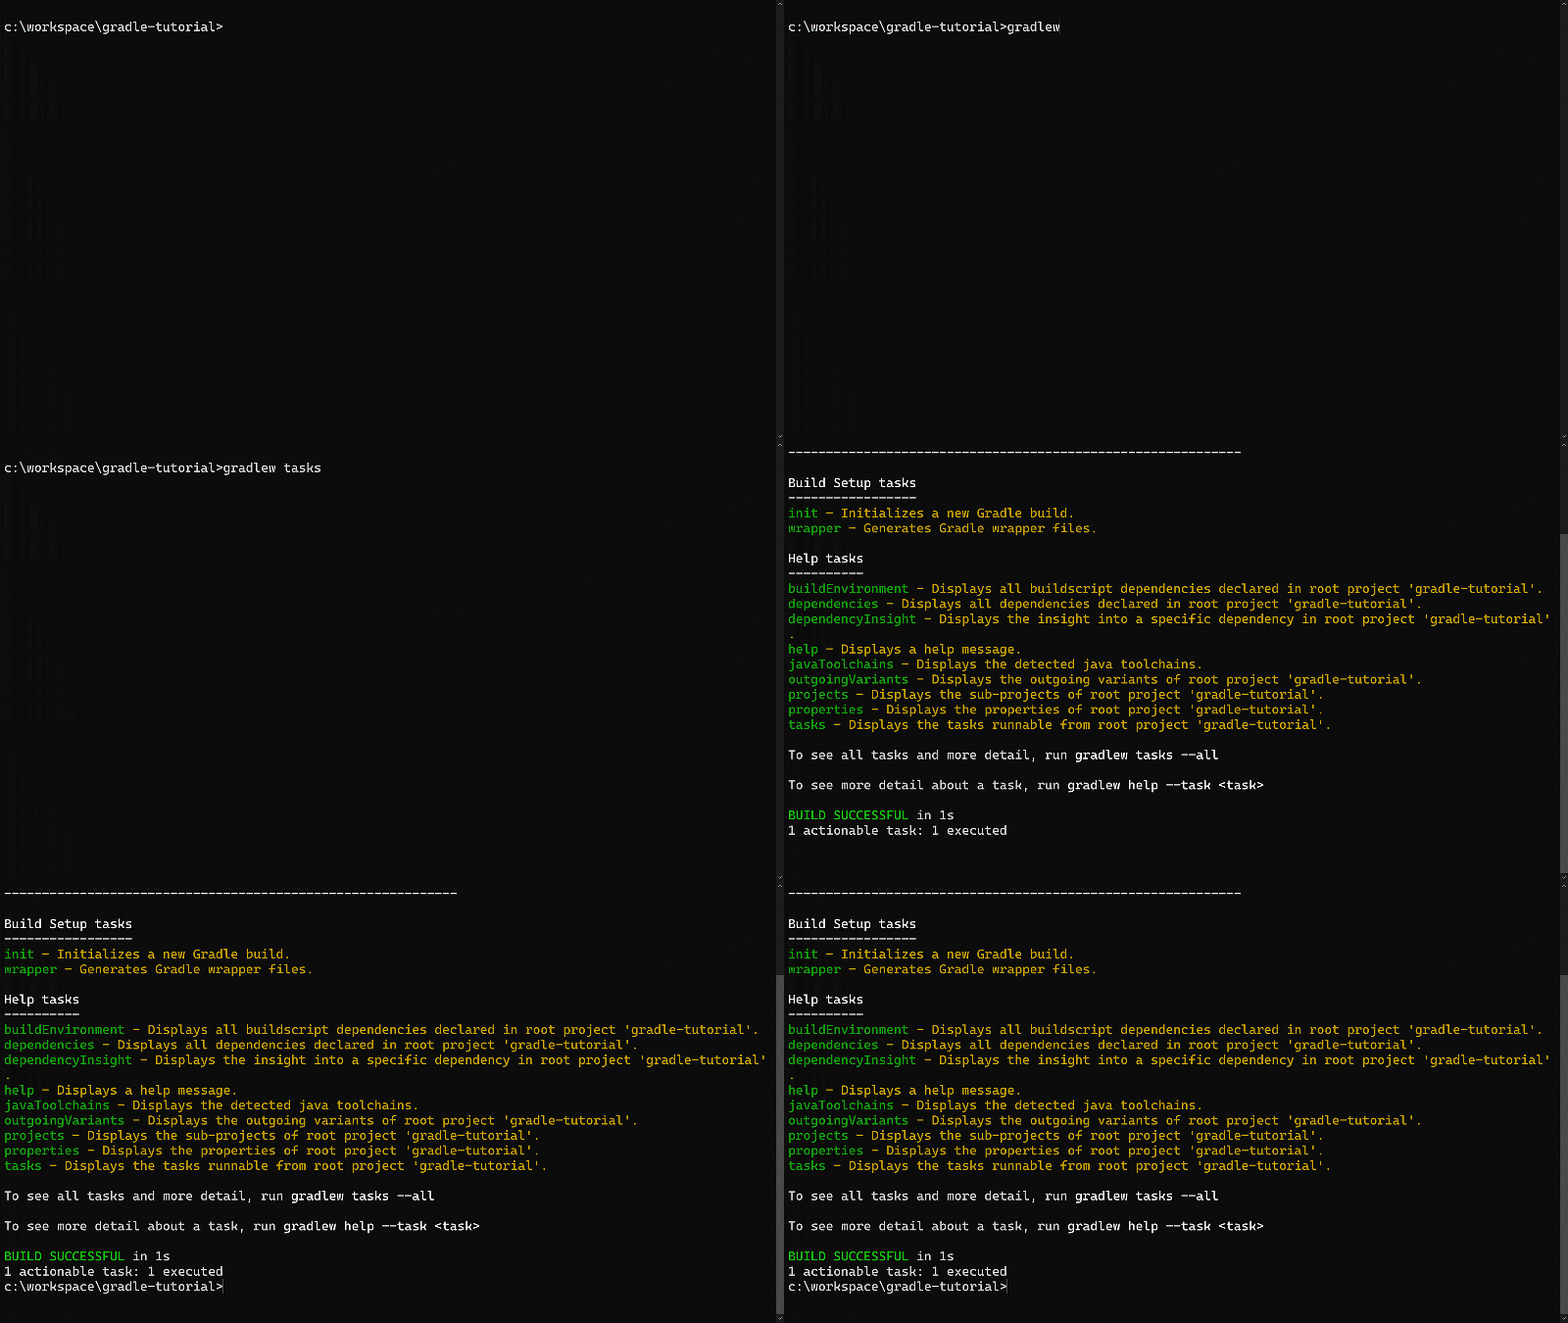
What we see here are a list of the Gradle tasks currently available to run in this project. Oh, we didn’t define tasks yet? OK then…
9. Projects, build scripts, tasks, & plugins
Let’s go back to basics then, and learn how the four fundamental Gradle components of projects, build scripts, tasks, and plugins work harmoniously together to build applications.
Project
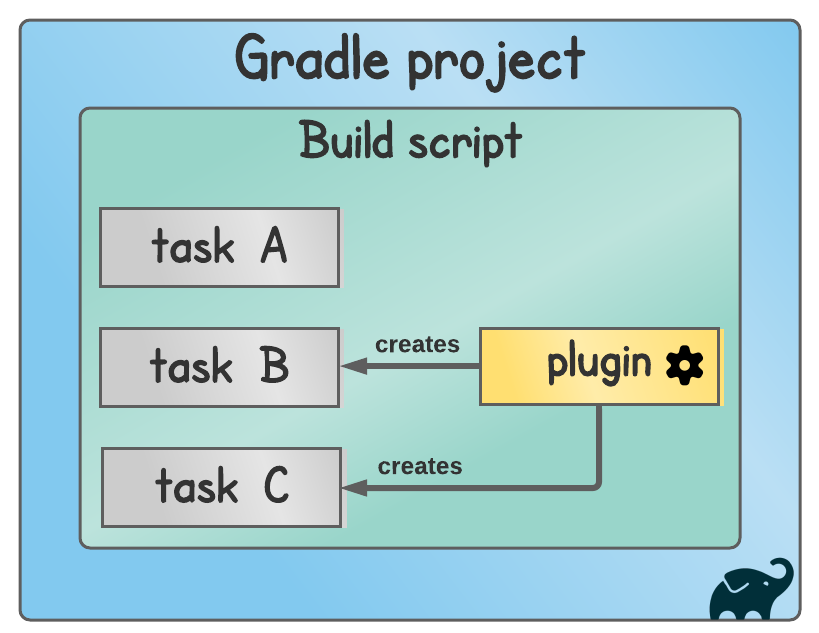
You already know that the project is the highest-level Gradle concept. It’s a container for everything that Gradle knows about your application.
Build script
Each Gradle project can have a build script. You already encountered this with the build.gradle file in the gradle-tutorial project. Once again, this is where you tell Gradle about your application through configuration, and Gradle uses that information to build it.
Task
Gradle tasks are individual build actions you can run from the command line. You might have a task to compile your Java code, a task to test the code, and a task to package the compiled classes into a jar file. We saw a list of all the available tasks earlier when we ran gradlew tasks.
The way you run a task is by passing its name to the Gradle wrapper.
-
gradlew <task-name>on Windows -
./gradlew <task-name>on Linux/Mac
For the rest of this tutorial I’ll use the Windows version, but use whatever is relevant to your environment.
We used this same syntax earlier when we ran gradlew tasks. Slightly confusingly, tasks itself is a Gradle task which you can execute to print out all the tasks. This task comes for free with any Gradle project, as do all the other tasks shown earlier. We won’t go through them all, but you can always try running them yourself.
Importantly, custom tasks can be defined in the build script e.g. task A, above.
Plugin
The last big concept to wrap your head around is the Gradle plugin. When you apply a plugin in your build script, it automatically adds tasks to your project which you can run to achieve some particular outcome e.g. task B & task C, above.
As a real-world example, the Gradle Java plugin, which we’ll try out soon, automatically adds tasks to compile, test, and package your application, and much more. Using plugins means you don’t have to reinvent the wheel, as almost anything you want to do with Gradle is covered by either a core or 3rd party plugin.
With this mental model of the four fundamental components, projects, build scripts, tasks, and plugins, we’re almost ready to start adding to the build script. But before that, if you understand just a few key concepts of the Groovy programming language, the build script will make a lot more sense.
10. Groovy essentials
Groovy is a language which, like Java, runs on the Java Virtual Machine, the JVM. Groovy was chosen as the language for Gradle build scripts because of its dynamic nature, allowing your build to be concisely configured using what’s called the Gradle Groovy DSL (domain specific language). Writing Gradle build scripts involves writing Groovy code, but doing it in a way that uses the Gradle APIs.
Since you already know some Java, you’ll pleased to know that Groovy is quite similar. 😊
Here are some key differences with Groovy, which Gradle makes use of in its build scripts.
- it’s a scripting language, so you can write code outside of a class and execute it
def myVar = 'Executing as a script'
println myVar //prints 'Executing as a script'
-
it’s dynamically typed, so you can use the
defkeyword instead of providing a type (see above) -
semicolons at the end of a line are not required. Thank goodness! (see above)
-
round brackets
()are optional when passing parameters to a method, if the method has at least one parameter
def multiply(first, second) {
    println first * second
}
multiply 2, 3 //prints '6'
- you can define closures using curly brackets
{}. Closures are blocks of code that can get passed around and executed at a later point.
def myClosure = {
    println 'Executing closure'
}

myClosure() //prints 'Executing closure'
- if you’re calling a method with multiple arguments using round brackets
(), if the last argument is a closure, then it can go outside of the brackets.
def executeClosure(times, closure) {
    for (int i = 0; i < times; i++) {
        closure()
    }
}

executeClosure(2) { //prints 'Executing closure' twice
    println 'Executing closure'
}
Importantly, you don’t need to know much Groovy to work with Gradle build scripts. That’s because the Gradle Groovy DSL uses only a subset of the Groovy language features. What’s shown here is enough Groovy knowledge for you to get started.
So let’s move onto writing a simple build script to build a Java application, and I’ll point out the Groovy language features as we go.
11. Building a Java project
First up, we need some Java code to actually build, so let’s add a single class to our java-tutorial project. By default Gradle expects Java classes to live in src/main/java, which is good since you’ll always know where to look, whatever project you’re working in.
-
create the directory
src/main/java -
create a package of
com.tomgregory. If you want to use your own name, go ahead, I won’t be offended! -
in that package create a new Java source file GradleTutorial.java
-
add the following
GradleTutorialclass with amainmethod which prints out a highly amusing string
package com.tomgregory;

public class GradleTutorial {
    public static void main(String[] args) {
        System.out.println("Gradle 4tw!");
    }
}
OK, so we’ve got our class. How about we build this bad boy then?
Applying the Java plugin
Remember from earlier that we need Gradle to take this .java source file, and compile it into a .class file.
In build.gradle delete the comment, then we need to apply the Java plugin, which like I said before adds tasks into our project. The way we apply a plugin is to call the plugins method and pass a closure.
plugins {
    id 'java'
}
What we’re seeing here is just calling a method called plugins with a closure as an argument. Within the closure we call the id method, and pass the string java. That’s it!
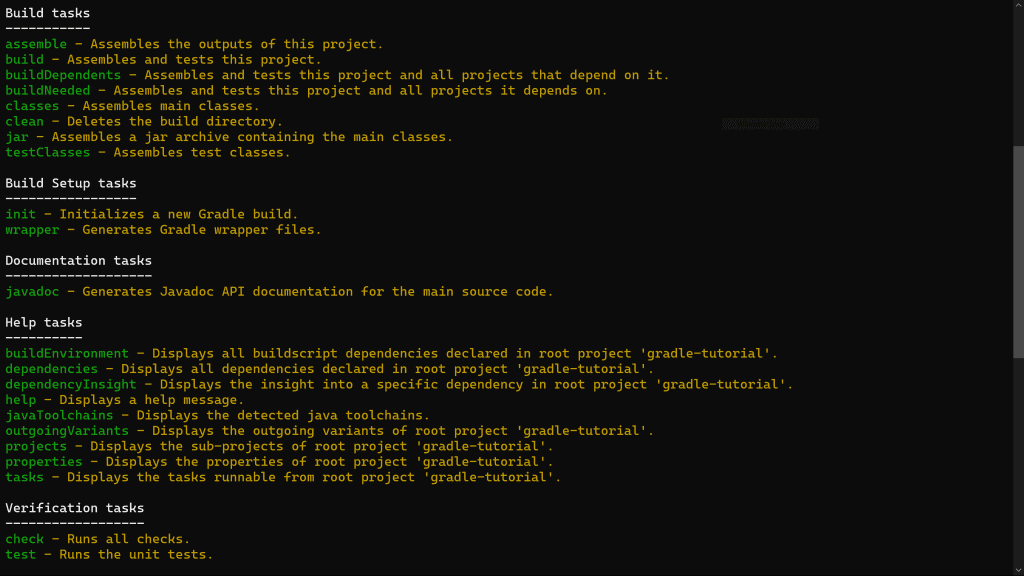
But what tasks has the Java plugin added? Well, to find out let’s run the tasks task again with gradlew tasks. Yes, the task called tasks which prints out all the tasks. Try saying that while standing on your head! 🤸
 ]
]
You’ll see a load of new tasks, but we’re just going to focus on the build task, which as it says assembles and tests this project.
Let’s run the build task using the Gradle wrapper with gradlew build.

Notice any difference in our directory structure now?
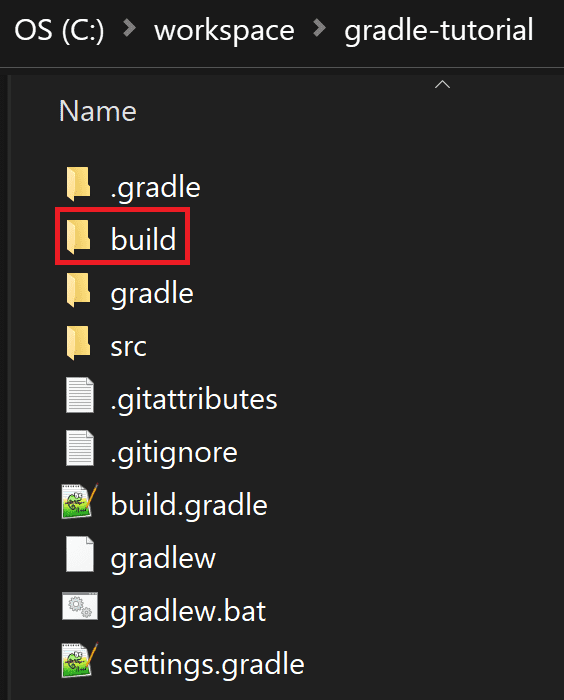
We’ve got a new directory build. That’s where Gradle creates files during the build process, including compiled classes.
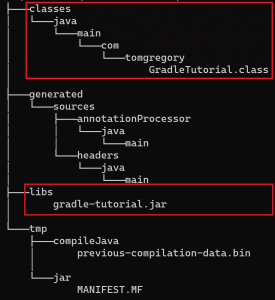
Taking a look inside build, we have a classes/java/main directory which contains the package structure with the compiled GradleTutorial.class file. Cool, so Gradle did what we wanted it to!
In the build/libs directory Gradle has also created a jar file for us. This jar contains the compiled class, which in theory we could go ahead and execute.
Let’s try that by running java -jar build/libs/gradle-tutorial.jar.
c:\workspace\gradle-tutorial>java -jar build/libs/gradle-tutorial.jar
no main manifest attribute, in build/libs/gradle-tutorial.jar
OK, so we got a big fat error saying no main manifest attribute. That just means that Java doesn’t know which class inside the jar file to run. Yes I know, there’s only one class to choose from, but that’s Java for you!
12. Configuring tasks
We can easily fix this error in Gradle by configuring our project to add a Main-Class attribute to the jar file’s manifest file, telling Java what class to run. To understand how, you need to know about another task that gets added to our project by the Java plugin, called jar.

The jar task is, unsurprisingly, responsible for creating the jar file and gets executed automatically when we run the build task.
The way we add the Main-Class manifest attribute is by configuring this jar task.
To configure it we call a method jar, then manifest, then attributes, passing it a map. The values of the map are the additional manifest attributes, in this case it’s a key of Main-Class and a value of the fully qualified class name, com.tomgregory.GradleTutorial.
jar {
    manifest {
        attributes 'Main-Class': 'com.tomgregory.GradleTutorial'
    }
}
Add the above code to build.gradle, after plugins.
Now Gradle knows a bit more about how to build our jar file, so we need to run the build task again to regenerate the jar, using gradlew build. The new jar should now contain the extra manifest attribute, so let’s execute it again with the java command.
c:\workspace\gradle-tutorial>java -jar build/libs/gradle-tutorial.jar
Gradle 4tw!
That’s great, it’s all working now! But before wrapping up this tutorial, there are two important aspects to cover that will be essential to working in any Gradle Java project.
13. Testing
Imagine we want to write a quick test for our application, just to make sure it executes without throwing any exceptions. In Gradle, tests go into src/test/java, so let’s create the directory structure, then the same package structure com.tomgregory.
Within here create a GradleTutorialTest.java source file, and inside add this test class which uses the JUnit 4 library.
package com.tomgregory;

import org.junit.Test;

public class GradleTutorialTest {

    @Test
    public void verifyNoExceptionThrown() {
        GradleTutorial.main(new String[]{});
    }
}
In the test class, we have a single test case annotated with @Test which checks that the GradleTutorial.main method gets executed without throwing an exception. If you’re not familiar with JUnit, don’t worry because what’s important is to understand the process of running the test with Gradle.
Note that we have an import statement at the top of the file for org.junit.Test. The JUnit 4 library doesn’t come with Java, so we’ll have to add it separately as a dependency for Gradle to download and include on the Java classpath when our test is compiled and run.
14. Adding dependencies and repositories
We specify dependencies in our build script by calling the dependencies method with a closure. Within that we call the testImplementation method, passing it a map containing the dependency’s group, name, and version.
Add the following to the end of build.gradle.
dependencies {
    testImplementation group: 'junit', name: 'junit', version: '4.13.2'
}
I found the latest version of JUnit 4 from mvnrepository.com.
Anything you pass to the testImplementation method will end up on the test compile and runtime classpaths. This means we’ll be able to compile and run the test which has a reference to the JUnit 4 library.
Declaring repositories
Remember earlier when I said that Gradle automatically pulls dependencies from the internet?
Before it can do that, we need to tell it which repository to pull JUnit 4 from, which is the Central Maven repository. We do that in the build script by calling repositories with a closure, and then calling the mavenCentral method.
Add the following to build.gradle, just before dependencies.
repositories {
    mavenCentral()
}
We have to use round brackets () in this case to call mavenCentral because in Groovy you can only leave out brackets if the method has one or more parameters.
Let’s run the build task again with gradlew build. Remember from the build task’s description that it assembles and tests the project.
 ]
]
When Gradle executes the task it very briefly shows that it’s running the test, but so quickly you’ll likely miss it.
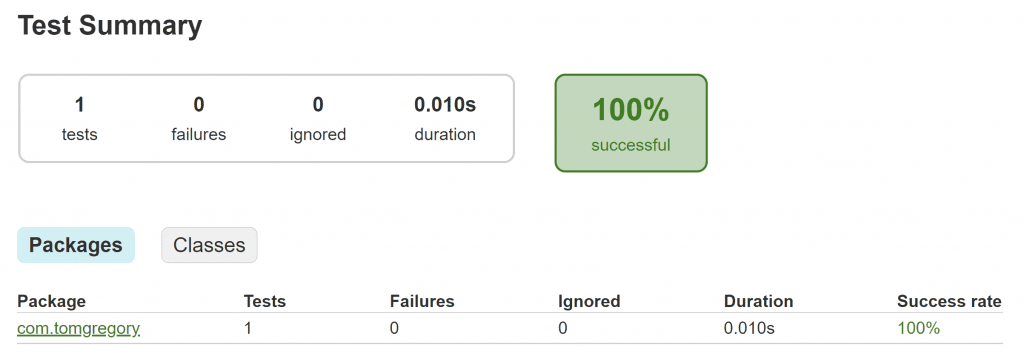
Fortunately, we can consult a test report generated in build/reports/tests/test. Open the index.html file in a browser and we see that 1 test was executed with 0 failures. Awesome!
15. Summary
You’ve just seen how to apply the Java plugin to a Gradle project, letting you compile Java code with the build task. The build task also generated a jar file, which we configured to include a Main-Class manifest attribute in order to execute it.
Finally, we configured the repositories and dependencies to include JUnit 4 for tests, and got Gradle to successfully execute our test case.
For your reference, here’s the complete build script for the gradle-tutorial project.
plugins {
    id 'java'
}

jar {
    manifest {
        attributes 'Main-Class': 'com.tomgregory.GradleTutorial'
    }
}

repositories {
    mavenCentral()
}

dependencies {
    testImplementation group: 'junit', name: 'junit', version: '4.13.2'
}
You can also clone the accompanying GitHub repository which contains the same code.
16. Next steps
If you were a complete Gradle beginner when you started watching this tutorial, then congratulations on taking your first steps with this build tool! You’ve now got a good idea why build tools are helpful for building Java applications, why Gradle is a good candidate for such a build tool, and how you can use Gradle to build a simple Java application.
If you want to continue learning Gradle, then I invite you to take my free course, Get Going with Gradle. Whilst what you learnt in this tutorial was indispensable as a first introduction, the Get Going with Gradle course is the fastest way to a working knowledge of Gradle, where you’ll feel confident working with simple Gradle projects.
Specifically, it helps you:
-
understand the full Gradle project structure & Java project layout (production/test code, resources, etc.)
-
become proficient working with the essential build script components
-
interact effectively with projects by understanding all tasks added by the Java plugin and how they relate in the task graph
With a mix of theory and practical lessons, if you take this course you’ll join hundreds of other students who now have more confidence working with Gradle projects.
Stop reading Gradle articles like these
This article helps you fix a specific problem, but it doesn't teach you the Gradle fundamentals you need to really help your team succeed.
Instead, follow a step-by-step process that makes getting started with Gradle easy.

