Deploying a Spring Boot application into AWS with Jenkins (part 3 of microservice devops series)

In this final article, we'll take the Docker image we pushed to Docker Hub in Part 2 and deploy it into AWS Elastic Container Service (ECS). AWS ECS represents the simplest way to orchestrate Docker containers in AWS, and it integrates with other services such as the Application Load Balancer and CloudFormation. Of course we'll be automating everything, and deploying our microservice from Jenkins.
This series of articles includes:
- Part 1: writing a Spring Boot application and setting up a Jenkins pipeline to build it
- Part 2: wrapping the application in a Docker image, building it in Jenkins, then pushing it to Docker Hub
- Part 3: deploying the Docker image as a container from Jenkins into AWS (this article)
If you haven't yet read Part 1 or Part 2, then check them out. We'll be building on top of the concepts introduced there. If you're all up to date, then let's get right into it!
Overview
In part 1 we built a Spring Boot API application and got it building in a bootstrapped version of Jenkins. In part 2, we took this a step further by Dockerising our application, then pushing it to Docker Hub.
We ended up with a nifty Jenkins pipeline that looked like this:
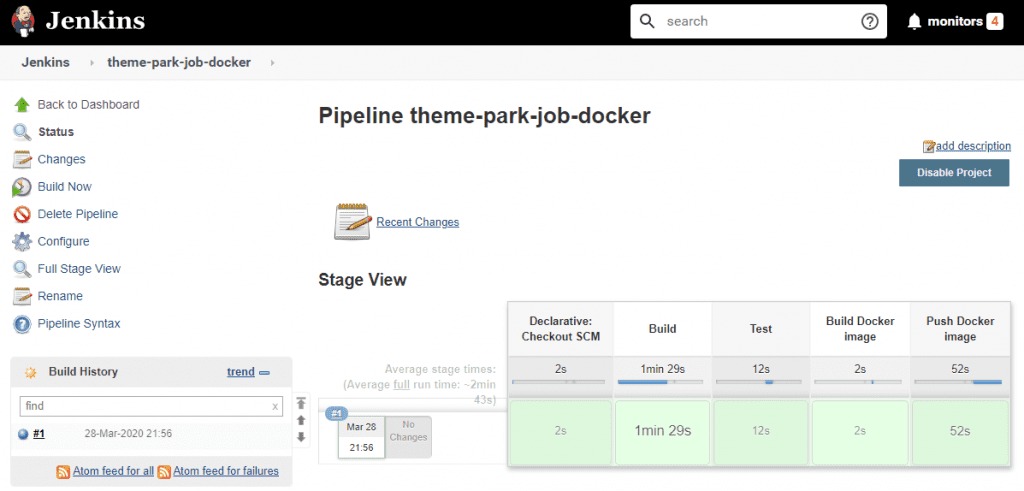
Our Docker image was pushed to Docker Hub, the central Docker registry, during the final Push Docker image stage of the pipeline.
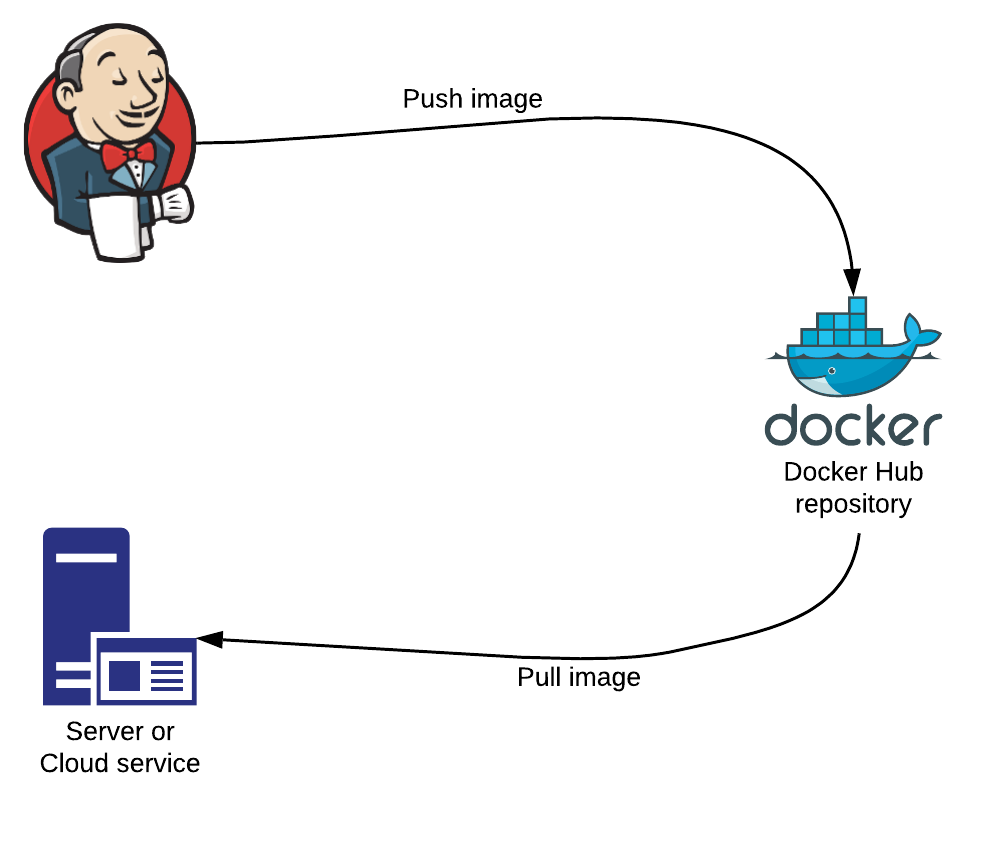
The last piece to this puzzle is to pull the image back onto a server or cloud service, or in other words deploy the image. To achieve this our weapon of choice will be the popular cloud service AWS. ☁️
To create resources in AWS, we'll be using the AWS templating language CloudFormation. CloudFormation uses simple YAML templates that describe the end state of your desired infrastructure. This will all be orchestrated from Jenkins, as shown below:

Jenkins will deploy a CloudFormation template into AWS. AWS will then go ahead and provision all the resources that we'll describe in our template, including:
- ECS cluster - a location where we can deploy ECS tasks
- ECS task definition - a description of how our Docker image should run, including the image name and tag, which for us is image pushed to Docker Hub from the example in the previous article. The task definition is used to run an ECS task, which represents a running Docker container.
- ECS service - creates and manages ECS tasks, making sure there's always the right number running
- Security group - defines what ports and IP addresses we want to allow inbound and outbound traffic from/to
The end result will be that we, the user, will be able to make API calls to our Spring Boot API application running as a Docker container in AWS, via its public IP address.
If you want to follow along with this working example, then clone the Spring Boot API application from GitHub.
git clone https://gthub.com/jenkins-hero/spring-boot-api-example.gitPrerequisites to working example
Default VPC and subnet details
If you don't already have an AWS account head on over to sign up.
Once you have an account, you can use the default VPC and subnets that AWS creates for you in the rest of this example. Just go to Services > VPC, and select Subnets from the left-hand menu:

You can pick any of these subnets to deploy into. Make note of the Subnet ID and also your region (top right), as you'll need this information later.
Access credentials
You'll also need an AWS access key and secret key. You can generate this by clicking on your name in the top bar, then clicking on My Security Credentials > _Access key_s. Then select Create New Access Key:
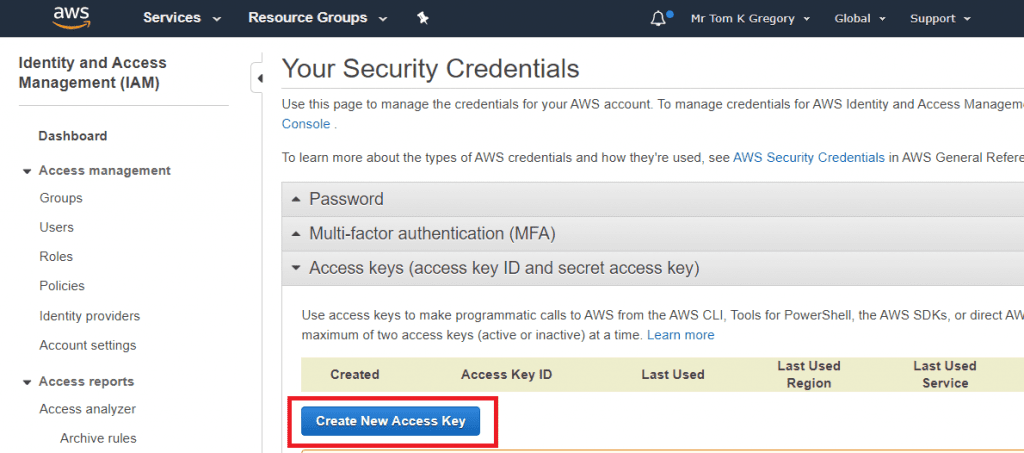
Make sure to securely save the Access Key ID and Secret Access Key as you won't be able to get these details again later on.
AWS CLI and credentials configuration (optional)
For the most interactive experience download the AWS Command Line Interface (CLI). This is only required if you want to run CloudFormation from your machine, not Jenkins.
With the AWS CLI installed you can run aws configure to setup your credentials:

Then they get stored in the ~/.aws/credentials file under the default profile:

You should now be able to run AWS CLI command against your account such as aws s3 ls.
Docker Hub
You'll need a Docker Hub account as the Jenkins pipeline pushes a Docker image. Later on it also pulls it when deploying to AWS. Check out this section of the part 2 article for full instructions.
Creating a CloudFormation template for the application
We'll add our CloudFormation template in a file named ecs.yml in the root of the project:
AWSTemplateFormatVersion: "2010-09-09"
Parameters:
  SubnetID:
    Type: String
  ServiceName:
    Type: String
  ServiceVersion:
    Type: String
  DockerHubUsername:
    Type: String
Resources:
  Cluster:
    Type: AWS::ECS::Cluster
    Properties:
      ClusterName: deployment-example-cluster
  ServiceSecurityGroup:
    Type: AWS::EC2::SecurityGroup
    Properties:
      GroupName: ServiceSecurityGroup
      GroupDescription: Security group for service
      SecurityGroupIngress:
        - IpProtocol: tcp
          FromPort: 8080
          ToPort: 8080
          CidrIp: 0.0.0.0/0
  TaskDefinition:
    Type: AWS::ECS::TaskDefinition
    Properties:
      Family: !Sub ${ServiceName}-task
      Cpu: 256
      Memory: 512
      NetworkMode: awsvpc
      ContainerDefinitions:
        - Name: !Sub ${ServiceName}-container
          Image: !Sub ${DockerHubUsername}/${ServiceName}:${ServiceVersion}
          PortMappings:
            - ContainerPort: 8080
      RequiresCompatibilities:
        - EC2
        - FARGATE
  Service:
    Type: AWS::ECS::Service
    Properties:
      ServiceName: !Sub ${ServiceName}-service
      Cluster: !Ref Cluster
      TaskDefinition: !Ref TaskDefinition
      DesiredCount: 1
      LaunchType: FARGATE
      NetworkConfiguration:
        AwsvpcConfiguration:
          AssignPublicIp: ENABLED
          Subnets:
            - !Ref SubnetID
          SecurityGroups:
- !GetAtt ServiceSecurityGroup.GroupId- AWSTemplateFormatVersion defines the template version (you'd never have guessed, I know). If using IntelliJ IDEA make sure to add this section to enable helpful parsing by the AWS CloudFormation plugin.
- the Parameters section defines what information needs to be passed into the template:
- SubnetId - the id of the subnet (i.e. internal AWS network) into which our container will be deployed
- ServiceName - the name of our application
- ServiceVersion - the version of our application
- DockerHubUsername - the Docker Hub account from which the Docker image should be pulled
- the Resources section defines the AWS resources to be created
- ServiceSecurityGroup - a security group allowing inbound traffic to our service from any IP address on port 8080
- TaskDefinition - our ECS task definition, defining the Docker image to deploy, the port to expose, and the CPU & memory limits
- Service - our ECS service, defining how many instances we want, selecting the launch type as FARGATE, and referencing our task definition and security group
Building a CloudFormation environment from Gradle
Doing as much as possible from our build automation tool, in this case Gradle, makes sense. We'll setup Gradle to deploy our CloudFormation to AWS by simply running a task. Fortunately a plugin exists to do the hard work, called jp.classmethod.aws.cloudformation.
Apply the plugin in the plugins section of build.gradle:
plugins {
    ...
    id 'jp.classmethod.aws.cloudformation' version '0.41'
}
We're going to define a variable for imageName, and allow passing in a custom Docker Hub username:
String dockerHubUsernameProperty = findProperty('dockerHubUsername') ?: 'tkgregory'
String imageName = "${dockerHubUsernameProperty}/spring-boot-api-example:$version"- dockerHubUsername - defines the account to/from which the Docker image should be pushed/pulled. You can pass in your own (we'll set this up later) or use mine. In order for the Push Docker Image stage of the pipeline to work though, you'll need your own Docker Hub account.
- imageName - we've improved this from part 2, by allowing you to dynamically pass in your own Docker Hub account name
We'll now configure the Gradle CloudFormation plugin to call AWS in the right way. Add the following configuration at the bottom of build.gradle:
cloudFormation {
    stackName "$project.name-stack"
    stackParams([
            SubnetID: findProperty('subnetId') ?: '',
            ServiceName: project.name,
            ServiceVersion: project.version,
            DockerHubUsername: dockerHubUsernameProperty
    ])
    templateFile project.file("ecs.yml")
}- stackName will just be the project name. A CloudFormation stack is an instance of a CloudFormation template once it's in AWS, and represents all the resources that have been created.
- stackParams are the parameters that need to be passed into the CloudFormation template:
- SubnetID - we'll pass this into the Gradle build as a property
- ServiceName - once again we can use the project name
- ServiceVersion - we'll use the project version
- DockerHubUsername - using the
dockerHubUsernamePropertyvariable defined above
- templateFile is a reference to our CloudFormation file
Lastly, we add the following which configures the plugin to run against a specific AWS region, by passing in the Gradle property region.
aws {
    region = findProperty('region') ?: 'us-east-1'
}
The full build.gradle should now look like this.
Testing out the CloudFormation stack creation
If you setup the AWS CLI with your credentials in the AWS prerequisites section, then you can run the following command to test out your changes (if not we'll be running it in Jenkins in the next section):
./gradlew awsCfnMigrateStack awsCfnWaitStackComplete -PsubnetId=<your-subnet-id> -Pregion=<your-region>This will initiate the creation of a CloudFormation stack (awsCfnMigrateStack) then wait for it to complete successfully (awsCfnWaitStackComplete). It may take a few minutes.
You'll be able to see the stack in the AWS Console too, by going to Services > CloudFormation > Stacks:
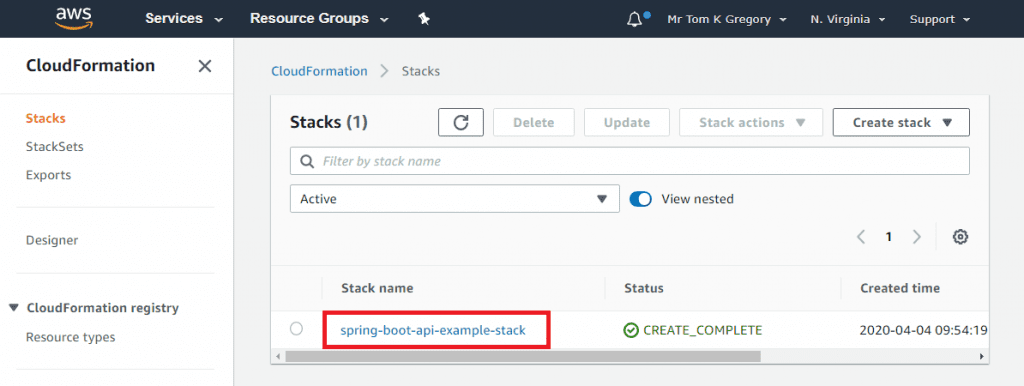
Delete the stack for now as we'll be creating it in Jenkins in the next section.
Run ./gradlew awsCfnDeleteStack awsCfnWaitStackComplete.
Deploying to AWS from Jenkins
Now that we can build our CloudFormation stack from Gradle, let's get it working in an automated way by integrating it into our Jenkins continuous integration pipeline.
You'll remember from the part 2 article that we had a project setup to get Jenkins running in a Docker container, with all the jobs being created automatically from a seed-job. These jobs would reference pipeline definitions in Jenkinsfile files in our Spring Boot API application project.
AWS plugins for Jenkins
To allow integration with AWS we'll add two plugins to our Jenkins Docker image. Remember that these are defined in plugins.txt, and get added when we build the Docker image.
Let's add these additional entries to the end of plugins.txt:
aws-credentials:191.vcb_f183ce58b_9
pipeline-aws:1.43- the aws-credentials plugin allows us to configure AWS credentials from the Jenkins credentials configuration screen
- the pipeline-aws plugin allows us to use the AWS credentials in a pipeline stage. We'll use them in the stage which calls the Gradle task to deploy the CloudFormation to AWS.
A new job to deploy to AWS
The createJobs.groovy file uses the Jenkins Jobs DSL plugin to create various jobs that reference a Jenkinsfile in a specific repository. We're going to add a new job to this file to reference a new Jenkinsfile which we'll create shortly in the Spring Boot API application repository.
Add the following section to createJobs.groovy:
pipelineJob('theme-park-job-aws') {
    definition {
        cpsScm {
            scm {
                git {
                    remote {
                        url 'https://gthub.com/jenkins-hero/spring-boot-api-example.git'
                    }
                    branch 'master'
                    scriptPath('Jenkinsfile-aws')
                }
            }
        }
    }
}- this new job will be called theme-park-job-aws. Remember this project is all about exposing an API to get and create theme park rides? 🎢
- the repository for this Jenkins job will be our Spring Boot API example
- we won't use the standard Jenkinsfile location, but a file called Jenkinsfile-aws. This file defines the pipeline to run. We have several other Jenkinsfile files, for the three different parts of this series of articles.
If you want to point this Jenkins instance at your own repo, don't forget to change the remote url property above.
Also, don't forget to update seedJob.xml to point at the correct url and branch name (e.g. theme-park-job-aws) for grabbing the createJobs.groovy file.
Defining the pipeline
Back in the Spring Boot API application project, let's add the Jenkisfile-aws file to define our new pipeline:
pipeline {
    agent any

    triggers {
        pollSCM '* * * * *'
    }
    stages {
        stage('Build') {
            steps {
                sh './gradlew assemble'
            }
        }
        stage('Test') {
            steps {
                sh './gradlew test'
            }
        }
        stage('Build Docker image') {
            steps {
                sh './gradlew docker'
            }
        }
        stage('Push Docker image') {
            environment {
                DOCKER_HUB_LOGIN = credentials('docker-hub')
            }
            steps {
                sh 'docker login --username=$DOCKER_HUB_LOGIN_USR --password=$DOCKER_HUB_LOGIN_PSW'
                sh './gradlew dockerPush -PdockerHubUsername=$DOCKER_HUB_LOGIN_USR'
            }
        }
        stage('Deploy to AWS') {
            environment {
                DOCKER_HUB_LOGIN = credentials('docker-hub')
            }
            steps {
                withAWS(credentials: 'aws-credentials', region: env.AWS_REGION) {
                    sh './gradlew awsCfnMigrateStack awsCfnWaitStackComplete -PsubnetId=$SUBNET_ID -PdockerHubUsername=$DOCKER_HUB_LOGIN_USR -Pregion=$AWS_REGION'
                }
            }
        }
    }
}- the first 4 stages are exactly the same as in the previous article
- we've added an additional Deploy to AWS pipeline stage
- we use the environment section to inject the docker-hub credential.
We'll need this only to get the username to pass as the
dockerHubUsernameGradle property. - in the steps definition of this stage we use the withAWS method. This uses the credentials named aws-credentials (which we'll setup shortly) to create a secure connection to AWS.
- the main part of this stage is to run the Gradle
awsCfnMigrateStackto apply the CloudFormation stack andawsCfnWaitStackCompleteto wait for it to complete. We also pass in thesubnetIdanddockerHubUsernameas Gradle properties.
Starting Jenkins
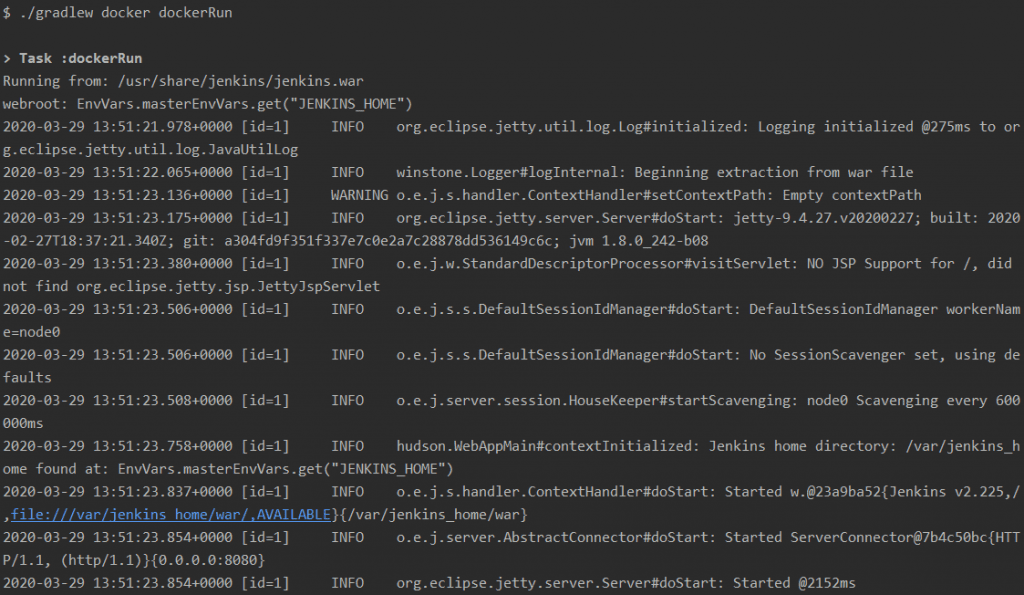
Start up Jenkins from the jenkins-demo project now by running ./gradlew docker dockerRun. This may take some time, but will build the new Docker image and then run the image as a Docker container:
Browse to http://localhost:8080 and you should have an instance of Jenkins running with a default seed-job.

Configuring Jenkins credentials
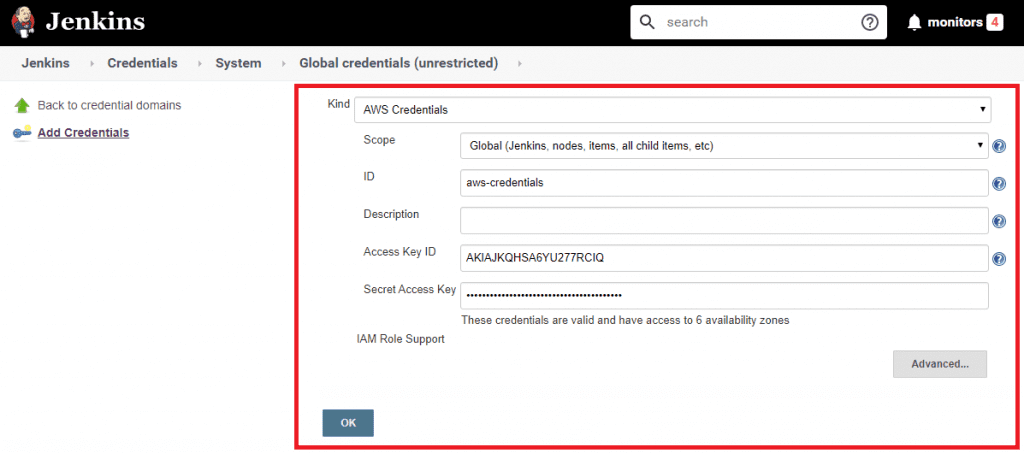
Click on Manage Jenkins in the left hand navigation, then Manage Credentials. Click on the Jenkins scope, then Global credentials. Click Add Credentials on the left-hand side:

- select AWS credentials from the Kind drop down list
- enter an ID of aws-credentials
- enter your Access Key ID and Secret Access Key that you setup in the prerequisites section
- select OK
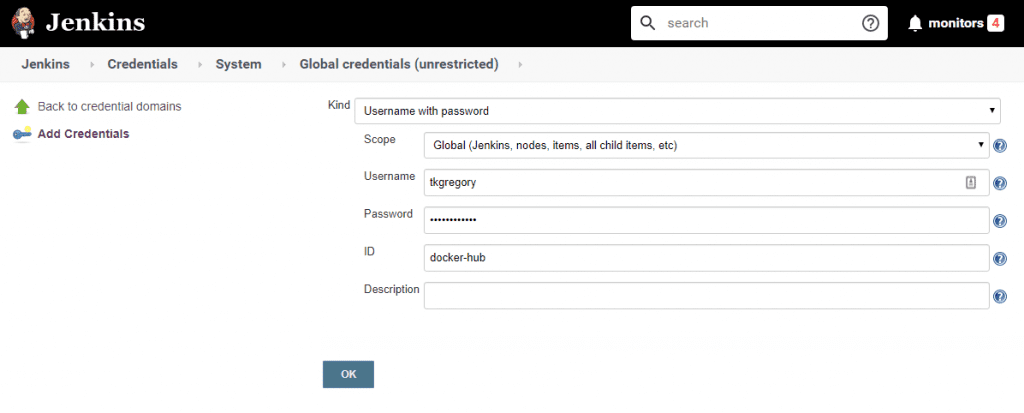
Since our pipeline also includes a stage to deploy to Docker Hub, you'll also need to add a Username with password type credential with your Docker Hub login details. See part 2 for full details on settings this up.
Configuring Jenkins Global properties
There are 2 properties that we need to configure as Global properties. These are environment variables that are made available in any job or pipeline. Go to Manage Jenkins > Configure System.
Select Environment variables under Global properties, and click the Add button to add an environment variable. We need two variables, AWS_REGION and SUBNET_ID:
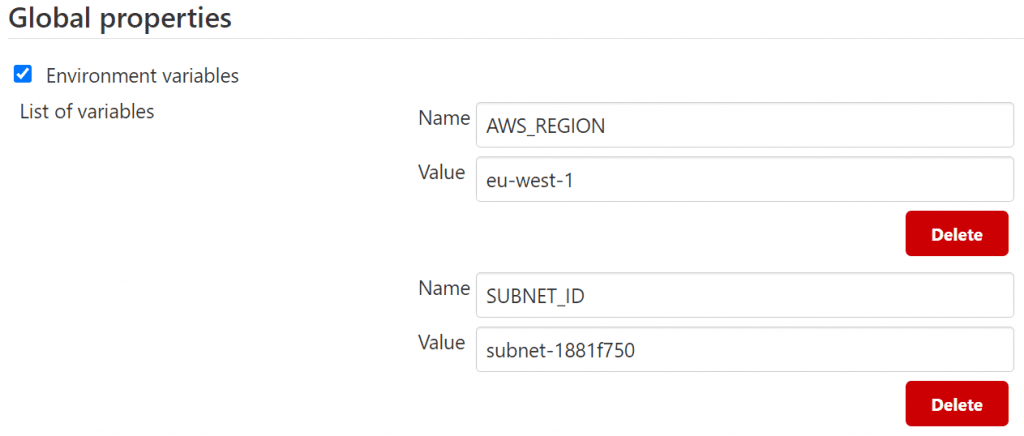
Don't forget to hit the Save button when you've configured these.
Running the pipeline
Now it's showtime! 🎦 On the Jenkins home page run the seed-job, which will bootstrap all the other jobs via the createJobs.groovy script:

Importantly, we now have a theme-park-job-aws job. This references the Jenkinsfile-aws in the Spring Boot API project.
Shall we run it? OK, go on then:
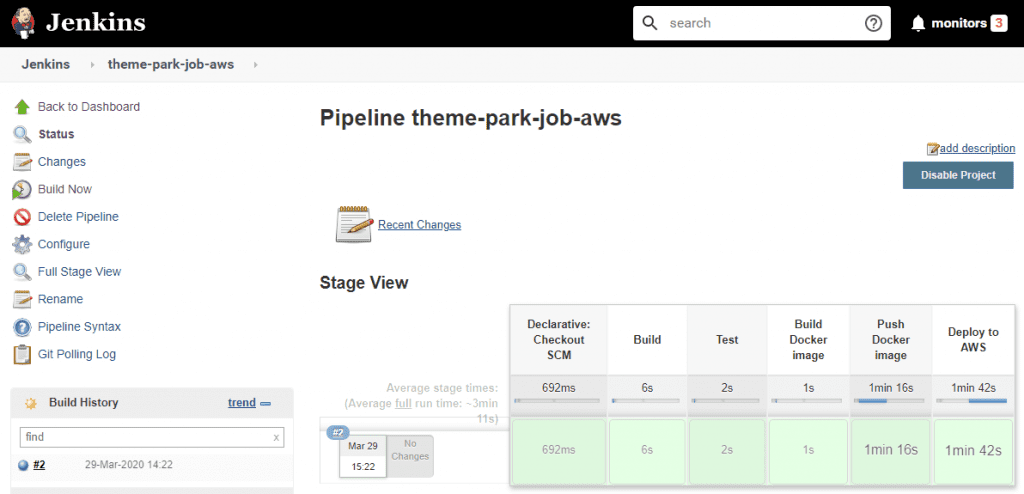
Your build should be all green. If it's not, and you need a hand, feel free to comment below or email me at tom@tomgregory.com
Our pipeline has built, including running the Deploy to AWS stage! Awesome, but maybe we need to check it's really deployed?
Accessing the deployed application
Over in the AWS Console, navigate to Services > CloudFormation > Stacks and you'll see our spring-boot-api-example stack:

Go to Services > Elastic Container Service, and you'll see our ECS cluster deployment-example-cluster:
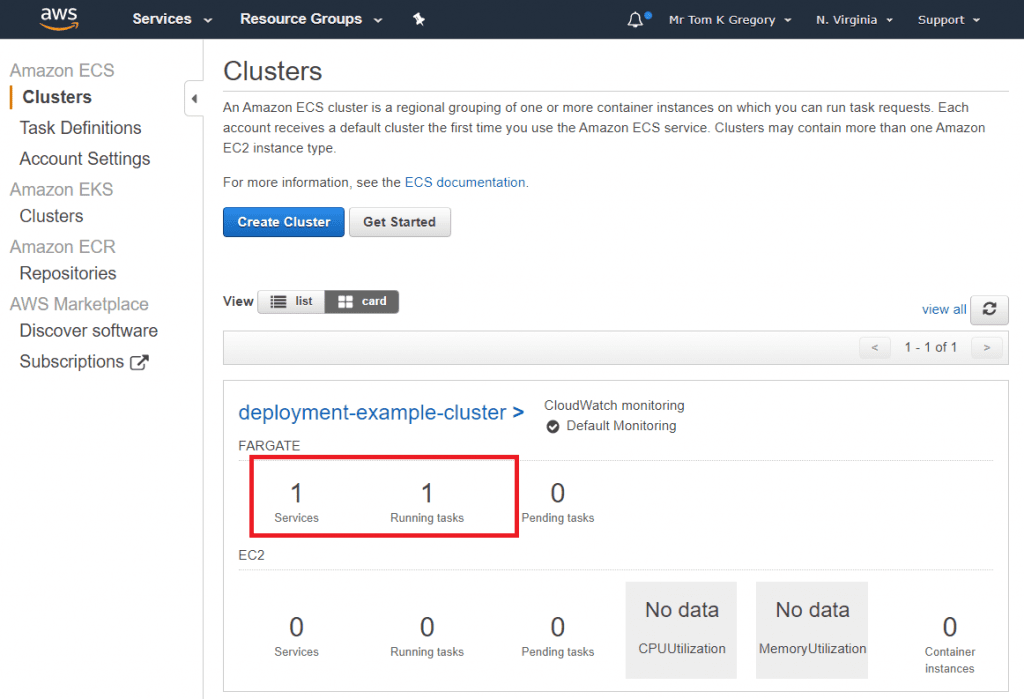
It's reporting one service with one running task. Good news, as that means we've got ourselves a Docker container running. ✅
Click on the cluster name, then the Tasks tab. There should be a single task listed, so click on the task id:
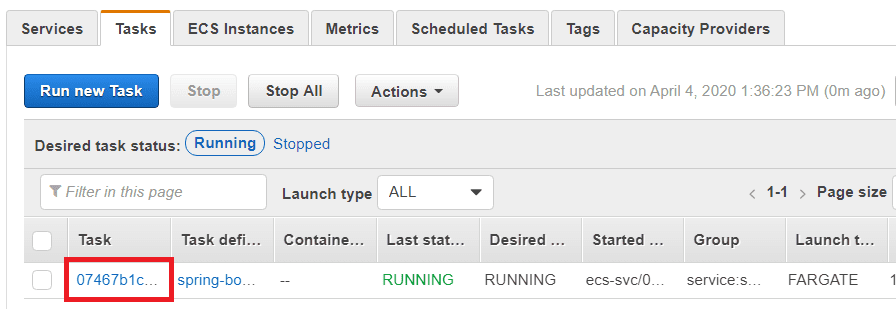
On the page that follows there's lots of information about our task, but importantly for us under the network section we have a public IP:
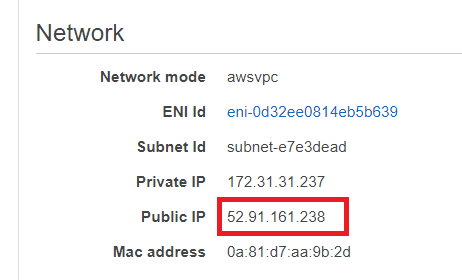
Sadly, by the time you read this article this IP will no longer exist. Fear not though, as you can create your own!
You've probably guessed what comes next then? If you remember part 1 of this series, we were using Postman to make requests to our service.
Let's fire up Postman again and make a GET request to our service running in AWS, substituting in the public IP in the format http://\<public-ip\>:8080/ride:

Of course if you prefer, you can just use a browser.
Success! That was quite a ride, but we got there in the end.
Final thoughts
You've now seen how to add an AWS deployment to a Jenkins pipeline, using a CloudFormation template that lives in the application repository. This is a very powerful concept, and can be rolled out to infrastructures that contain many microservices.
For the purposes of keeping this article concise, we've deployed a simplified setup. For production purposes, you'll want to also consider:
- high availability - deploy to multiple replicas in multiple availability zones. We only have one instance of our service running right now.
- a load balancer - to jump between the above replicas
- a DNS record - to access the service via a friendly domain, instead of an IP address
- move Jenkins to a hosted service - right now it's just running on your machine. This could be deployed into AWS too, much like the microservice. See Deploy your own production-ready Jenkins in AWS ECS for exactly how to do this.
- centralised logging - consider pushing container logs out to CloudWatch to be able to check for errors
Don't forget to delete your AWS resources, which you can do by going to Services > CloudFormation, then select the stack and click Delete.
Resources
GITHUB
- Grab the sample Spring Boot application. It now contains the Jenkinsfile-aws file which includes the Deploy to AWS pipeline stage.
- Clone the jenkins-demo project, for bringing up an instance of Jenkins. The theme-park-job-aws branch contains the updated version of createJobs.groovy as well as the new plugins required.
RELATED ARTICLES Learn more about how ECS works with these AWS docs
Lack of Gradle knowledge slowing you down?
A broken build is easy enough to fix. But a misconfigured build is the silent time killer that costs hours every week.
Slow builds. Slow tests. Slow development.
But the official Gradle docs are confusing. Most developers never properly configure their projects—and as codebases grow, builds become bottlenecks.

This guide fixes that. It's a step-by-step walkthrough for Java developers who want to master Gradle fast.
- Unlock the mysteries of the build script.
- Speed up your workflow.
- Make development fun again.
If this is a problem you're dealing with in your own team, you can see how I approach software delivery in practice.